How To Write Lazarus Component/de
│
Deutsch (de) │
English (en) │
español (es) │
magyar (hu) │
italiano (it) │
한국어 (ko) │
русский (ru) │
中文(中国大陆) (zh_CN) │
Das ist eine Anleitung, wie man Komponenten erstellt.
Schritt 1: Erstellen des Packages
- Klicken Sie im Lazarus Hauptmenue Package -> neues Package ... um den Package-Manager ausführen.

- Ein Datei-Speichern-Dialog öffnet sich. Wählen Sie ein Verzeichnis und einen Dateinamen für das neu anzulegende Package und klicken Sie auf Speichern. Wenn Lazarus Sie auffordert Datei in Kleinbuchstaben umbenennen klicken Sie auf Ja.
- Glückwunsch: Sie haben soeben Ihr erstes Package erstellt!

Schritt 2: Erstellen der Unit
Sie können eine neue Unit erstellen oder eine existierende Datei nutzen. Beide Möglichkeiten sind nachfolgend beschrieben.
Erstellen einer neuen Unit
- Nutzen Sie den + Hinzufügen Button und klicken Sie auf den Reiter Neue Komponente.

- Wählen Sie eine Komponente wie eine TComboBox.
- Wählen Sie customcontrol1.pas als Unit-Dateinamen und CustomControl1 als Unit-Namen.
- Sie können jetzt der Komponente noch ein Icon geben, sowie festlegen, auf welcher Palette die Komponente später in der Lazarus-IDE erscheinen soll.
- Klicken Sie auf Neue Komponente erzeugen.
unit CustomControl1;

{$mode objfpc}{$H+}

interface

uses
  Classes, SysUtils, LResources, Forms, Controls, Graphics, Dialogs, StdCtrls;

type
  TCustomControl1 = class(TComboBox)
  private
    { Private declarations }
  protected
    { Protected declarations }
  public
    { Public declarations }
  published
    { Published declarations }
  end;

procedure Register;

implementation

procedure Register;
begin
  RegisterComponents('Standard',[TCustomControl1]);
end;

end.
- Installieren Sie die Package in dem Sie auf Nutzung ... -> Installieren klicken.

- Die IDE fragt Sie, ob Lazarus neu kompiliert werden soll. Bestätigen Sie mit Ja.

- Starten Sie Lazarus neu und sehen Sie Ihre neue Komponente in der entsprechenden Komponentenpalette. Glückwunsch: Sie haben eben Ihr erstes Package mit Ihrer ersten Package-Komponente erstellt.

![]() Hinweis: Wenn Sie die neue Komponente in der Komponente-Palette nicht angezeigt bekommen, ist es sehr wahrscheinlich, dass nicht die neu kompilierte Version von Lazarus ausgeführt wird. Sie können festlegen, wo Lazarus neu erstellt wird, unter Werkzeuge -> Einstellungen -> Dateien -> Lazarus-Verzeichnis.
Hinweis: Wenn Sie die neue Komponente in der Komponente-Palette nicht angezeigt bekommen, ist es sehr wahrscheinlich, dass nicht die neu kompilierte Version von Lazarus ausgeführt wird. Sie können festlegen, wo Lazarus neu erstellt wird, unter Werkzeuge -> Einstellungen -> Dateien -> Lazarus-Verzeichnis.
Zufügen einer vorhandenen Unit
Wenn Sie schon eine vorhandene Unit haben, können Sie diese dem Package wie folgt zufügen:

- Klicken Sie den + Hinzufügen Button, gehen Sie auf dem Reiter Dateien hinzufügen.
- Klicken Sie auf Dateien hinzufügen und wählen Sie Ihre vorhandene Datei. Wenn Sie die aufzunehmende Datei hinzugefügt haben, klicken Sie auf Dateien ins Package aufnehmen.
- Wenn der Package-Manager anmahnt, daß die Unit nicht im Unit-Pfad ist, klicken Sie auf Ja um das Verzeichnis dem Unitpfad hinzuzufügen.
- Klicken Sie den + Hinzufügen Button nochmal, gehen Sie auf dem Reiter Dateien hinzufügen, wählen Sie die .lrs Datei und Klicken Sie auf Dateien ins Package aufnehmen (Sehen Sie im Schritt 3 für weitere Informationen über das Erstellen des Icons).
- Klicken Sie den + Hinzufügen Button nochmal, gehen Sie auf dem Reiter Neue Anforderung. In Package-Name klicken Sie auf LCL und bestätigen Sie die Auswahl mit Neue Abhängigkeit erzeugen.
Das Endresultat sollte so aussehen:

- Klicken Sie unterhalb des Dateibaumes den Paket-Manager. Stellen Sie sicher, daß in den Dateieigenschaften Register Unit aktiviert ist.
- Klicken Sie auf den Button Optionen. Wählen Sie die Registerkarte IDE-Einbindung. Stellen Sie sicher, dass Designtime und Runtime von Packagetyp aktiviert ist.
- Klicken Sie auf kompilieren, um zu überprüfen, dass die Dateien fehlerfrei kompilieren.
- Klicken Sie auf den Button Installieren. Lazarus wird neu erstellen und automatisch neu gestartet.
Die Komponente ist erstellt und kann verwendet werden:
![]()
Schritt 3: Erstellen eines Icons für das Package
Sie sollten 24x24 Pixel große PNG-Files als Icons verwenden.
Das verwendete Iconformat ist .lrs. FPC kann standardmäßige auch Resourcedateien .rc oder kompilierte Ressourcedateien .res seit der FPC Version 2.6. verwenden. Siehe FPC _resources.
Mit dem Lazarus-Bild-Editor
Mit dem Lazarus Image Editor können Sie die Symbole im .lrs-Format erstellen.
Mit Lazres
lazres sollte sich normalerweise im Unterverzeichnis Tools von Lazarus befinden.
Sie müssen möglicherweise Lazres vor der ersten Verwendung kompilieren. Öffnen Sie einfach die lazres.lpi in der IDE und wählen im Menü Start -> Komplieren (Strg + F9).
lrs Datei erstellen
Um die lrs-Datei zu erstellen führen Sie einfach folgenden Befehl aus:
~/lazarus/tools/lazres samplepackage.lrs TMyCom.png
Wobei
- samplepackage der Name Ihres Packages ist
- TMyCom der Name Ihrer Komponente ist.
Sie können auch mehrere Images zu Ihrer lrs-Datei zufügen, indem Sie die entsprechenden Namen der Image-Dateien am Ende anhängen. zB: ~/lazarus/tools/lazres samplepackage.lrs TMyCom.png TMyOtherCom.png ...
Beispiel
So könnte zum Beispiel eine resultierende Datei samplepackage.lrs aussehen:
LazarusResources.Add('TMyCom','PNG',[
  #137'PNG'#13#10#26#10#0#0#0#13'IHDR'#0#0#0#24#0#0#0#24#8#2#0#0#0'o'#21#170#175
  +#0#0#0#4'gAMA'#0#0#177#143#11#252'a'#5#0#0#0'|IDAT8O'#237#212#209#10#192' '#8
  +#5'P'#247#231#251's'#215#138#133#164#166'\'#220#195'`'#209'c'#157'L'#173#131
  +#153#169'd4'#168'dP'#137'r_'#235'5'#136'@Zmk'#16'd9'#144#176#232#164'1'#247
  +'I'#8#160'IL'#206'C'#179#144#12#199#140'.'#134#244#141'~'#168#247#209'S~;'#29
  +'V+'#196#201'^'#10#15#150'?'#255#18#227#206'NZ>42'#181#159#226#144#15'@'#201
  +#148#168'e'#224'7f<@4'#130'u_YD'#23#213#131#134'Q]'#158#188#135#0#0#0#0'IEND'
  +#174'B`'#130
]);
Achten Sie darauf, dass die Ressourcendatei in Ihren Quellcode der neuen Komponente eingebunden wird, indem Sie in die Uses-Klausel LResources und folgende Zeilen am Ende des Quellcodes einfügen:
initialization
  {$I samplepackage.lrs}
Recompiling Packages
Immer, wenn Sie in Ihrer Datei mycom.pas Änderungen vornehmen, müssen Sie anschließend das Package neu erstellen. Öffnen Sie dazu die Datei samplepackage.lpk im Package-Manager und klicken Sie auf Nutzung -> Installieren.
Removing Packages
- To remove installed components: on the IDE menu, click Package > Configure installed packages. The following image shows the Installed Packages tool.
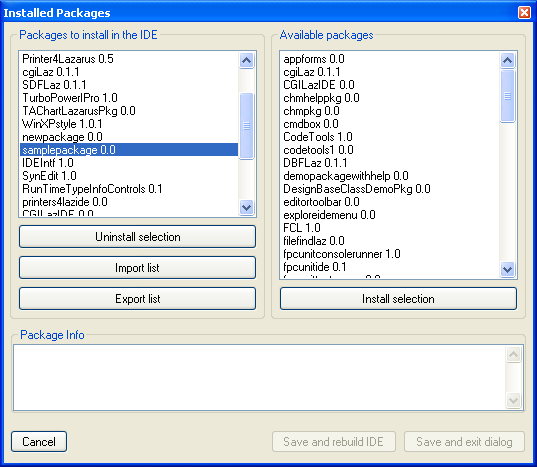

- Select the package you want to uninstall and click Uninstall selection.
If something goes wrong with a package (e.g. package directory is deleted without first uninstalling it), Lazarus may not allow you to uninstall packages. To fix the problem, at the IDE menu click Tools > Build Lazarus. Lazarus will rebuild all packages and restart. You should now be able to uninstall problematic packages.
Enhancing mycom.pas
- The code in mycom.pas above gives you the basics on what you need to create a component. The following is an enhanced version with some tips on how to write procedures and events for components.
- The OnChange2 shows how to create events
- The OnSample shows how to create custom events
- MyText and MyText2 shows different ways to write properties.
- You can use TComboBox instead of TCustomComboBox as the base class, which publishes all properties as TComboBox.
- If TCustomComboBox is used as the base class, you'll notice a lot of properties and events will be missing in the IDE Object Inspector. To add those properties and events, just copy and paste the properties as listed below // properties from TComboBox. These list of properties can be got from the TComboBox declaration in the StdCtrls unit. Omit any property which you want to handle yourself.
unit mycom;

{$mode objfpc}{$H+}

interface

uses
  Classes, SysUtils, StdCtrls, Forms, Dialogs,
  LCLType,LCLIntf,lresources,LCLProc;

type

  TSampleEvent = procedure(MyText: String) of Object;

  TMyCom = class (TCustomComboBox)
  private
    FMyText: String;
    FOnChange2: TNotifyEvent;
    FOnSample: TSampleEvent;
  public
    constructor Create(TheOwner: TComponent); override;
    procedure CreateWnd; override;
    procedure Change; override;
  protected
    function GetMyText2: String;
    procedure SetMyText2(MyText: String);
  published
    property MyText: String read FMyText write FMyText;
    property MyText2: String read GetMyText2 write SetMyText2;
    property OnChange2: TNotifyEvent read FOnChange2 write FOnChange2;
    property OnSample: TSampleEvent read FOnSample write FOnSample;

    // properties from TComboBox
    property Align;
    property Anchors;
    property ArrowKeysTraverseList;
    property AutoComplete;
    property AutoCompleteText;
    property AutoDropDown;
    property AutoSelect;
    property AutoSize;
    property BidiMode;
    property BorderSpacing;
    property CharCase;
    property Color;
    property Ctl3D;
    property Constraints;
    property DragCursor;
    property DragMode;
    property DropDownCount;
    property Enabled;
    property Font;
    property ItemHeight;
    property ItemIndex;
    property Items;
    property ItemWidth;
    property MaxLength;
    property OnChange;
    property OnChangeBounds;
    property OnClick;
    property OnCloseUp;
    property OnContextPopup;
    property OnDblClick;
    property OnDragDrop;
    property OnDragOver;
    property OnDrawItem;
    property OnEndDrag;
    property OnDropDown;
    property OnEditingDone;
    property OnEnter;
    property OnExit;
    property OnGetItems;
    property OnKeyDown;
    property OnKeyPress;
    property OnKeyUp;
    property OnMeasureItem;
    property OnMouseDown;
    property OnMouseMove;
    property OnMouseUp;
    property OnStartDrag;
    property OnSelect;
    property OnUTF8KeyPress;
    property ParentBidiMode;
    property ParentColor;
    property ParentCtl3D;
    property ParentFont;
    property ParentShowHint;
    property PopupMenu;
    property ReadOnly;
    property ShowHint;
    property Sorted;
    property Style;
    property TabOrder;
    property TabStop;
    property Text;
    property Visible;
  end;

procedure Register;

implementation

procedure Register;
begin
  RegisterComponents('Sample',[TMyCom]);
end;

constructor TMyCom.Create(TheOwner: TComponent);
begin
  inherited Create(TheOwner);
  Self.Style := csDropDownList;
end;

procedure TMyCom.CreateWnd;
begin
  inherited CreateWnd;
  Items.Assign(Screen.Fonts);
end;

procedure TMyCom.Change;
begin
  inherited;
  if Assigned(FOnChange2) then FOnChange2(Self);
  if Assigned(FOnSample) then FOnSample(FMyText);
end;

function TMyCom.GetMyText2: String;
begin
  Result:=FMyText;
end;

procedure TMyCom.SetMyText2(MyText: String);
begin
  FMyText:=MyText;
end;

initialization
  {$I samplepackage.lrs}

end.
Using embedded (visual) components
It's possible to use standard components embedded in your own components (look for example at TLabeledEdit or TButtonPanel).
Let's say you want to create a custom panel with a TLabel on it. With the steps described above the base package and source files can be created. Now do the following to add a TLabel to the component:
- Add a private attribute for the label component (FEmbeddedLabel: TLabel;).
- Add a published read-only property for the label component (property EmbeddedLabel: TLabel read FEmbeddedLabel;)
- Create the label in the component's (overridden) constructor (FEmbeddedLabel := TLabel.Create(self); )
- Set the parent of the component (FEmbeddedLabel.Parent := self;)
- If the component to be embedded is not a 'subcomponent' by default (like TBoundLabel, TPanelBitBtn etc) then add the call to SetSubComponent. This is necessary for the IDE so it knows that it has to store the properties of the embedded component as well. TLabel is not a subcomponent by default so the call to the method must be added (FEmbeddedLabel.SetSubComponent(true);).
To sum it up you would get something like this (only the essential parts are shown):
TEnhancedPanel = class(TCustomControl)
private
  { The new attribute for the embedded label }
  FEmbeddedLabel: TLabel;

public
  { The constructor must be overriden so the label can be created }
  constructor Create(AOwner: TComponent); override;

published
  { Make the label visible in the IDE }
  property EmbeddedLabel: TLabel read FEmbeddedLabel;
end;

implementation

constructor TEnhancedPanel.Create(AOwner: TComponent);
begin
  inherited Create(AOwner);

  // Set default width and height
  with GetControlClassDefaultSize do
    SetInitialBounds(0, 0, CX, CY);

  // Add the embedded label
  FEmbeddedLabel := TLabel.Create(Self); // Add the embedded label
  FEmbeddedLabel.Parent := self;         // Show the label in the panel
  FEmbeddedLabel.SetSubComponent(true);  // Tell the IDE to store the modified properties
  FLabel.Name := 'EmbeddedLabel';
  FLabel.Caption := 'Howdy World!';

  // Make sure the embedded label can not be selected/deleted within the IDE
  FLabel.ControlStyle := FLabel.ControlStyle - [csNoDesignSelectable];

  // Set other properties if necessary
  //...

end;
Using custom paint procedure
You can always subclass a component inside your program. For example, this implements a custom Paint procedure to a TLabel:
type
  TMyLabel = class(TLabel)
    protected
      procedure Paint; override;
  end;
{...}
implementation
{...}
procedure TMyLabel.Paint;
begin
  // your code to implement Paint, for example
  Canvas.TextOut(0,0,Caption);
end;
Now you can create a MyLabel inside your program, at run time, with that overridden Paint procedure instead of the standard one.
For most components, and for most methods, it would be recommendable to call inherited procedure inside it:
procedure TMyLabel.Paint;
begin

  inherited Paint;   /////////////////////

  // your code to implement Paint, for example
  Canvas.TextOut(0,0,Caption);
end;
However, inherited behavior is not desirable in this case, since the second writing action would overlap the first (inherited) one.
Integrating the component with the IDE
Property editors
Property editors provide custom dialogs to edit properties in the object inspector. For most properties, like strings, string lists, images, enumerated types and others, there are already default property editors, but if a custom component has a special kind of property it may require a custom dialog to edit the property.
Each property editor is a class, which should descend from TPropertyEditor or one of its descendents and implement methods from this base class. They should be registered in the 'Register' procedure by using the function RegisterPropertyEditor from the unit PropEdits. It is a standard to name property editors with the property name followed by 'Property', for example TFieldProperty for the property editor of the TField property.
  TPropertyEditor = class
  public
    function  AllEqual: Boolean; Virtual;
    function  AutoFill: Boolean; Virtual;
    procedure Edit; Virtual;     // Activated by double-clicking the property value
    procedure ShowValue; Virtual; // Activated by control-clicking the property value
    function  GetAttributes: TPropertyAttributes; Virtual;
    function  GetEditLimit: Integer; Virtual;
    function  GetName: ShortString; Virtual;
    procedure GetProperties(Proc: TGetPropEditProc); Virtual;
    function  GetHint(HintType: TPropEditHint; x, y: integer): String; Virtual;
    function  GetDefaultValue: AnsiString; Virtual;
    procedure GetValues(Proc: TGetStrProc); Virtual;
    procedure SetValue(const NewValue: AnsiString); Virtual;
    procedure UpdateSubProperties; Virtual;
    function  SubPropertiesNeedsUpdate: Boolean; Virtual;
    function  IsDefaultValue: Boolean; Virtual;
    function  IsNotDefaultValue: Boolean; Virtual;
    // ... shortened
  end;
A good example for a property editor is the TFont property editor.
One of the most common cases for property editors is properties which are classes. Because classes have many fields and can have a variety of formats, it's not possible for Lazarus to have the object inspector edit field able to edit it, like is done for strings and numeric types.
For classes, a convention is to have the value field show permanently the name of the class in parentheses, for example "(TFont)" and the "..." button shows a dialog to edit this class. This behaviour, except for the dialog, is implemented by a standard property editor for classes called TClassPropertyEditor, which can be inherited from when writing property editors for classes:
TClassPropertyEditor = class(TPropertyEditor)
public
  constructor Create(Hook: TPropertyEditorHook; APropCount: Integer); Override;
  function GetAttributes: TPropertyAttributes; Override;
  procedure GetProperties(Proc: TGetPropEditProc); Override;
  function GetValue: AnsiString; Override;
  property SubPropsTypeFilter: TTypeKinds Read FSubPropsTypeFilter
                                         Write SetSubPropsTypeFilter
                                       Default tkAny;
end;
Going back to the TFont example, inheriting from TClassPropertyEditor already offers part of the desired behavior and then the TFontPropertyEditor class only needs to implement showing the dialog in the Edit method and set the attributes for the editor:
  TFontPropertyEditor = class(TClassPropertyEditor)
  public
    procedure Edit; Override;
    function  GetAttributes: TPropertyAttributes; Override;
  end;

procedure TFontPropertyEditor.Edit;
var
  FontDialog: TFontDialog;
begin
  FontDialog := TFontDialog.Create(NIL);
  try
    FontDialog.Font    := TFont(GetObjectValue(TFont));
    FontDialog.Options := FontDialog.Options + [fdShowHelp, fdForceFontExist];
    if FontDialog.Execute then SetPtrValue(FontDialog.Font);
  finally
    FontDialog.Free;
  end;
end;

function TFontPropertyEditor.GetAttributes: TPropertyAttributes;
begin
  Result := [paMultiSelect, paSubProperties, paDialog, paReadOnly];
end;
Component editors
Component editors control the behavior of right-clicking and double clicking components in the form designer.
Each component editor is a class, which should descend from TComponentEditor or one of its descendents and implement methods from this base class. They should be registered in the 'Register' procedure by using the function RegisterComponentEditor from the unit ComponentEditors. It is a standard to name component editors with the component name followed by 'Editor', for example TStringGridComponentEditor for the property editor of the TStringGrid component. Although user component editors should be based in TComponentEditor, most of its methods are actually from an ancestor, so it is necessary to also know TBaseComponentEditor:
  TBaseComponentEditor = class
  protected
  public
    constructor Create(AComponent: TComponent;
                       ADesigner: TComponentEditorDesigner); Virtual;
    procedure Edit; Virtual; Abstract;
    procedure ExecuteVerb(Index: Integer); Virtual; Abstract;
    function  GetVerb(Index: Integer): String; Virtual; Abstract;
    function  GetVerbCount: Integer; Virtual; Abstract;
    procedure PrepareItem(Index: Integer; const AnItem: TMenuItem); Virtual; Abstract;
    procedure Copy; Virtual; Abstract;
    function  IsInInlined: Boolean; Virtual; Abstract;
    function  GetComponent: TComponent; Virtual; Abstract;
    function  GetDesigner: TComponentEditorDesigner; Virtual; Abstract;
    function  GetHook(out Hook: TPropertyEditorHook): Boolean; Virtual; Abstract;
    procedure Modified; Virtual; Abstract;
  end;
The most important method of a component editor is Edit, which is called when the component is double clicked. When the context menu for the component is invoked the GetVerbCount and GetVerb methods are called to build the menu. If one of the verbs (which means menu items in this case) are selected, ExecuteVerb is called. There is a default component editor (TDefaultEditor) which implements Edit to search the properties of the component for the most appropriate one to be edited. It usually chooses an event, which is edited by adding it's skeleton code in the code editor and setting the cursor to be in place to add code for it.
Other important methods from TBasComponentEditor are: ExecuteVerb(Index), which executes one of the extra menu items placed on the right-click popup menu; GetVerb – To return the name of each extra popup menu item. Note that t is the responsibility of the component editor to place special menu item caption characters like & to create a keyboard accelerator and “-” to create a separator; GetVerbCount – Returns the amount of items to be added to the popup menu. The index for the routines GetVerb and ExecuteVerb is zero based, going from 0 to GetVerbCount – 1; PrepareItem – Called for each verb after the menu item was created. Allows the menu item to be customized such as by adding subitems, adding a checkbox or even hiding it by setting Visible to false; Copy - Called when the component is being copied to the clipboard. The component data for use by Lazarus will always be added and cannot be modified. This method is instead for adding a different kind of clipboard information to paste the component in other applications, but which won't affect the Lazarus paste.
A simple and interesting example is the TCheckListBox component editor which creates a dialog to edit. More convenient then implementing all methods from TBaseComponentEditor is inheriting from TComponentEditor, and this is what TCheckListBoxEditor does. This base class adds empty implementations for most methods and some default ones for others. For Edit it calls ExecuteVerb(0), so if the first item will be identical to the double-click action, which is a convention for editor, there is no need to implement Edit. This basic action for the double-click and first menu item is often a dialog, and for TCheckListBox this is also done:
  TCheckListBoxComponentEditor = class(TComponentEditor)
  protected
    procedure DoShowEditor;
  public
    procedure ExecuteVerb(Index: Integer); override;
    function  GetVerb(Index: Integer): String; override;
    function  GetVerbCount: Integer; override;
  end;

procedure TCheckGroupComponentEditor.DoShowEditor;
var
  Dlg: TCheckGroupEditorDlg;
begin
  Dlg := TCheckGroupEditorDlg.Create(NIL);
  try
    // .. shortened
    Dlg.ShowModal;
    // .. shortened
  finally
    Dlg.Free;
  end;
end;

procedure TCheckGroupComponentEditor.ExecuteVerb(Index: Integer);
begin
  case Index of
    0: DoShowEditor;
  end;
end;

function TCheckGroupComponentEditor.GetVerb(Index: Integer): String;
begin
  Result := 'CheckBox Editor...';
end;

function TCheckGroupComponentEditor.GetVerbCount: Integer;
begin
  Result := 1;
end;
See also
- Extending the IDE
- Lazarus Packages - A guide for creating a package under Lazarus
- Components and Code examples
- Lazarus Components
- IDE Window: Add to Package
You can post questions regarding this page here