Peg Solitaire tutorial
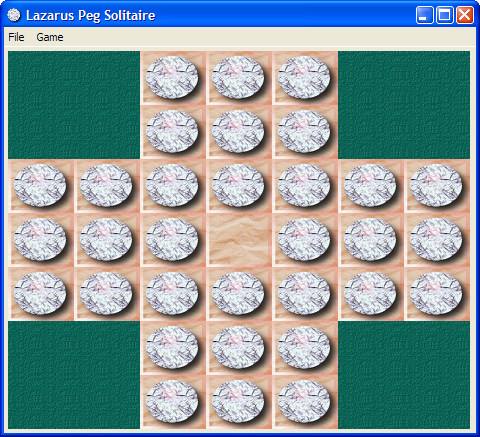
Template:newpage This tutorial is the second Lazarus tutorial that aims at introducing the basics of Lazarus application development. It's best to start this tutorial after having finished the first one (Howdy_World_(Hello_World_on_steroids)). This tutorial exlpains a bit about how to work with graphics and how to make a program modular. The final product of this tutorial is a basic but working version of the Peg Solitaire game ([1]). If all goes well in the end it will look something like this:
Start the project
As mentioned in the previous tutorial it's best to start with a clean, separate directory for each project. A quick recap:
- Create a new directory for this game.
- Start a new Application (Project/New Project... and select Application).
- In the project options insert bin\ in front of the target filename.
- Save the project as PegSolitaire.
- Save the main form as ufrmMain.
- In the object inspector change the form's name to frmMain.
- Change the caption to Lazarus Peg Solitaire.
And extra for this project:
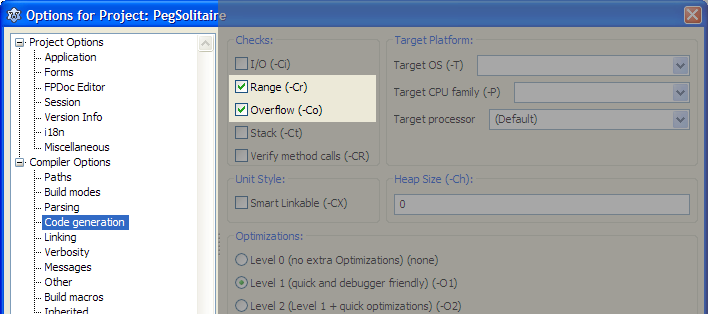
- Open the project options dialog (Shift-Ctrl-F11).
- Select Compiler Options/Code Generation.
- Enable Range checking and Overflow error checking (see image belows).
First steps
It's always a good idea to seperate gui related code from data structure definitions. So the first step will be the creation of a separate unit for our Solitaire data structures.
- From the menu choose File/New Unit....
- Save the unit as PegDatastructures (and press the lowercase button that pops up).
The basic elements of a Peg Solitaire board are the marbles, the board structure and the empy places. We'll simulate this by a simple matrix that has cells of a certain type (empty, occupied and not accessible). And we'll encapsulate all this in a class that handles all the data manipulation.
- Add the following code to the PegDatastructures unit.
<Delphi>const
C_MAX = 7; // Max board size: 7x7
type
 TCellNums = 1..C_MAX;
 TCellType = (ctNoAccess, ctEmpty, ctPeg);
 TPegCells = array[TCellNums, TCellNums] of TCellType;
 TPegSolitaire = class
 private
   Size: TCellNums;
   PegCells: TPegCells;

 public
   constructor Create(const pSize: TCellNums);
 end;</Delphi>
It's fair to assume that other code that is going to use this class needs access to the cells contents (i.e. PegCells). The way to handle this is either by defining a set of functions to access the cells or define a so called array property. Let's go for the latter approach and add the following line to the public section of the TPegSolitaire class: <Delphi>property Cell[const pRow, pCol: TCellNums]: TCellType;</Delphi>
- Position the text cursor on the constructor line.
- Press Ctrl-Shift-C: the IDE generates the constructor body (as we expected) but it also generates the empty bodies for the 2 methods that give us access to PegCells via the Cells property.
- GetCell retrieves data from the private variable PegCells. Add the following code to the function:
<Delphi>result := PegCells[pRow,pCol]</Delphi>
- SetCell populates the PegCells array with data. Add the following code to the procedure:
<Delphi>PegCells[pRow,pCol] := pValue</Delphi>
- And now finalize the Create constructor. Add this code to it's body:
<Delphi>var iRow,iCol: integer; begin
 // Store the size of the board locally
 Size := pSize;
 // Initialize all cells to 'not accessible'
 for iRow := 1 to C_MAX do
   for iCol := 1 to C_MAX do
     Cell[iRow,iCol] := ctNoAccess;</Delphi>
Now that the basic data structure is in place, let's have a look at the graphics we are going to need. There are many ways to display a solitaire board. We are going to use a paintbox. That will give us full control over the graphic features that Lazarus gives us out of the box.
Our main form is going to use the data structure we defined in the PegDatastructure file.
- Open the main form's sourcefile.
- Add PegDatastructures it to the uses list at the top of the file:
<Delphi>uses
 PegDatastructures,
 Classes, SysUtils, FileUtil, Forms, Controls, Graphics, Dialogs;</Delphi>
- Press F12 (this will give us the form editor).
- From the Standard palette choose a TButton and drop it on the form (in the upper left corner).
- Change the caption to Test paint.
- In the Additionaltab select TPaintbox and drop it on the form.
- Change Align to alRight.
- Change BordSpacing.Around to 4.
- Change Anchors.akLeft to true.
- Change Name to pbPeg.
- Resize the form so it looks something like this:
Next step is to draw the cells matrix on this paintbox by splitting it in rows and columns that will contain each cell of the board. To make it scaleable we'll calculate the width and height independantly. We'll need a couple of variables to hold the results. First the width and height of the cells, so all cells (7) fit exactly on the form. We'll develop the painting code interactively and we are going to use the button that was dropped on the form for that.
- Double click the test paint button (this creates the event handler).
- Add 2 variables:
<Delphi>var
 CellWidth : integer;
 CellHeight: integer;<Delphi>


