fpWeb Tutorial/es
│
العربية (ar) │
English (en) │
español (es) │
русский (ru) │
Originalmente basado en: tutorial de fcl-web (en PDF) por un usuario del foro Leledumbo.
Introducción
fpWeb es un esquema de aplicación web que viene con FPC por defecto como parte del paquete fcl-web. El esquema en sí mismo está construido encima de las características de fcl-web. El esquema está construido con mentalidad de RAD para hacer buen uso de la componentización en producir contenido dinámico. Un paquete Lazarus es provisto que pueda usar el esquema en forma de arrastrar y soltar para su administración de sesión y producción de contenido.
Este tutorial intentará cubrir la funcionalidad básica de fpWeb, así que uno puede construir una aplicación común para web con él. Note que este tutorial NO intenta enseñar ningún protocolo HTTP, HTML, CSS, JavaScript o manipulación de base de datos como los lenguajes de protocolo y cliente debieran ser los prerequisitos para cada programador de aplicaciones web y la manipulación de base de datos no difiere de la implementación de escritorio.
Arquitectura (lea POR FAVOR)
Antes de iniciar, es necesario conocer la arquitectura y flujo de aplicación para evitar confusiones cuando ciertas cosas no funcionen o lo hagan de forma inesperada. Así que por favor pase algo de tiempo leyendo esta sección.
Aplicación
La aplicación aquí se refiere al protocolo que su aplicación implementará. fpWeb felizmente se cambia de módulos CGI, FCGI, Apache a un servidor embebido, y más si fcl-web implementa otro en el futuro. Cada aplicación se implementa en su propia unidad, así que para cambiar de una aplicación a otra, con la excepción del módulo Apache, sólo se necesita cambiar el respectivo identificador en la cláusula uses. Para 3.0.0 en adelante son:
- fpCGI -> CGI
- fpFCGI -> FastCGI
- fpApache (requiere httpd también) -> módulo Apache
- fpHttpApp -> servidor embebido
- microhttpapp -> servidor embebido usando la biblioteca GNU libmicrohttp.
- fphttpsys -> soporte de sistema Windows para el protocolo HTTP.
A través de este tutorial, usaremos el servidor embebido en beneficio de simplicidad porque no tiene que tratar con configurar el servidor virtual ni enredarse con el manejo complicado de archivos y servicios. Su aplicación será una aplicación portátil binaria para web! Otra razón sería que hay más de una aplicación de servidor web y que cada una tiene una forma distinta de configurar. Sería exagerado cubrir todos mientras que su documentación hace el trabajo. El módulo Apache se implementa como una biblioteca (dinámica), mientras que otros protocolos son aplicaciones normales. Cada aplicación puede que tenga propiedades específicas (como puertos) disponibles y que sólo competen a esa aplicación. Eso es el porqué de ver los ejemplos fcl-web, pares de .lpi / .lpr para cada protocolo están puestos en sus propios directorios, sólo los módulos web se comparten.
Módulos Web

Las aplicaciones fpWeb constan de módulos web los que hacen la producción actual de contenido. Un módulo web puede contener acciones web que pueden dividir la funcionalidad incluso más. Por ejemplo, un módulo web auténtico puede que tenga acciones web de login y logout. Mientras que un módulo web de acerca de, puede no necesitar una acción específica y sirve sólo para un contenido. El módulo Web se integra con fpTemplate que puede usarse para producir contenido dinámico con una plantilla. Esto es bastante similar a lo que hace PHP, sólo el espacio entre la lógica y la presentación se impone en vez de lo que se sugiere. Algunos dicen que fpTemplate implementa una vista pasiva mientras que PHP por defecto implementa un patrón de diseño de vista activa.
Instalación
El paquete fpWeb para Lazarus no se instala por defecto (pero viene con él), para activar fpWeb:
- Abra Lazarus y escoja Paquetes->Instalar/Desinstalar Paquetes’’’
- En el listbox disponible para la instalación, busque weblaz y presione Instala selección. Presione Guardar y reconstruir IDE y confirme con Continuar
- Deje que el IDE se reconstruya y reincide solo. Si todo va bien, deberá ahora tener una pestaña ftweb en la paleta de componentes, como se muestra:

Módulos Especializados
La clase *TFPWebModule* (usada abajo) es un simple ejemplo del módulo fpWEB que puede usarse para toda clase de peticiones HTTP.
Sin embargo, fpWEB viene con algunos módulos especializados que tienen soporte extra para tareas especializadas:
- La clase TSimpleFileModule en la unidad fpwebfile.pp puede usarse para enviar archivos. Sólo apunte a un directorio, y él hace el resto.
- La clase TFPHTMLModule en la unidad fphtml.pp puede usarse para producir HTML.
- La clase TProxyWebModule en la unidad fpwebproxy.pp es un proxy de redirección listo para usar.
- La clase TFPWebProviderDataModule en la unidad fpwebdata.pp sirve de datos en formato JSON que puede guardar ExtJS.
- La clase TSQLDBRestModule en la unidad sqldbrestmodule.pp implementa un servidor REST completo respaldado por SQLDB. Vea más información en SQLDBRestBridge.
- La clase TJSONRPCModule en la unidad webjsonrpc.pp implementa un servicio JSON-RPC.
- La clase TExtDirectModule en la unidad fpextdirect.pp implementa una variante Ext.Direct de un servicio JSON-RPC.
Hola, Mundo!
Creemos una aplicación Web sencilla. Como se enseñó comúnmente cuando se aprendía programación, "Hola, Mundo!" será nuestra primera app.
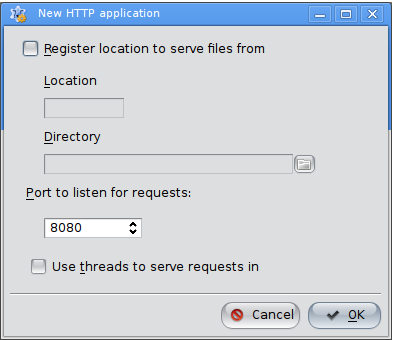
1. Abra Lazarus y escoja Proyecto->Nuevo Proyecto luego HTTP server Application

2. Otro diálogo deberá aparecer para servir archivos estáticos, selección de puerto y multihilo. Sólo use por defecto el puerto 8080.
Puede que omita servir archivos estáticos (vaya a la sección de tips and tricks si quiere saber más).

- IMPORTANTE!:
- Si escogió usar hilos en *nix, no olvide agregar cthreads como la primera unidad en la cláusula uses del archivo .lpr, de otra forma se generará un error RTE 232. Cuando se ejecuta desde una consola, un mensaje deberá aparecer:
Este binario no se compiló con soporte de hilos. Recompile la aplicación con un manejado de hilasen la cláusula uses del programa antes de cualquier unidad que use hilos.
3. Desde Enero 14 de 2017 (o FPC 3.0.4), pueda que necesite abrir el archivo .lpr y agregar la siguiente línea en el cuerpo principal si no está puesto:
Application.LegacyRouting := true;
- la razón estará explicada en el capítulo #Routing.
4. Cualquier cosa que escoja, clique "OK" y se le presentará en el módulo de aplicación fpWeb por defecto.
5. Enfoque el módulo y muévase al Inspector de Objetos. Siéntase libre de renombre el módulo si así lo prefiere.
6. Escoja la pestaña Events y clique el botón a la derecha de la segunda columna de la fila OnRequest para crear el manejador del evento.

- Será dirigido al editor de código fuente con el código:
procedure TFPWebModule1.DataModuleRequest(Sender: TObject; ARequest: TRequest;
AResponse: TResponse; var Handled: Boolean);
begin
  |
end;
- Escriba:
procedure TFPWebModule1.DataModuleRequest(Sender: TObject; ARequest: TRequest;
AResponse: TResponse; var Handled: Boolean);
begin
  AResponse.Content := 'Hola, Mundo!';
  Handled := true;
end;
7. Luego ejecute su aplicación (o presione F9).
8. Abra su navegador y escriba:
9. Deberá ver "Hola, Mundo!'.
En caso contrario, revise:
- El marco de trabajo hace mucho de manejo de excepciones y el depurador del IDE podrá atraparlos e interrumpe su aplicación. Está bien agregar muchas de las excepciones para la lista del olvido así que se pueda concentrar más en su flujo de aplicación. Manténgase evitando y continuando hasta que no aparezcan más diálogos y el navegador muestre el contenido.
- Handled := true es la forma que le decimos que la solicitud ha sido manejada. Si no se coloca (o se pone en false) mostrará la página de error. Por ahora, esto no afecta el flujo de peticiones, pero lo hará después. Así que déjelo así hasta que el momento en que se le de buen uso.
- otra pista: pruebe sin un cortafuegos cargado en RAM (como una aplicación, como un servicio o daemon, o ambos).
Leyendo los datos GET & POST
Es probable que un contenido dinámico se active a partir de la entrada del usuario, tanto a través de formularios, proveyendo valores en el URL, etc. Esos datos se envían a través de la petición, la cual se representa en el método como ARequest parámetro de tipo TRequest.
Leyendo GET
Los datos GET se proveen como ARequest.QueryFields , el cual desciende de TStrings. Resumiendo, cualquier cosa que haga con TStrings, se aplica aquí como acceder a los datos en un estilo de mapa a través de la propiedad Values.
Reusando el código anterior, reemplace el cuerpo del método con:
procedure TFPWebModule1.DataModuleRequest(Sender: TObject; ARequest: TRequest;
 AResponse: TResponse; var Handled: Boolean);
var
  LName: String;
begin
  LName := ARequest.QueryFields.Values['Name'];  // QueryFields para GET
  if LName = EmptyStr then
    with AResponse.Contents do begin                          // En el formulario
      Add('<form action="%s" method="GET"', [aRequest.URI]); // solicitante
      Add('<label for="name">Por favor dame tu nombre:</label>'); // deberá estar
      Add('<input type="text" name="name" id="name" />'); // un input con id "name"
      Add('<input type="submit" value="Send" />');
      Add('</form>');
    end
  else
    AResponse.Content := Format('<h1>Hola, %s!</h1>', [LName]);
  Handled := true;  // <— Se dio buen manejo!
end;
ARequest.URI es sólo una conveniencia referirse al URI actual, así que cuando cambie su módulo registrado, este código permanece igual.
Note que como en Pascal, nos referimos a los datos se hace sin importar las mayúsculas/minúsculas.
Como es una petición GET, en la dirección de la página aparece la sintaxis de lo solicitado. Ahora puede intentar la solicitud /, la cual mostrará
Por favor dame tu nombre:
y al final de la dirección coloque /?name=<escriba algo aquí, p.e.: Fernando>, lo que mostrará
Hola, Fernando!
Leyendo POST
POST no difiere mucho de GET, sólo en la propiedad que accede. Si GET se acceda a través de ARequest.QueryFields, POST se accede a través de ARequest.ContentFields. El estilo de POST del código previo es:
procedure TFPWebModule1.DataModuleRequest(Sender: TObject; ARequest: TRequest;
 AResponse: TResponse; var Handled: Boolean);
var
  LName: String;
begin
  LName := ARequest.ContentFields.Values['Name']; // ContentFields para POST
  if LName = EmptyStr then
    with AResponse.Contents do
    begin
      Add('<form action="%d" method="POST"', [ARequest.URI]);
      Add('<label for="name">Por favor dame tu nombre:</label>');
      Add('<input type="text" name="name" id="name" />');
      Add('<input type="submit" value="Send" />');
      Add('</form>');
    end
  else
    AResponse.Content := Format('<h1>Hola, %s!</h1>', [LName]);
  Handled := true;
end;
Leyendo Subir Archivos
Una excepción es para los archivos de lectura multipart/form-data, p.e. los archivos. Eso está disponible en ARequest.Files como una instancia de TUploadedFiles, la cual desciende de TCollection. Lo siguiente es la interfaz pública TUploadedFiles la cual puede usarse para acceder a los archivos:
TUploadedFiles = Class(TCollection)
    ·
    ·
    ·
public
  Function First: TUploadedFile;
  Function Last: TUploadedFile;
  Function IndexOfFile(AName: String) : Integer;
  Function FileByName(AName: String) : TUploadedFile;
  Function FindFile(AName: String) : TUploadedFile;
  Property Files[Index: Integer] : TUploadedFile read GetFile Write SetFile; default;
end;
// Cada TUploadedFile por sí mismo tiene varias propiedades:
TUploadedFile = Class(TCollectionItem)
    ·
    ·
    ·
Public
  Destructor Destroy; override;
  Property FieldName: String Read FFieldName Write FFieldName;
  Property FileName: String Read FFileName Write FFileName;
  Property Stream: TStream Read GetStream;
  Property Size: Int64 Read FSize Write FSize;
  Property ContentType: String Read FContentType Write FContentType;
  Property Disposition: String Read FDisposition Write FDisposition;
  Property LocalFileName: String Read FLocalFileName Write FLocalFileName;
  Property Description: String Read FDescription Write FDescription;
end;
Debería ser lo suficientemente descriptivo, con la excepción de FileName y LocalFileName. FileName es el archivo original name como se subió desde el cliente, LocalFileName es la ruta del archivo en el servidor donde el archivo se guarda de forma temporal. Note la diferencia en los términos en negrita antes descritos.
Nuevamente, reusemos el mismo manejador de petición, nótese que se puede optimizar el código usando una constante Req:
procedure TFPWebModule1.DataModuleRequest(Sender: TObject; ARequest: TRequest;
 AResponse: TResponse; var Handled: Boolean);
const
  Req = '<form id="form" action="%d" method="POST" enctype="multipart/form-data">' +
        '<label for="name">Drag n drop or click to add file:</label><input type=' +
        '"file" name="input" /><input type="submit" value="Send" /></form>';
var
  n, i: Integer;
  f: TUploadedFile;
begin
  n := ARequest.Files.Count;
  if n = 0 then
    with AResponse.Contents do
      Add(Req, [ARequest.URI])
  else begin
    f := ARequest.Files[0];
    AResponse.Contents.LoadFromStream(f.Stream);
  end;
  Handled := true;
end;
arrastrar y soltar un archivo (preferiblemente texto, tal si fuese presentado como texto) en el campo de entrada de archivo (o clique el botón respectivo) entonces clique en el botón Enviar. El contenido de archivo deberá mostrarse.
Cookies
Configuración

El guardar y mantener las cookies son responsabilidad del navegador, por tanto el servidor necesita enviarlo como parte de la respuesta para mantener una. AResponse.Cookies contiene una lista de cookies a enviarse. Es descendiente de TCollection, respectivamente el TCookie contenido es descendiente de TCollectionItem. Por lo tanto, puede usar TCollection en la forma de manejar items para manipularlo.
Aquí un ejemplo:
procedure TFPWebModule1.DataModuleRequest(Sender: TObject; ARequest: TRequest;
 AResponse: TResponse; var Handled: Boolean);
var
  C: TCookie;
begin
  C := AResponse.Cookies.Add;
  C.Name := 'miCookie';
  C.Value := 'algunValor';
  Handled := true;
end;
No verá ninguna salida en su navegador. Pero si usa alguna herramienta de navegador (Chrome y Brave tienen una incorporada), puede ver el encabezado de la respuesta:

Note que la cookie tiene atributos, así que Name y Value no son las únicas cosas que pueda poner. Navegue por la interfaz de TCookie para ver qué propiedades soporta.
Obteniéndola
Una vez se da el encabezado Set-Cookie arriba, la subsecuente petición a su sitio contendrá un encabezado adicional que contiene el valor que solicitó previamente poner:

Afortunadamente, la forma de leerla no es distinta de los datos GET o POST. La propiedad relacionada es ARequest.CookieFields. Para leer una cookie previamente puesta:
procedure TFPWebModule1.DataModuleRequest(Sender: TObject; ARequest: TRequest;
 AResponse: TResponse; var Handled: Boolean);
begin
  AResponse.Contents.Add('<p>Cookie get: ' + ARequest.CookieFields.Values['mycookie'] + '</p>');
  Handled := true;
end;
Sesiones
TFPWebModule es un descendiente de TSessionHTTPModule, así que tiene capacidad de manejo de sesiones. La sesión está basada en módulos, así que cada módulo puede escoger usar o no el manejo de sesiones.
La sesión se implementa de forma abstracta. Por defecto, no se provee implementación. Un ejemplo de implementación usando archivos .ini está en la unidad iniwebsession. Debe tener esta unidad en su proyecto o implementar una para que el manejo de sesión funcione. Si decide implementar uno, básicamente necesita extender e implementar métodos abstractos en las clases TCustomSession y TSessionFactory.
Activando la Sesión
Para activar el manejo de sesión, ponga la propiedad CreateSession en true. La sesión será iniciada antes del manejo de la petición. En caso de una nueva sesión, OnNewSession será invocado. Inicialice sus variables de sesión aquí.
Manipulación de las Variables de Sesión
Las variables de sesión se proveen como Session.Variables (nb: el objeto Session es el equivalente al arreglo $_SESSION que se usa en PHP). Esto es una estructura parecida a mapa de cadenas, así que puede leer / escribir así:
Session.Variables['miVar'] := miVar; // escritura
...
miVar := Session.Variables['miVar']; // lectura
Poner una variable como cadena vacía NO la remueve. En vez de eso, si realmente quiere remover una variable, llame Session.RemoveVariable.
Terminando la Sesión
Llame Session.Terminate cuando quiera terminar una sesión (p.e.: logout del usuario). La sesión también expirará automáticamente si la siguiente petición viene después de Session.TimeOutMinutes desde la última petición. Cuando termina la sesión, OnSessionExpired será invocado. Haga toda la limpieza que necesite aquí.
Routing
Since FPC 3.0.4, a new routing mechanism has been implemented. Instead of maintaining backward compatibility, it is decided that the new routing will be the default. Thus, any old code (or new code depending on old routing) must be ported by adding:
Application.LegacyRouting := true;
in the .lpr.
Old Mechanism
Using Multiple Modules
You can have multiple modules in your app. Click "File" menu, then click "New...". A dialog shall appear, select "Web Module" from the treeview.

then click OK.
With multiple modules exist in your app, you can no longer request just with /. The framework will not be
able to magically select which module must serve the response, so there are two ways to state which
module you'd like to call:
- /<module name>
- /?module=<module name>
In the 2nd format, you can change "module" (which is the default value) to whatever valid query string key by modifying Application.ModuleVariable.
Using Actions
So far, we've only used web modules with single request handler. This doesn't scale much as your web app gets more and more complex. Moreover, some features might have shared properties and be better logically grouped, e.g.:
- Account module
- Login action
- Logout action
- Register action
- Product module
- Create action
- Update action
- Delete action
- Details action
Request Handling Flow
Before using action, it is important to know fpWeb request handling flow. Failing to do so might render your action useless because it's always your data module that handles the request. How could that be? Going back a few chapters, remember the Handled := true that we always did before? Now this is where Handled parameter comes into play.
Every requests will go through module's OnRequest first, regardless the requested action. Only if it does not set Handled to true, web action's OnRequest is executed.
In general, the request flow is:

Notice the "Our Concern" box, that's what we're going to put our attention at.
Add Actions to Web Modules
To add an action, select the web module then go to object inspector. In the properties tab, select Actions and click the button on the second column.

A popup window shall appear where you can add, delete and reorder actions.

Press Add, a new action shall appear in the list. Select it then go to object inspector. It will currently show properties and events of that newly created action. Rename the Name property (this will be the name you write in the URL, so give it a short, simple but descriptive name) as you wish, I will choose "Hello". Move on to events tab, do the same as OnRequest for module, click button on the right of OnRequest row to create the request handler.

You will be presented in the same OnRequest interface, but this one handles web action instead of web module. Whatever you can do in web module's OnRequest can be done here as well. Copy the method body from the "Hello, World!" section.
Remember to remove Handled := true from the previous web module's OnRequest body (or remove the event completely) for the action to take care of the request handling.
Run your project, and fire up your browser. Now, since the request handling is delegated to web action, you can no longer just request /, but you need /<action name> or <Module's ActionVar property>=<action name>. Note that <Module's ActionVar property> has a default value of empty string, unlike Application.ModuleVariable which has "module" as the default value. So, by default, you can only use the /<action name> form.
If you have multiple modules, then you have a variety of options:
- /<module name>/<action name>
- /<module name>?action=<action name>
- /<action name>?module=<module name>
- /?module=<module name>&action=<action name>
Note that as soon as a module have at least one action, /<module or action name> alone will by default map to /<action name>. To change the behavior such that it maps to /<module name> by default, set Application.PreferModuleName to true. In case of multiple modules, if no module name given, then the default module will handle the given action. To change the behavior such that module name must be explicitly given, set Application.AllowDefaultModule to false.
The following tables summarize what will happen based on the two properties:
| /<module or action name> | Application.PreferModuleName | ||
|---|---|---|---|
| true | false | ||
| Application.AllowDefaultModule | true | /<module name> | /<default module>/<action name> |
| false | /<module name> | ERROR | |
Default Action
Remember the previous diagram, the "Delegate request handling to actions" is actually not so simple, but if we expand that diagram, the image will be too big to fit. So, here's the diagram of that part:

Two important things from the flow: DefActionWhenUnknown and a default action. The former is a web module's property while the latter corresponds to Default property of an action. In the latter case, in case there are more than two actions having Default property set to true, the the action order (as how it's shown in the manage actions popup window) will be considered to decide which is the default action. The two properties forms what the application should do if no matching action found for a given request.
The following tables summarize what will happen based on the two properties:
| Request with invalid action name | DefActionWhenUnknown | ||
|---|---|---|---|
| true | false | ||
| Action.Default | true | Request handled by default action | Error: No action found for action: <action name> |
| false | Error: Invalid action name and no default action | Error: No action found for action: <action name> | |
| Request without action name, i.e.: / | DefActionWhenUnknown | ||
|---|---|---|---|
| true | false | ||
| Action.Default | true | Request handled by default action | Request handled by default action |
| false | Error: No action name and no default action | Error: No action name and no default action | |
In case of error response above, a stack trace shall follow, complete with line number information if you build your app with -gl. We'll see later on how to create custom handler for this (stacktrace are no good for production). But for now, make sure you understand the concept of web module and web action, especially the request flow. Play around until you think you're ready for next section.
New Mechanism
The new mechanism is extremely flexible and works even without data modules (old mechanism only works with data modules).
A dedicated unit for this routing is provided as httproute (add this to uses clause of program / unit where you want to register routes). The unit contains a function HTTPRouter that will return singleton object responsible for application's route management and has RegisterRoute method to register your route.
Route Syntax
The first parameter of HTTPRouter.RegisterRoute is the route that will be matched against incoming request. It can be as simple as * above, which means 0 or more paths or simply any paths, up to as complex as /api/v1/:resource/* which means REQUEST_URI header should start with /api/v1/ followed by something else that will be bound to variable named resource and finally ended with 0 or more paths. It will match:
- /api/v1/products
- /api/v1/products/1
- /api/v1/products/1/clone
- /api/v1/products/something/else/that/is/really/long/and/silly
but not:
- /api/v1
- /excuse/me/api/v1/products
Basically there are only 3 special characters:
- * denoting 0 or more paths
- :param denoting a part
- / denoting part separator
your route will be composed of these 3 characters, plus everything else that made up a route.
Registering a Route
The 2nd, 3rd or 4th parameter (depending on whether you want to handle specific HTTP method and/or pass additional data to it) of HTTPRouter.RegisterRoute is overloaded with several possibilities:
- Callback procedure
TRouteCallback = Procedure(ARequest: TRequest; AResponse);
- Callback event
TRouteEvent = Procedure(ARequest: TRequest; AResponse) of object;
- Object satisfying a (CORBA) interface
IRouteInterface = Interface ['{10115353-10BA-4B00-FDA5-80B69AC4CAD0}']
  Procedure HandleRequest(ARequest: TRequest; AResponse: TResponse);
end;
- Object extending abstract router class
TRouteObject = Class(TObject, IRouteInterface)
Public
  Procedure HandleRequest(ARequest: TRequest; AResponse: TResponse); virtual; abstract;
end;

TRouteObjectClass = Class of TRouteObject;
By default, if 2nd parameter is not a TRouteMethod, then all HTTP methods will match. Use one of rmUnknown, rmAll, rmGet, rmPost, rmPut, rmDelete, rmOptions, rmHead, rmTrace to match only a specific HTTP method.
Registration order matters. If there are two or more routes matching the current request, the earlier registered one will handle it.
In this new mechanism, standalone Hello, World! program can be as simple as:
uses
  fphttpapp, httpdefs, httproute;
procedure DoHello(ARequest:TRequest; AResponse : TResponse);
begin
  AResponse.Content:='<html><body><h1>Hello,World!</h1></body></html>'
end;

begin
  HTTPRouter.RegisterRoute('*', @DoHello);
  Application.Port := 9000;
  Application.Initialize;
  Application.Run;
end.
Webserver example
This is an example of a simple, cross-platform, multi-threaded web server.
program webserver;

{$mode objfpc}{$H+}

uses
  {$ifdef UNIX}
    cthreads, cmem,
  {$endif}
  fphttpapp, httpdefs, httproute;

procedure route1(aReq: TRequest; aResp: TResponse);
begin
  aResp.content:='<html><body><h1>Route 1 The Default</h1></body></html>'
end;

procedure route2(aReq: TRequest; aResp: TResponse);
begin
  aResp.content:='<html><body><h1>Route 2</h1></body></html>'
end;

begin
  HTTPRouter.registerRoute('/', @route1, true);
  HTTPRouter.registerRoute('/route2', @route2);
  Application.port := 8080;
  Application.threaded := true;
  Application.initialize;
  Application.run;
end.
To open "Route 1" type into your browser the following URL: http://127.0.0.1:8080
To open "Route 2" type into your browser the following URL: http://127.0.0.1:8080/route2
Using Templates
fpWeb has integrated support for FPTemplate, Free Pascal's generic templating engine. It doesn't have to be used from web application context, but with integrated support things will be easier a bit. At least the memory management can be ignored as the module will take care of it.
There are two levels where one can use templates at: action and module. The full RAD support is incomplete, so you need to go down to hand coding at some points.
There are two modes of operation: non-parameterized and parameterized. The active mode is controlled by AllowTagParams property, which should be obvious enough what value refers to what mode.
Template string can be given from a file through FileName property or a direct string through Template property. Template.Template, I know it sounds weird :) If both are filled then FileName will take precedence.
The two properties: StartDelimiter and EndDelimiter define how the engine should recognize a template tag. For instance, if you have:
- StartDelimiter = '{+'
- EndDelimiter = '+}'
then a string '{+title+}' defines a template tag named 'title'. Note that spaces are significant, so '{+ title +}' defines a template tag named ' title ' instead of just 'title'.
Special for parameterized mode, additional three properties: ParamStartDelimiter, ParamEndDelimiter and ParamValueSeparator defines how the engine should recognize a template tag parameter. For instance, if you have:
- ParamStartDelimiter = '[-'
- ParamEndDelimiter = '-]'
- ParamValueSeparator = '='
then a string '{+data [-p=v-][-a=b-] +}' defines a template tag named 'data' with parameter 'p' of value 'v' and parameter 'a' of value 'b'. This can be used to pass template level parameter such as expected date format, header-row-footer for customizable output presentation, name of file, etc. you decide.
As a consequence of different way of operation, the core event where the template works is different, too. Non-parameterized will use OnGetParam while the parameterized will use OnReplaceTag. The two has of course different interface:
Type
  // OnGetParam: for simple template tag support only (ex: {Name})
  TGetParamEvent = Procedure(
    Sender: TObject;
    Const ParamName: String;
    Out AValue: String
  ) Of Object;
  // OnReplaceTag: for tags with parameters support
  TReplaceTagEvent = Procedure(
    Sender: TObject;
    Const TagString: String;
    TagParams: TStringList;
    Out ReplaceText: String
  ) Of Object;
In OnGetParam, you check for ParamName, then assign AValue accordingly. i.e., if you want tag 'title' to be replaced by 'My App', then fill in the method with:
// use Trim() if you want the spaces around tag to be insignificant
case Trim(ParamName) of
  'title': AValue := 'My App';
else
  AValue := 'UNKNOWN';
end;
In OnReplaceTag, you check for TagString and optionally TagParams, then assign ReplaceText accordingly. i.e., if you want tag 'datetime' to be replaced by current time with parameter 'datetimeformat' to specify how the date and time should be formatted, then fill in the method like this:
// use Trim() if you want the spaces around tag to be insignificant
case Trim(TagString) of
  'datetime': AValue := FormatDateTime(TagParams.Values['datetimeformat'],Now);
else
  AValue := 'UNKNOWN';
end;
At Action Level
Create/select an action, then go to object inspector. You will see a subcomponent property named Template. This template is a normal TFPTemplate instance. Expand it and fill in the properties as explained above. Now go to Events tab, again expand Template, you will see the two events. Fill the one based on your value of AllowTagParams property.
NOTE: If your Lazarus cannot autocomplete the event, try writing the name manually in the edit box then click the ... button. This is a bug in present Lazarus which may be fixed in the future.
At this level, template with a content is not automatically set as request handler. It might change in the future, but let's deal with its current state. Fill in OnRequest event of the action, then fill it with:
with Actions.CurrentAction as TFPWebAction do
begin
  AResponse.Content := Template.GetContent;
end;
Handled := true;
The cast is required since CurrentAction is of type TCustomWebAction instead of TFPWebAction. Without it, we can't access the Template property.
At Module Level
At module level, you currently have to do it by hand coding since no RAD support is implemented. The linked property is ModuleTemplate . This is however not a regular TFPTemplate instance, but special TFPWebTemplate class that's a descendant of it.
The idea here is to have module provide a layout while the actions provide content, with the ability to provide additional variables. It's therefore a good idea to keep AllowTagParams as is and assign OnGetParam event **of the module** only. Do NOT assign OnGetParam of ModuleTemplate as it will never be called.
A template tag named 'content' will be replaced automatically by what content produced by action, everything else is either replaced from internal template variables or from OnGetParam.
Using Separated Template
Despite the somewhat incomplete integration, nothing stops you from using fpTemplate (or any other templating solutions) manually, outside from the integrated support. This could even be better in some cases since it's modular.
Using an html Producer object
Assuming that there is a TWebAction named act_get_my_html, you must ask to write in AResponse, the return of an internal bytes stream: when answering with html Producer objects solution, we must use the methods of the writer. It manages a memory stream for a purpose of rapidity. No string type here, like with the above fpTemplate solution which uses text \ string processing as in the regular Php way. The Producer writes in AResponse with a recursive " foreach " iteration, that traverses the polymorphic objects HTML Dom tree, composed with the hierarchy THtmlCustomElement = Class(TDOMElement) Classes (see unit htmlelements.pp). So, the AResponse is written by the parameter aWriter, with the following call:
procedure TFPWebModule1.act_get_my_htmlRequest(Sender: TObject; ARequest: TRequest; AResponse: TResponse; var Handled: Boolean);
begin
  (* ask HTMLEntityProducer1 for the content of its html DOM elements: *)
  HTMLEntityProducer1.HandleRequest(ARequest, AResponse, Handled);
  Handled := True;
end;
Said again, it's the job of the Producer to convert its internal memory stream into text in the response object: that's how this pattern was designed, although there is a text-html rendering method named ProduceContent for debugging purposes only. You can override this method if you are writing or debugging a Producer component.
Here is an example, always with an html Producer object, allowing to create a web application in the "RAD way", i.e. with the drag-drop of the HTMLEntityProducer component from the pallet:
procedure TFPWebModule1.HTMLEntityProducer1WriteEntity(Sender: THTMLContentProducer; aWriter: THTMLWriter);
begin

  aWriter.startHeader;
    aWriter.Meta('','Content-Type','text/html; charset=UTF-8');
    aWriter.title('My web page');
    aWriter.link('stylesheet','stylesheet.css','text/css','screen');
  aWriter.EndHeader;

  aWriter.Startbody;
    aWriter.Startparagraph;
      aWriter.heading2('Hello, world from inside §1:');
      aWriter.Text('Here is text written inside the current paragraph.');
    aWriter.Endparagraph;
    aWriter.paragraph('This is another text written inside a self "started and ended" paragraph.');
    aWriter.Startparagraph;
      aWriter.heading2('Hello, world from inside §2:');
      aWriter.Text('Here is the final text.');
      aWriter.Image.src := 'logo.png';
      AnotherProducer.WriteContent(aWriter);
    aWriter.Endparagraph;
  aWriter.Endbody;

end;
The TWebAction.ContentProducer property allows to couple a THTTPContentProducer to its web action exposed via a URI on the net.
[ToDo: there is no official documentation about the components "RAD way" of fpWeb (html producer, html provider, html adapter, html formatter, etc)]
Tips and Tricks
Returning Different HTTP Response Code
By default, fpWeb will return HTTP 200 OK to indicate successful request handling. This surely is not always the case, as user input might not be as what we expected. To do so, set AResponse.Code in your request handler to the code you want to return.
Redirect Request to Different URL
A common flow after a successful login is to redirect user to his account page. This can be done by calling AResponse.SendRedirect in your request handler, supplying the URL to redirect request to.
Serving Static Files (Embedded Web Server)
Remember the dialog in the #Hello, World! section after you select HTTP server Application? If you tick "Register location to serve files from" you can fill "Location" (the URI segment, must not contain any slashes) and "Directory" (physical directory in your computer, must exist at runtime) and the wizard will simply add:
RegisterFileLocation('<Location>','<Directory>');
to the beginning of your .lpr and add the unit fpwebfile to the uses clause. You can actually do this by hand anytime and also register multiple times for different locations / directories. After this you can request /<Location>/<any filename under Directory> and it will be served automatically. Note that the mimetype of the file is determined by fpmimetypes. Call MimeTypes.LoadFromFile with your mime.types file in order to give correct mimetype based on its extension. Otherwise, the file will always be served as application/octet-stream which means the browser will download it instead of interpreting it (especially important for JavaScript and CSS files).
You can grab a complete mime.types here http://svn.apache.org/viewvc/httpd/httpd/trunk/docs/conf/mime.types?&view=co
In Lazarus 2.0.6 or newer you must add at the top of your program the full path of the mime.types file
begin
  MimeTypesFile := Application.Location + 'mime.txt';
Take into consideration that the default path coming with the project is lib\$(TargetCPU)-$(TargetOS)
For example httpproject\lib\i386-win32\mime.txt
Centralize Management of Configuration and Modules
By default, the program file (.lpr) is the one that contains protocol unit. This limits the ability to use Application object from other contexts such as from web modules. Fortunately, it's not difficult to refactor to have what we want. We remove RegisterHTTPModule calls from web modules' units and left out the .lpr to empty main block with single unit identifier in the uses clause, we name it: brokers. The unit contains:
unit Brokers;

{$mode objfpc}{$H+}

interface

{ $define cgi}
{ $define fcgi}
{$define httpapp}

uses
  CustWeb;

function GetApp: TCustomWebApplication; inline;

implementation

uses
  {$ifdef cgi}fpcgi{$endif}
  {$ifdef fcgi}fpfcgi{$endif}
  {$ifdef httpapp}fphttpapp{$endif}
  ,webmodule1
  ,webmodule2
  ;

function GetApp: TCustomWebApplication;
begin
  Result := Application;
end;

initialization
  RegisterHTTPModule('wm1', TWebModule1);
  RegisterHTTPModule('wm2', TWebModule2);
  {$ifndef cgi}
  Application.Port := 2015;
  {$endif}
  Application.Initialize;
  Application.Run;
end.
This way, we can control over web module registration and also provide an API to get Application object (casted as TCustomWebApplication), while still easily switch between protocol implementations, in a single place.
Terminating Gracefully (FastCGI / Embedded Web Server)
Instead of Ctrl+C-ing your app, there is a way for your app to terminate gracefully, doing whatever cleanup it needs, by calling Application.Terminate. You might need to use previous trick to easily access the Application object. A common implementation is to provide a specific password protected module / action that calls the Terminate method. You may choose whatever way you want, though.
Custom Exception Handler
[edit the May 1, 2020 => moved from a method pointer to a simple procedure.]
To override the default exception handler, which prints stacktrace whenever an exception is raised (i.e.: on HTTP 404 or 500), and thus not good for production, you must assign Application.OnShowRequestException.
This is a method so you will need to provide your procedure that implements the method and assign it by using the object. i.e.: if you have MyExceptionHandler as an
object of TMyExceptionHandler which has MyShowRequestException method, you can assign it by:
Application.OnShowRequestException := @MyExceptionHandler.MyShowRequestException;
don't forget to .Create() MyExceptionHandler BEFORE assigning above or you will get an
EAccessViolation!
You must provide your global procedure that implements your own exception handler (in production, it is advisable to replace the call stack by an HTTP status code and its explanation). Then, you can override the default exception handler, by assigning it like this:
Application.OnShowRequestException := @MyShowRequestException;
Pure Hand Coding (No Form Designer Required)
It's not a must to use Lazarus' form designer to write an fpWeb application. You can use pure hand coding technique to write it. The secret lies in the 3rd parameter of RegisterHTTPModule : SkipStreaming. When this parameter is set to true, fpWeb will not search for .lfm resource. Therefore everything must be manually handled: property settings, event handlers, action registration, etc.
Note that it's logical to do what's usually done through object inspector in an overriden constructor. Inside it, call the inherited constructor supplying both AOwner and CreateMode as parameters. After that you can set properties, assign event handlers, etc. Example:
type
  THelloWorldModule = class(TFPWebModule)
    constructor CreateNew(AOwner: TComponent; CreateMode: Integer); override;
    procedure Request(Sender: TObject; ARequest: TRequest;
      AResponse: TResponse; var Handled: Boolean);
  end;

constructor THelloWorldModule.CreateNew(AOwner: TComponent; CreateMode: Integer);
begin
  inherited CreateNew(AOwner,CreateMode);
  OnRequest := @Request;
end;

procedure THelloWorldModule.Request(Sender: TObject; ARequest: TRequest;
 AResponse: TResponse; var Handled: Boolean);
begin
  AResponse.Content := 'Hello, World!';
  Handled := true;
end;
See also
- Possibly same content
- Lazarus for the web (tutorial)
- Lazarus for the web: Sessions and Templates (tutorial) This article explains a TSQLDBSession Class that manages a SQL connection, that inherits from a web session (in order to manage the histories of web session variables, within a connection-session to a database having row-locking capabilities).
- the examples - read the text files - in your directory ...\fpc\x.x.x\source\packages\fcl-web\examples.
![]()
- XML or JSON, on ExtJS: if you want to use a more or less complex engine that is very "accomplished" regarding the rendering aspect of Javascript objects on the browser side, in addition to their functionalities (like ExtJS, for example, to display a db-aware grid, dynamic graphics, etc), this kind of solution very very often expects an XML or a JSON file. There are Adapter and Formatter classes (e.g. the classes TExtJSXMLWebdataInputAdaptor, TExtJSJSONDataFormatter).
Overall, the Adapter classes adapt the nodes of an incoming jSon or XML to a mapping of their TField database fields. And Formatter classes are mappers of each TField of a record to its node in jSon or XML format, before sending it out towards the browser.