|
|
| (4 intermediate revisions by the same user not shown) |
| Line 1: |
Line 1: |
| | {{ARM_Embedded_Tutorial_-_Raspberry_Pi_Pico_Blinking_the_onboard_LED}} | | {{ARM_Embedded_Tutorial_-_Raspberry_Pi_Pico_Blinking_the_onboard_LED}} |
| | + | |
| | + | == Introduction == |
| | | | |
| | Finally we are ready to craft some code. To make things easier, I have created a git repository that hosts the examples and extra binaries needed for successfully building the code. | | Finally we are ready to craft some code. To make things easier, I have created a git repository that hosts the examples and extra binaries needed for successfully building the code. |
| Line 13: |
Line 15: |
| | This technique is helpful when you want to get working results fast, we can already get something going without the need for us to fully understand the new microcontroller architecture. | | This technique is helpful when you want to get working results fast, we can already get something going without the need for us to fully understand the new microcontroller architecture. |
| | | | |
| − | The main Pascal Code will look like this:
| + | == Load the blinky Project in lazarus == |
| − | | |
| − | <syntaxhighlight lang=pascal>
| |
| − | const
| |
| − | LED_PIN=25;
| |
| − | GPIO_OUT=true;
| |
| − | | |
| − | var
| |
| − | i : longWord;
| |
| − | | |
| − | begin
| |
| − | runtime_init;
| |
| − | gpio_init(LED_PIN);
| |
| − | gpio_set_dir(LED_PIN,GPIO_OUT);
| |
| − | repeat
| |
| − | gpio_put(LED_PIN,true);
| |
| − | for i := 0 to 300000 do ;
| |
| − | gpio_put(LED_PIN,false);
| |
| − | for i := 0 to 300000 do ;
| |
| − | until 1=0;
| |
| − | end.
| |
| − | </syntaxhighlight>
| |
| | | | |
| − | to make this code work we will need some additional components. First of all, we need a working GPIO (General-Purpose Input/Output) library for the Raspberry Pi Pico.
| + | To follow along, open the blinky-raspi_pico.lpi project from the 'blinky directory in Lazarus: |
| | | | |
| − | When you use my repository the file is already checked in, when you want to create your own version you need to follow the chapter 'Chapter 3. Blinking an LED in C' in the getting started PDF and build the C version of the blinking LED example.
| + | [[File:lazarus-pico-blinky.png|800px]] |
| | | | |
| − | When done, search for a file named 'gpio.c.obj' that is hidden deep down in our build directory. On my Mac the file is located here:
| |
| | | | |
| − | ./CMakeFiles/blink.dir/Users/ring/devel/pico-sdk/src/rp2_common/hardware_gpio/gpio.c.obj
| + | The main Pascal Code will look like this: |
| − | | |
| − | Copy this file into the directory where you are storing code for this blinky example.
| |
| − | | |
| − | Now change the code to include this library and look up the correct definition for the functions we need from the GPIO header files:
| |
| | | | |
| | <syntaxhighlight lang=pascal> | | <syntaxhighlight lang=pascal> |
| − | program Blinky;
| + | program blinky; |
| − | {$L gpio.c.obj}
| + | {$MODE OBJFPC} |
| − | procedure gpio_init(gpio : longWord); external;
| + | {$H+} |
| − | procedure gpio_put(gpio : longWord; value : longBool); external;
| + | {$MEMORY 10000,10000} |
| − | procedure gpio_set_dir(gpio : longWord; &out : longBool); external;
| |
| − | procedure runtime_init;
| |
| | | | |
| − | const
| + | uses |
| − | RESETS_SAFE_BITS = %1111111111100110110111111;
| + | pico_gpio_c, |
| − | RESETS_PRECLOCK_BITS = %0001111000100110110111110;
| + | pico_timer_c; |
| − | RESETS_POSTCLOCK_BITS = %1110000111000000000000001;
| |
| | | | |
| − | begin
| + | begin |
| − | resets.reset_set := RESETS_SAFE_BITS;
| + | gpio_init(TPicoPin.LED); |
| − | resets.reset_clr := RESETS_PRECLOCK_BITS;
| + | gpio_set_dir(TPicoPin.LED,TGPIODirection.GPIO_OUT); |
| − | repeat
| + | repeat |
| − | until (resets.reset_done and RESETS_PRECLOCK_BITS) = RESETS_PRECLOCK_BITS;
| + | gpio_put(TPicoPin.LED,true); |
| − | end;
| + | busy_wait_us_32(500000); |
| | + | gpio_put(TPicoPin.LED,false); |
| | + | busy_wait_us_32(500000); |
| | + | until 1=0; |
| | + | end. |
| | </syntaxhighlight> | | </syntaxhighlight> |
| | | | |
| − | and we are ready to compile our code.
| + | The first few lines should look familiar: |
| − | | |
| − | As we still have a few steps of work ahead of us, my recommendation is that we first use command line to do the initial compiles as it is a little easier to see what is still necessary to fix.
| |
| − | | |
| − | We will need to use the fpcupdeluxe FPC shell sript wrapper, so make sure you call it with the correct path of your fpcupdeluxe installation:
| |
| − | | |
| − | '''Windows'''
| |
| − | | |
| − | todo
| |
| − | | |
| − | '''macOS x86_64'''
| |
| − | | |
| − | $HOME/fpcupdeluxe-embedded/fpc/bin/x86_64-darwin/fpc.sh -Tembedded -Parm -Cparmv6m -Wpraspi_pico -O1 -Xu Blinky.lpr
| |
| − | | |
| − | '''macOS aarch64'''
| |
| − | | |
| − | $HOME/fpcupdeluxe-embedded/fpc/bin/aarch64-darwin/fpc.sh -Tembedded -Parm -Cparmv6m -Wpraspi_pico -O1 -Xu Blinky.lpr
| |
| − | | |
| − | Our code compiles, but linking fails:
| |
| | | | |
| − | Free Pascal Compiler version 3.3.1 [2021/01/25] for arm
| + | We want OBJFPC mode, and use AnsiStrings ({$H+}). |
| − | Copyright (c) 1993-2020 by Florian Klaempfl and others
| |
| − | Target OS: Embedded
| |
| − | Compiling Blinky.lpr
| |
| − | Assembling blinky
| |
| − | Linking Blinky
| |
| − | Blinky.o: In function `main':
| |
| − | /Users/ring/devel/rppico/Blinky//Blinky.lpr:16: undefined reference to `gpio_set_dir'
| |
| − | /Users/ring/devel/rppico/Blinky//Blinky.lpr:18: undefined reference to `gpio_put'
| |
| − | /Users/ring/devel/rppico/Blinky//Blinky.lpr:20: undefined reference to `gpio_put'
| |
| − | Blinky.lpr(24) Error: Error while linking
| |
| − | Blinky.lpr(24) Fatal: There were 1 errors compiling module, stopping
| |
| − | Fatal: Compilation aborted
| |
| − | Error: /Users/ring/fpcupdeluxe/fpc/bin/aarch64-darwin/ppcarm returned an error exitcode
| |
| | | | |
| − | Why's that? We saw the definitions in the GPIO header files and we linked to the correct object file. The reason is that those two functions are defined as inline and for that reason we cannot access them.
| + | then we define the values for Stacksize and Heapsize. Raspberry Pico has lots of memory so be generous here... |
| | | | |
| − | So here we need to manually create our own implementation. The good thing is that inlined functions are usually quite simple and our missing functions are no exception.
| + | Strictly speaking we do not use any heap memory in this example because we do not use any AnsiStrings or any other dynamic memory allocation. |
| | | | |
| − | After reading through the GPIO header files we have implementations of the missing calls in Pascal:
| + | Next thing we do is to include the bindings to the C-Api provided by Raspberry Foundation. |
| | | | |
| − | <syntaxhighlight lang=pascal>
| + | pico_gpio_c has all definitions for the gpio port and pico_timer_c provides the busy_wait functions we use. |
| − | program Blinky;
| |
| − | {$L gpio.c.obj}
| |
| − | procedure gpio_init(gpio : longWord); external;
| |
| | | | |
| − | procedure runtime_init;
| + | Please also note that we use TPicoPin record defined in pico_gpio_c so that we do not need to remember all those pin names available to us. |
| − | const
| |
| − | RESETS_SAFE_BITS = %1111111111100110110111111;
| |
| − | RESETS_PRECLOCK_BITS = %0001111000100110110111110;
| |
| − | RESETS_POSTCLOCK_BITS = %1110000111000000000000001;
| |
| − | begin
| |
| − | resets.reset_set := RESETS_SAFE_BITS;
| |
| − | resets.reset_clr := RESETS_PRECLOCK_BITS;
| |
| − | repeat
| |
| − | until (resets.reset_done and RESETS_PRECLOCK_BITS) = RESETS_PRECLOCK_BITS;
| |
| − | end;
| |
| | | | |
| − | procedure gpio_set_dir(gpio : longWord; &out : longbool);
| + | TPicoPin.LED is for example the equivalent of GPIO Pin 25. |
| − | var
| |
| − | mask : longWord;
| |
| − | begin
| |
| − | mask := 1 shl gpio;
| |
| − | if out = true then
| |
| − | sio.gpio_oe_set := mask
| |
| − | else
| |
| − | sio.gpio_oe_clr := mask;
| |
| − | end;
| |
| | | | |
| − | procedure gpio_put(gpio : longWord; value : boolean);
| + | Hit 'Build' and after a second or two the code should be ready for testing.... |
| − | var
| |
| − | mask : longWord;
| |
| − | begin
| |
| − | mask := 1 shl gpio;
| |
| − | if value=true then
| |
| − | sio.gpio_set := mask
| |
| − | else
| |
| − | sio.gpio_clr := mask;
| |
| − | end;
| |
| | | | |
| − | const
| |
| − | LED_PIN=25;
| |
| − | GPIO_OUT=true;
| |
| − | var
| |
| − | i : longWord;
| |
| − | begin
| |
| − | runtime_init;
| |
| − | gpio_init(LED_PIN);
| |
| − | gpio_set_dir(LED_PIN,GPIO_OUT);
| |
| − | repeat
| |
| − | gpio_put(LED_PIN,true);
| |
| − | for i := 0 to 300000 do ;
| |
| − | gpio_put(LED_PIN,false);
| |
| − | for i := 0 to 300000 do ;
| |
| − | until 1=0;
| |
| − | end.
| |
| − | </syntaxhighlight>
| |
| | | | |
| − | This approach looks a little over-complicated at first but the GPIOs are always the simplest example. For more complex peripherals like I2C or USB this approach really shines as it saves a lot of time in the end.
| + | == Running your first Pico App == |
| | | | |
| | We now have a binary, but does it work? | | We now have a binary, but does it work? |
| | | | |
| − | To find out we need to upload the elf executable file to the board, a task easily done with our Debug Probe and the help of arm-none-eabi-gdb.
| + | The easiest way to test is to press and hold the 'BootSel' button on your Pico and to plug it into an USB-Port of your computer. |
| − | | |
| − | First, we have to connect our development board to either our Raspi-based debug probe or to the 2nd Pico that we converted to a Pico Probe. If you have not yet prepared your debug probe read the instructions on how to do so in this document:
| |
| − | | |
| − | [[ARM Embedded Tutorial - Raspberry Pi Pico Setting up for Development]]
| |
| − | | |
| − | Fire up your <tt>openocd</tt> instance:
| |
| − | | |
| − | $HOME/devel/openocd-rpi/src/openocd -f interface/picoprobe.cfg -f target/rp2040.cfg -s /Users/ring/devel/openocd-rpi/tcl
| |
| − | Open On-Chip Debugger 0.10.0+dev-g14c0d0d33-dirty (2021-01-29-15:13)
| |
| − | Licensed under GNU GPL v2
| |
| − | Info : only one transport option; autoselect 'swd'
| |
| − | Warn : Transport "swd" was already selected
| |
| − | adapter speed: 5000 kHz
| |
| − | Info : Hardware thread awareness created
| |
| − | Info : Hardware thread awareness created
| |
| − | Info : RP2040 Flash Bank Command
| |
| − | Info : Listening on port 6666 for tcl connections
| |
| − | Info : Listening on port 4444 for telnet connections
| |
| − | Info : clock speed 5000 kHz
| |
| − | Info : SWD DPIDR 0x0bc12477
| |
| − | Info : SWD DLPIDR 0x00000001
| |
| − | Info : SWD DPIDR 0x0bc12477
| |
| − | Info : SWD DLPIDR 0x10000001
| |
| − | Info : rp2040.core0: hardware has 4 breakpoints, 2 watchpoints
| |
| − | Info : rp2040.core1: hardware has 4 breakpoints, 2 watchpoints
| |
| − | Info : starting gdb server for rp2040.core0 on 3333
| |
| − | Info : Listening on port 3333 for gdb connections
| |
| − | | |
| − | Now we can fire up our gdb and see our program run:
| |
| − | | |
| − | '''Windows'''
| |
| − | | |
| − | todo
| |
| − | | |
| − | '''macOS x86_64'''
| |
| − | | |
| − | $HOME/fpcupdeluxe-embedded/fpc/bin/x86_64-darwin/arm-embedded-gdb Blinky.elf
| |
| | | | |
| − | '''macOS aarch64''' | + | Then navigate to the blinky/ directory and Drag&Drop the 'blinky.uf2' file on the RPI-RP2 drive |
| | | | |
| − | $HOME/fpcupdeluxe-embedded/fpc/bin/aarch64-darwin/arm-embedded-gdb Blinky.elf
| + | [[File:pico-drag-drop-uf2.png|800px]] |
| | | | |
| − | GNU gdb (GNU Tools for STM32 7-2018-q2-update.20190328-1800) 8.1.0.20180315-git
| + | Shortly after dropping the uf2 file the Pico will reboot and the LED will start blinking.... |
| − | Copyright (C) 2018 Free Software Foundation, Inc.
| |
| − | ....
| |
| − | Reading symbols from Blinky.elf...done.
| |
| − | (gdb) target remote localhost:3333
| |
| − | Remote debugging using localhost:3333
| |
| − | 0x00001bd0 in ?? ()
| |
| − | (gdb) load
| |
| − | Loading section .text, size 0x748 lma 0x10000000
| |
| − | Loading section .data, size 0x71 lma 0x10000748
| |
| − | Start address 0x10000678, load size 1977
| |
| − | Transfer rate: 1 KB/sec, 988 bytes/write.
| |
| − | (gdb) cont
| |
| − | Continuing.
| |
| | | | |
| − | And you should see the LED blink!
| + | [[ARM Embedded Tutorial - FPC and the Raspberry Pi Pico|Back to main Pico Page]] |
│
English (en) │
Introduction
Finally we are ready to craft some code. To make things easier, I have created a git repository that hosts the examples and extra binaries needed for successfully building the code.
Please clone this repository:
https://github.com/michael-ring/pico-fpcexamples
to access the working examples plus the extra prerequisites.
Our first version of the blinking LED theme will stay close to the example provided by the Raspberry Foundation in their Pico examples repository on GitHub. The code will look pretty much the same as the C code; we will also re-use code already done by the Foundation by linking to object files from their SDK.
This technique is helpful when you want to get working results fast, we can already get something going without the need for us to fully understand the new microcontroller architecture.
Load the blinky Project in lazarus
To follow along, open the blinky-raspi_pico.lpi project from the 'blinky directory in Lazarus:
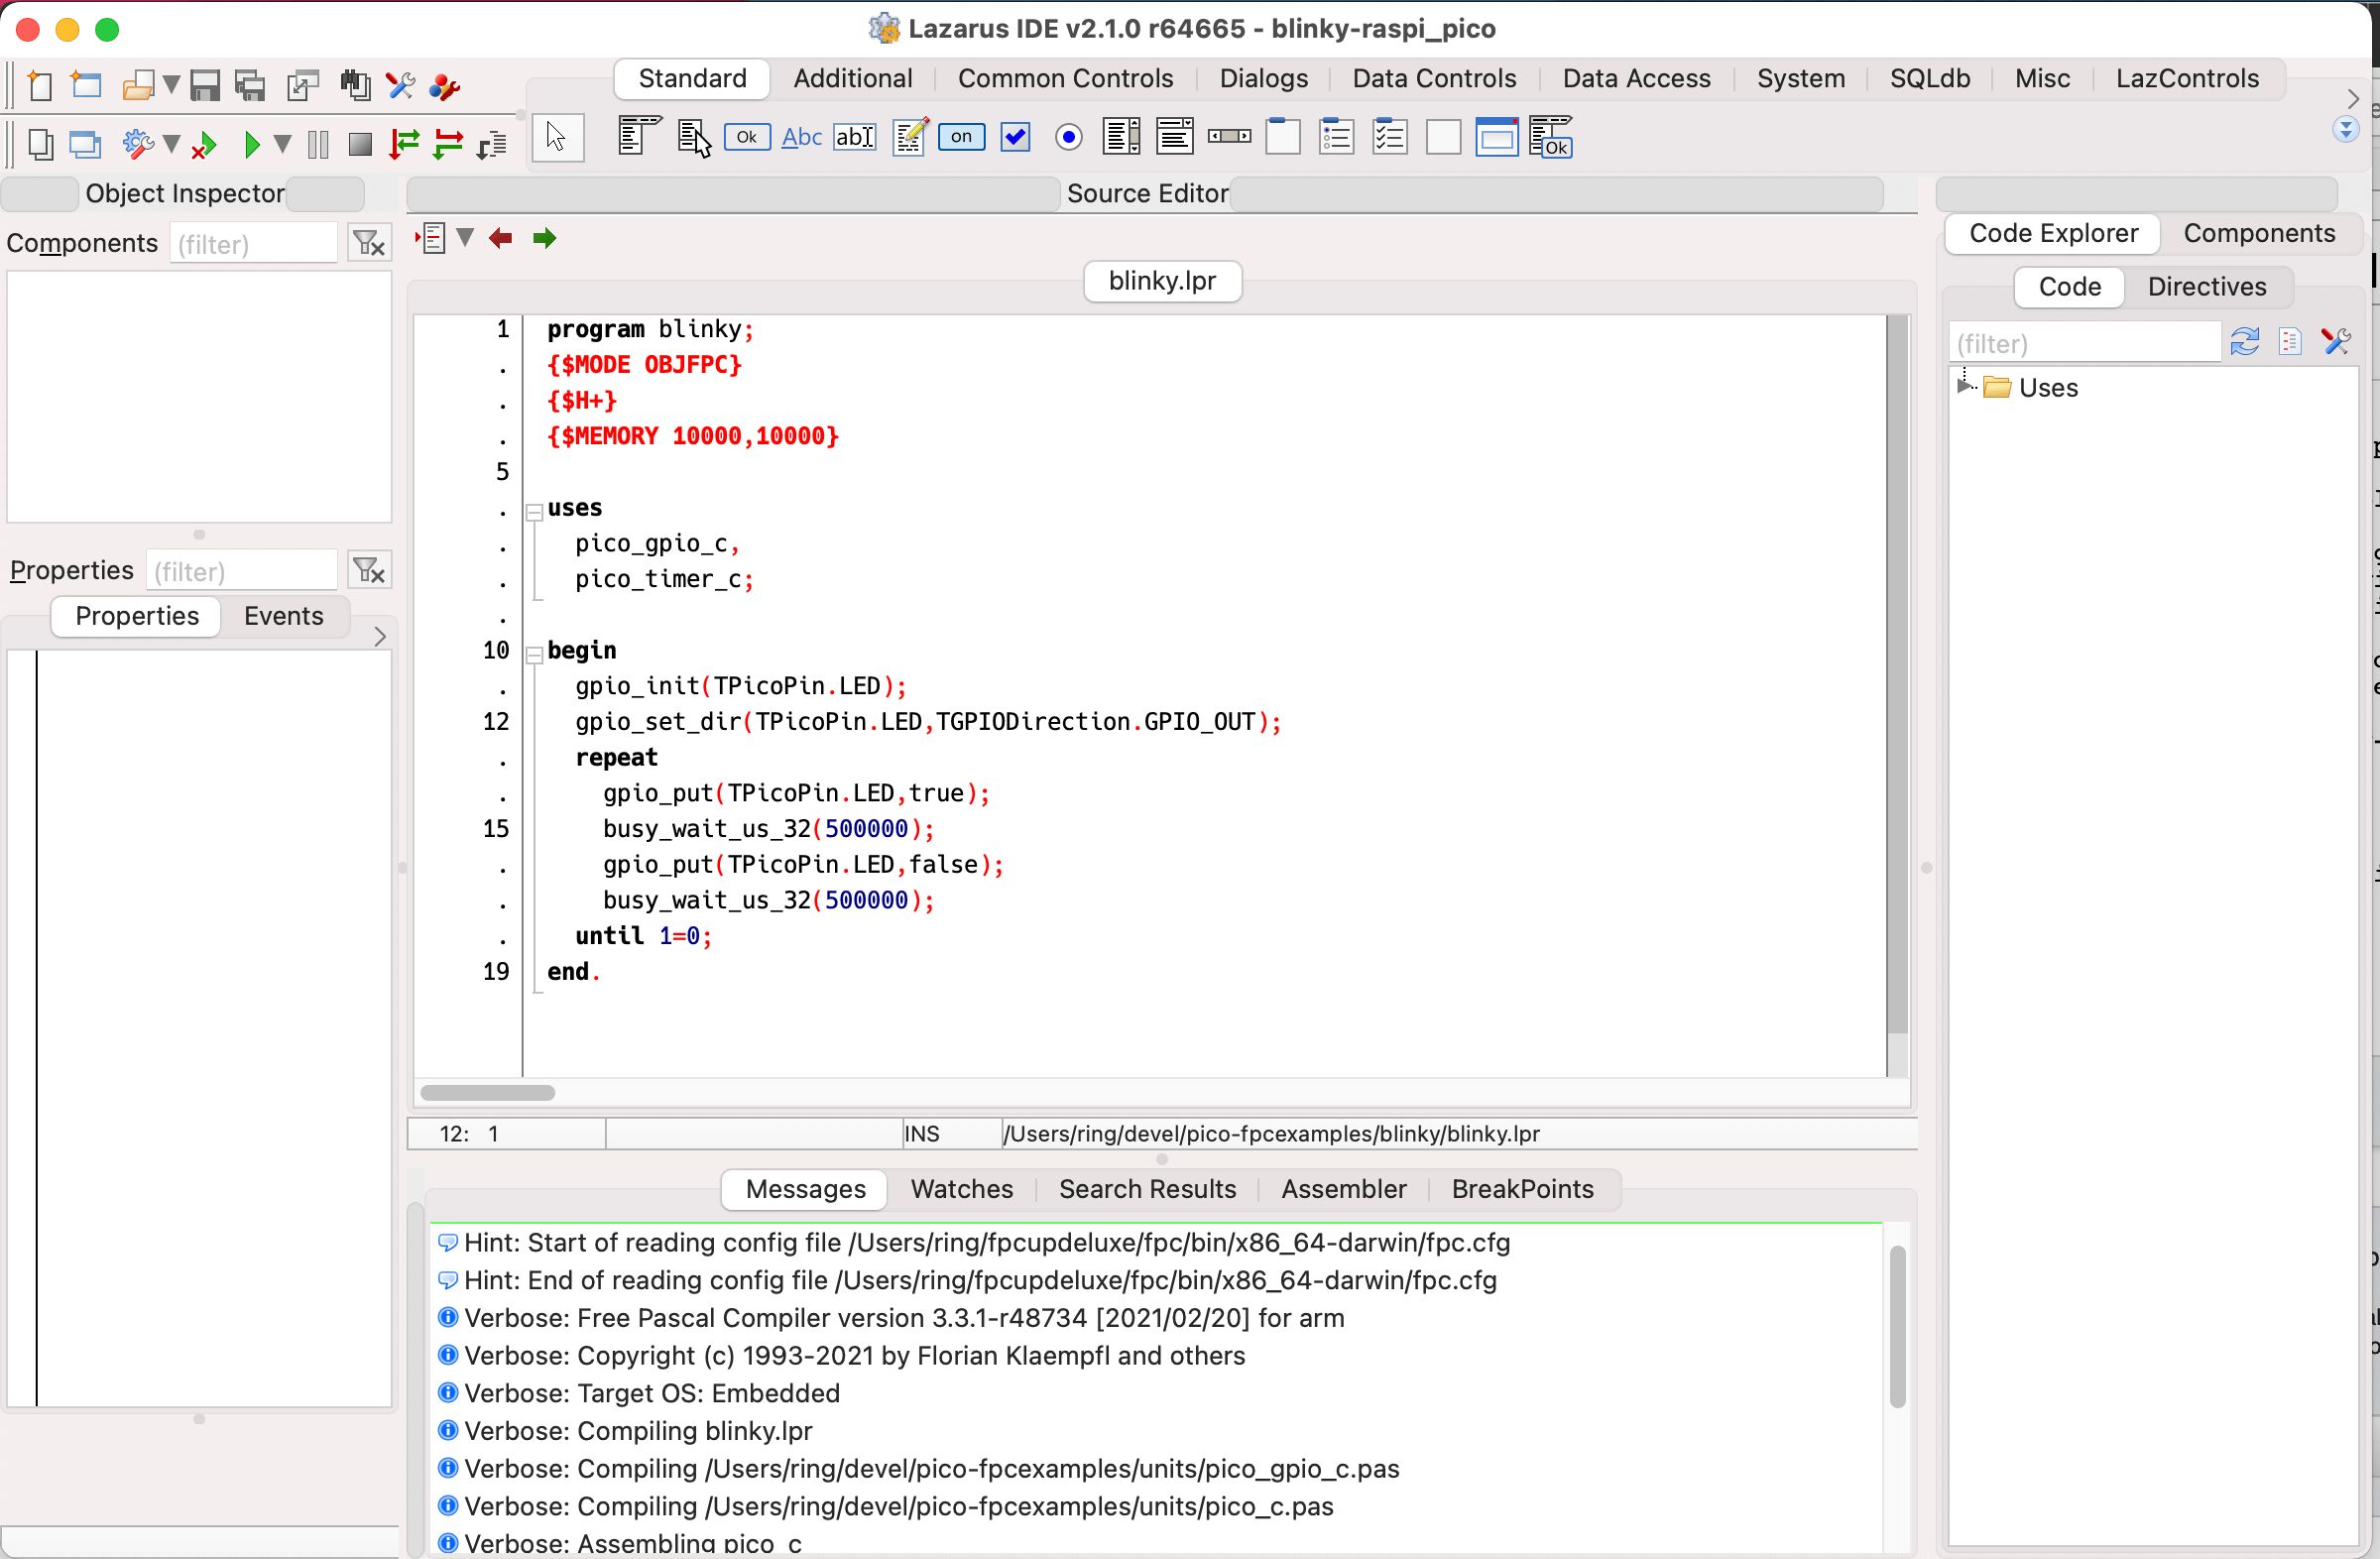
The main Pascal Code will look like this:
program blinky;
{$MODE OBJFPC}
{$H+}
{$MEMORY 10000,10000}

uses
  pico_gpio_c,
  pico_timer_c;

begin
  gpio_init(TPicoPin.LED);
  gpio_set_dir(TPicoPin.LED,TGPIODirection.GPIO_OUT);
  repeat
    gpio_put(TPicoPin.LED,true);
    busy_wait_us_32(500000);
    gpio_put(TPicoPin.LED,false);
    busy_wait_us_32(500000);
  until 1=0;
end.
The first few lines should look familiar:
We want OBJFPC mode, and use AnsiStrings ({$H+}).
then we define the values for Stacksize and Heapsize. Raspberry Pico has lots of memory so be generous here...
Strictly speaking we do not use any heap memory in this example because we do not use any AnsiStrings or any other dynamic memory allocation.
Next thing we do is to include the bindings to the C-Api provided by Raspberry Foundation.
pico_gpio_c has all definitions for the gpio port and pico_timer_c provides the busy_wait functions we use.
Please also note that we use TPicoPin record defined in pico_gpio_c so that we do not need to remember all those pin names available to us.
TPicoPin.LED is for example the equivalent of GPIO Pin 25.
Hit 'Build' and after a second or two the code should be ready for testing....
Running your first Pico App
We now have a binary, but does it work?
The easiest way to test is to press and hold the 'BootSel' button on your Pico and to plug it into an USB-Port of your computer.
Then navigate to the blinky/ directory and Drag&Drop the 'blinky.uf2' file on the RPI-RP2 drive

Shortly after dropping the uf2 file the Pico will reboot and the LED will start blinking....
Back to main Pico Page

