BGRABitmap tutorial 9/ru
│ Deutsch (de) │ English (en) │ français (fr) │ русский (ru) │
Home | Tutorial 1 | Tutorial 2 | Tutorial 3 | Tutorial 4 | Tutorial 5 | Tutorial 6 | Tutorial 7 | Tutorial 8 | Tutorial 9 | Tutorial 10 | Tutorial 11 | Tutorial 12 | Tutorial 13 | Tutorial 14 | Tutorial 15 | Tutorial 16 | Edit
В этом уроке показано, как использовать затенение по Фонгу (фонгирование) для создания текстур.
Создаём новый проект
Создайте новый проект и добавьте ссылку на модуль BGRABitmap, так же, как в первом уроке.
Затенение по Фонгу и освещённость
Для использования фонгирования, Вам необходимо создать экземпляр класса TPhongShading. Он находится в модуле BGRAGradients.
Давайте добавим переменную в определение формы:
TForm1 = class(TForm)
  ...
  phong: TPhongShading;
Теперь в обработчике события создания формы (OnCreate) создадим необходимый класс и укажем параметры:
procedure TForm1.FormCreate(Sender: TObject);
begin
  phong := TPhongShading.Create;
  phong.LightPositionZ := 150;
  phong.SpecularIndex := 20;
  phong.AmbientFactor := 0.4;
  phong.LightSourceIntensity := 250;
  phong.LightSourceDistanceTerm := 200;
end;
SpecularIndex "индекс зеркальности" указывает на концентрацию отраженного света.
А в обработчике события уничтожения формы (OnDestroy) освободим память, выделенную под класс:
procedure TForm1.FormDestroy(Sender: TObject);
begin
  phong.Free;
end;
Когда форма будет прорисовываться, добавим некоторый фонгированный объект:
procedure TForm1.FormPaint(Sender: TObject);
var
  image: TBGRABitmap;

begin
    image := TBGRABitmap.Create(ClientWidth,ClientHeight,ColorToBGRA(ColorToRGB(clBtnFace)));

    phong.DrawSphere(image,rect(20,20,120,120),50,BGRA(255,0,0));

    image.Draw(Canvas,0,0,True);
    image.free;
end;
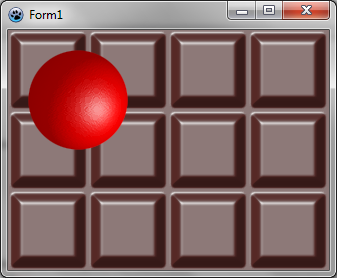
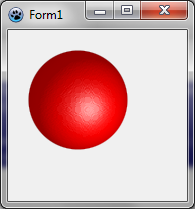
Параметры DrawSphere - это: целевое изображение, границы объекта, максимальная высота и цвет. Диаметр сферы равен 100, поэтому максимальная высота полушария равна 50.
Наконец, когда мышь перемещается, было бы неплохо, чтобы источник света следовал за курсором:
procedure TForm1.FormMouseMove(Sender: TObject; Shift: TShiftState; X,
  Y: Integer);
begin
  phong.LightPosition := point(X,Y); //координаты источника
  FormPaint(Sender); //перепрорисовка формы
end;
Запустим программу
Вы должны получить возможность играть со светом на сфере:
Используем фонгирование для создания текстур
Следующая процедура создает кусок шоколада:
function CreateChocolateTexture(tx,ty: integer): TBGRABitmap;
var
  square,map: TBGRABitmap;
  phong: TPhongShading;
  margin: integer;
begin
  margin := tx div 20; //empty space around the square
  square := CreateRectangleMap(tx-2*margin,ty-2*margin,tx div 8);

  //создаём карту с квадратом посередине
  map := TBGRABitmap.Create(tx,ty,BGRABlack);
  map.PutImage(margin,margin,square,dmDrawWithTransparency);

  //применим размытие, чтобы сделать его более гладким
  BGRAReplace(map,map.FilterBlurRadial(tx div 40,rbFast));
  square.free;

  //создаём результирующий растровый рисунок
  result := TBGRABitmap.Create(tx,ty);

  //используем фонгирование
  phong := TPhongShading.Create;
  phong.LightSourceDistanceFactor := 0;
  phong.LightDestFactor := 0;
  phong.LightSourceIntensity := 200;
  phong.AmbientFactor := 0.5;
  phong.LightPosition := Point(-50,-100);
  phong.LightPositionZ := 80;

  //нарисуем кусок шоколада с максимальной высотой 20
  phong.Draw(result,map,20,0,0,BGRA(86,41,38));
  map.Free;
  phong.Free;
end;
Фонгировщик использует карту высот для визуализации световых эффектов. Здесь карта содержит квадрат.
Среди свойств фонгировщика есть LightSourceDistanceFactor и LightDestFactor. Приведение этих значений в ноль делает результат неровным. Действительно, когда коэффициент расстояния равен нулю, расстояние между светом и объектом не учитывается, а когда коэффициент назначения света равен нулю, позиция объекта не учитывается при вычислении угла света.
Теперь, когда форма создана, создадим текстуру шоколада:
chocolate := CreateChocolateTexture(80,80);
А когда форма уничтожается:
chocolate.Free;
Перед phong.DrawSphere в OnPaint событии, добавим следующую строку:
image.FillRect(0,0,80*7,80*4,chocolate,dmSet);
Весь код
unit UMain;

{$mode objfpc}{$H+}

interface

uses
  Classes, SysUtils, FileUtil, LResources, Forms, Controls, Graphics, Dialogs,
  ExtCtrls, Buttons, BGRABitmap, BGRABitmapTypes, BGRAGradients;

type
  { TForm1 }

  TForm1 = class(TForm)
    Timer1: TTimer;
    procedure FormCreate(Sender: TObject);
    procedure FormDestroy(Sender: TObject);
    procedure FormMouseMove(Sender: TObject; Shift: TShiftState; X, Y: Integer);
    procedure FormPaint(Sender: TObject);
  private
    { private declarations }
  public
    { public declarations }
    phong: TPhongShading;
    chocolate: TBGRABitmap;
  end;

var
  Form1: TForm1;

implementation

function CreateChocolateTexture(tx,ty: integer): TBGRABitmap;
var
  square,map: TBGRABitmap;
  phong: TPhongShading;
  margin: integer;
begin
  margin := tx div 20;
  square := CreateRectangleMap(tx-2*margin,ty-2*margin,tx div 8);
  map := TBGRABitmap.Create(tx,ty,BGRABlack);
  map.PutImage(margin,margin,square,dmDrawWithTransparency);
  BGRAReplace(map,map.FilterBlurRadial(tx div 40,rbFast));
  square.free;

  result := TBGRABitmap.Create(tx,ty);
  phong := TPhongShading.Create;
  phong.LightSourceDistanceFactor := 0;
  phong.LightDestFactor := 0;
  phong.LightSourceIntensity := 200;
  phong.AmbientFactor := 0.5;
  phong.LightPosition := Point(-50,-100);
  phong.LightPositionZ := 80;
  phong.Draw(result,map,20,0,0,BGRA(86,41,38));
  map.Free;
  phong.Free;
end;

{ TForm1 }

procedure TForm1.FormCreate(Sender: TObject);
begin
  phong := TPhongShading.Create;
  phong.LightPositionZ := 150;
  phong.SpecularIndex := 20;
  phong.AmbientFactor := 0.4;
  phong.LightSourceIntensity := 250;
  phong.LightSourceDistanceTerm := 200;

  chocolate := CreateChocolateTexture(80,80);
end;

procedure TForm1.FormDestroy(Sender: TObject);
begin
  phong.Free;
  chocolate.Free;
end;

procedure TForm1.FormMouseMove(Sender: TObject; Shift: TShiftState; X,
  Y: Integer);
begin
  phong.LightPosition := point(X,Y);
  FormPaint(Sender);
end;


procedure TForm1.FormPaint(Sender: TObject);
var
  image: TBGRABitmap;
begin
    image := TBGRABitmap.Create(ClientWidth,ClientHeight,ColorToBGRA(ColorToRGB(clBtnFace)));

    image.FillRect(0,0,80*7,80*4,chocolate,dmSet);
    phong.DrawSphere(image,rect(20,20,120,120),50,BGRA(255,0,0));

    image.Draw(Canvas,0,0,True);
    image.free;
end;

initialization
  {$I UMain.lrs}

end.
Запустим программу
Вы должны увидеть хорошую плитку шоколада с большой вишней:

Совместное использование шума Перлина и затенения Фонга
Идея состоит в том, чтобы создать карту с шумом Перлина, а затем использовать фонгирование для рендеринга. Вот как создать каменную текстуру:
function CreateStoneTexture(tx,ty: integer): TBGRABitmap;
  var
    temp: TBGRABitmap;
    phong: TPhongShading;
  begin
    result := CreateCyclicPerlinNoiseMap(tx,ty,1,1,0.6);
    temp:= result.GetPart(rect(-2,-2,tx+2,ty+2)) as TBGRABitmap;

    phong := TPhongShading.Create;
    phong.LightSourceDistanceFactor := 0;
    phong.LightDestFactor := 0;
    phong.LightSourceIntensity := 100;
    phong.LightPositionZ := 100;
    phong.NegativeDiffusionFactor := 0.3;
    phong.AmbientFactor := 0.5;
    phong.Draw(result,temp,30,-2,-2,BGRA(170,170,170));

    phong.Free;
    temp.Free;
  end;
First, we create a cyclic map. It's important that it be cyclic in order to make a tilable texture. But then, when we will apply phong shading, we need to make the shader aware of the cycle. So, with GetPart, we extract the generated map with 2 more pixels on each border, so the shader can be applied to the map with the cycle.
The call to phong.Draw with offset (-2,-2) renders the map at the correct location, taking into account that we've added two pixels.
Now in the OnPaint event :
procedure TForm1.FormPaint(Sender: TObject);
var
  image: TBGRABitmap;
  stone: TBGRABitmap;
begin
    image := TBGRABitmap.Create(ClientWidth,ClientHeight,ColorToBGRA(ColorToRGB(clBtnFace)));

    stone := CreateStoneTexture(100,100);
    image.FillEllipseAntialias(200,100,150,50,stone);
    stone.free;

    image.Draw(Canvas,0,0,True);
    image.free;
end;
Run the program
You should see a form with a stoned background.
Rendering water
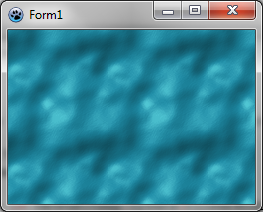
It is almost the same procedure to generate water texture :
function CreateWaterTexture(tx,ty: integer): TBGRABitmap;
const blurSize = 5;
var
  temp: TBGRABitmap;
  phong: TPhongShading;
begin
  result := CreateCyclicPerlinNoiseMap(tx,ty,1,1,1.2);
  temp:= result.GetPart(rect(-blurSize,-blurSize,tx+blurSize,ty+blurSize)) as TBGRABitmap;
  BGRAReplace(temp,temp.FilterBlurRadial(blurSize,rbFast));

  phong := TPhongShading.Create;
  phong.LightSourceDistanceFactor := 0;
  phong.LightDestFactor := 0;
  phong.LightSourceIntensity := 150;
  phong.LightPositionZ := 80;
  phong.LightColor := BGRA(105,233,240);
  phong.NegativeDiffusionFactor := 0.3;
  phong.SpecularIndex := 20;
  phong.AmbientFactor := 0.4;

  phong.Draw(result,temp,20,-blurSize,-blurSize,BGRA(28,139,166));
  phong.Free;
  temp.Free;
end;
The main difference is that we apply a blur filter to make it the water smooth and set the light color.
Using thresholds to render snow prints
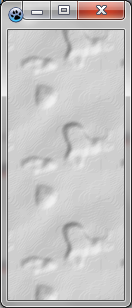
It is possible to keep only a small subrange of altitudes, to have a texture that shows foot prints in the snow.
function CreateSnowPrintTexture(tx,ty: integer): TBGRABitmap;
var
  v: integer;
  p: PBGRAPixel;
  i: Integer;

  temp: TBGRABitmap;
  phong: TPhongShading;
begin
  //here a random map is generated
  result := CreateCyclicPerlinNoiseMap(tx,ty,1,1,1.2);

  //now we apply thresholds
  p := result.Data;
  for i := 0 to result.NbPixels-1 do
  begin
    v := p^.red;
    //if the value is above 80 or under 50, then we divide it by 10 to make it almost horizontal
    if v > 80 then v := (v-80) div 10+80;
    if v < 50 then v := 50-(50-v) div 10;
    p^.red := v;
    p^.green := v;
    p^.blue := v;
    inc(p);
  end;

  //to make phong shader aware of the cycle
  temp:= result.GetPart(rect(-2,-2,tx+2,ty+2)) as TBGRABitmap;
  //apply a radial blur
  BGRAReplace(temp,temp.FilterBlurRadial(2,rbFast));
  phong := TPhongShading.Create;
  phong.LightSourceDistanceFactor := 0;
  phong.LightDestFactor := 0;
  phong.LightSourceIntensity := 100;
  phong.LightPositionZ := 100;
  phong.NegativeDiffusionFactor := 0.3; //want shadows
  phong.Draw(result,temp,30,-2,-2,BGRAWhite);
  phong.Free;
  temp.Free;
end;
We obtain this :
Previous tutorial (textures) Next tutorial (texture mapping)


