Code Signing for macOS

This article applies to macOS only.
See also: Multiplatform Programming Guide
This article applies to iOS only.
See also: Multiplatform Programming Guide
│
English (en) │
русский (ru) │
Introduction
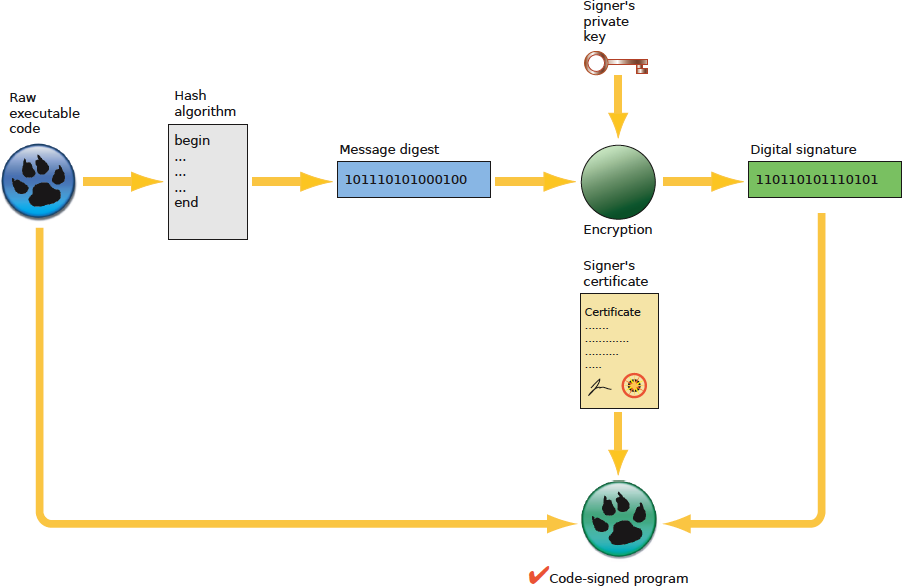
Code signing ensures both authenticity and integrity of executables that have been downloaded from wide area networks like the Internet. The discussion below applies equally to App Store distribution and distribution outside the App Store.
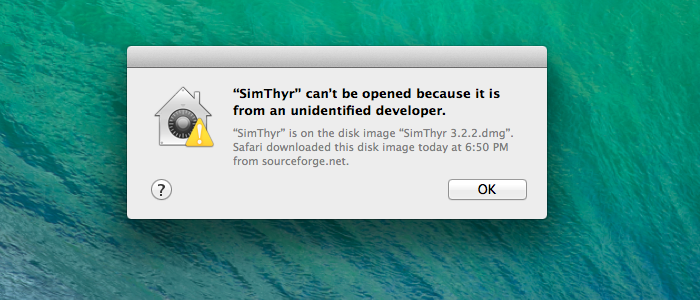
Code signing is required in iOS. On macOS 10.7 and later, it enables programs downloaded from the Internet to be opened without any warnings (if they are signed with an Apple-issued certificate) and it is required when using certain functionality (eg APIs used by debuggers; note that in this case a self-signed certificate that is marked as "trusted" suffices). This functionality is performed by Apple's Gatekeeper software.
The evolution of Gatekeeper
Gatekeeper, first introduced in Mountain Lion (10.8, 2012), is a Mac security feature that was designed to protect Apple computers from malicious software. Gatekeeper checks applications against the list of apps that Apple has approved for its App Store or have been code signed by developers who have Apple-issued certificates where the application is not offered through the app store. It does not perform any safety checks by itself, other than that the application wasn't changed since the developer signed it, nor does it offer any guarantees about the developer other than that they are paying Apple $US 99 per year (aka an "Identified Developer").
The original Gatekeeper options introduced in Mountain Lion, accessed from Preferences > Security and Privacy > General, were:
- App Store
- App Store and Identified Developers
- Anywhere
By choosing the Anywhere option, the user was once able to entirely disable Gatekeeper. The default setting only allowed the launching of applications from the App Store or from a developer who had signed their application with an Apple-issued certificate.
When macOS Sierra was released in 2016, Apple made some important changes to Gatekeeper and limited the the Gatekeeper options to:
- App Store
- App Store and Identified Developers
However, you can restore the missing Gatekeeper Anywhere' option in Preferences by opening a terminal and executing the command:
$ sudo spctl --master-disable
which still works up to and including macOS Catalina. The better, as in more secure, alternative was to instead bypass Gatekeeper by opening the application from the right-click context menu or by control clicking on the application. This still triggered the alert dialog but it now contained an Open button to successfully launch the application. This method of bypassing Gatekeeper still works in macOS Catalina.
Gatekeeper Dialogs
Simple warning after opening a downloaded application in Leopard.
Default settings are more strict in Mavericks, where they prevent downloaded unsigned apps from being started via double-clicking.

If the application is launched via context menu in Mavericks a simple warning is displayed similar to that of earlier versions.

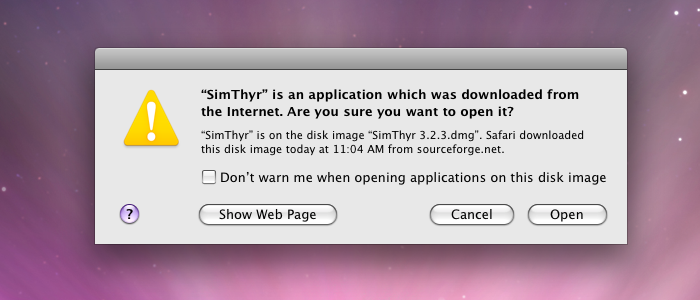
Gatekeeper shows a simplified warning, if a code-signed app has been downloaded and launched for the first time. In subsequent launches the program is starts immediately.
Overview of code-signing a program written with Lazarus and Free Pascal


Overview
The basic steps to sign an application that has been written with Lazarus and/or Free Pascal are:
- Obtain a Developer ID from Apple and install it in your system's key chain.
- Note the alphanumeric key of your Developer ID (aka TeamIdentifier).
- Sign your application with the codesign command.
- Sign your installer pkg with the productsign command.
It is not possible to use certificates from third-party providers like Comodo because they will not pass Gatekeeper which requires an Apple developer issued certificate. Also note that you cannot sign Windows applications with the Apple developer certificate (this time you do need a third-party Comodo etc certificate).
A macOS application distributed outside the Mac App Store will generally have 3–4 separate layers of signing:
- The application itself will be code signed using an application certificate.
- If the application has an installer, the package file will be signed using an installer certificate.
- The disk image containing the application or installer will be signed using an application certificate.
- The disk image will notarized, and then the ticket generated by the notary service will be stapled to it.
Gatekeeper requirements
- Your application should be standalone with no unacceptable external dependencies. The only acceptable external dependencies are system libraries. All other dependencies should be copied to your MyApp.app bundle folder. Gatekeeper rejects any application that has non-system external dependencies.
- All binary files inside MyApp.app should be code signed.
- All binary files should be located in standard locations inside the MyApp.app bundle folder. Refer to the table below.
| Location | Description |
|---|---|
| Contents | Top content directory of the bundle |
| Contents/MacOS | Main executable; helper apps and tools |
| Contents/Frameworks | Frameworks, dylibs |
| Contents/PlugIns | Plug-ins, both loadable and extensions |
| Contents/XPCServices | XPC services |
| Contents/Helpers | Helper apps and tools |
| Contents/Library/Automator | Automator actions |
| Contents/Library/Spotlight | Spotlight importers |
| Contents/Library/LoginItems | Installable login items |
| Contents/Library/LaunchServices | Privileged helper tools installed by the ServiceManagement framework |
Note: No non-binary files should ever be located in the folders specified in the table above.
Using codesign to sign your application
1. Sign your application with:
codesign -f -o runtime --timestamp -s "Developer ID Application: YOUR NAME (TEAM_ID)" /path/to/bundle.app
2. Display basic information about the result of the signing process:
codesign -dv -r- /path/to/bundle.app
If your application was successfully signed this command will return information similar to this:
Executable=/Users/apple/Desktop/your.app/Contents/MacOS/yourappname
Identifier=org.yourdomain.yourappname
Format=app bundle with Mach-O thin (x86_64)
CodeDirectory v=20500 size=101470 flags=0x10000(runtime) hashes=3164+3 location=embedded
Signature size=9063
Timestamp=7 Dec 2019 at 18:36:08
Info.plist entries=16
TeamIdentifier=<10 alpha numeric digits>
Runtime Version=10.14.0
Sealed Resources version=2 rules=13 files=45
designated => identifier "org.yourdomain.yourappname" and anchor apple generic and certificate 1[field.1.2.840.113635.100.6.2.6] /* exists */ and certificate leaf[field.1.2.840.113635.100.6.1.13] /* exists */ and certificate leaf[subject.OU] = <10 alpha numeric digits>
3. Verify your signature:
codesign -vv /path/to/bundle.app
If your app was successfully signed this command will return the strings "valid on disk" and "satisfies its Designated Requirement", respectively, after the path to your application.
Using productsign to sign your pkg installer
1. Sign your installer pkg file with:
productsign --timestamp --sign "Developer ID Installer: YOUR NAME (TEAM_ID)" /path/to/unsigned.pkg /path/to/signed.pkg
2. Verify your signature with:
spctl -vv --assess --type install /path/to/your.pkg
which should yield information similar to this if it was successful:
your.pkg: accepted
source=Developer ID
origin=Developer ID Installer: YOUR NAME (<10 alpha numeric digits>)
Using codesign to sign your disk image
Beginning in macOS 10.11.5, you can apply a code signature to read-only, compressed disk images that you use to distribute content. In this case you do not need to separately sign your application.
1. Sign your disk image with:
codesign -f -o runtime --timestamp -s "Developer ID Application: YOUR NAME (TEAM_ID)" /path/to/YourImage.dmg
2. Verify your signature with:
spctl -a -t open --context context:primary-signature -vv /path/to/YourImage.dmg
which should yield information similar to this if it was successful:
YourImage.dmg: accepted
source=Developer ID
origin=Developer ID Application: YOUR NAME (<10 alpha numeric digits>)
After 3 February 2020 Apple is fully enforcing notarization for macOS 10.14.5+ (Mojave) with the consequence that the above verification of your disk image will now return information similar to this:
YourImage.dmg: rejected
source=Unnotarized Developer ID
origin=Developer ID Application: YOUR NAME (<10 alpha numeric digits>)
See Notarization for macOS 10.14.5+ for more details.
How to install certificates on a second computer
There are two ways to do this:
- using the Keychain Access application; and
- using Xcode.
Using the Keychain Access application
- On the first computer which has the certificates, open the Keychain Access application and create a new keychain. Now select your existing login keychain, and then My Certificates. Your certificates should be shown on the right. There should be a disclosure arrow on the left side, and selecting that should reveal your private key. Select each certificate, and copy and paste (do not drag or you'll remove it from your login keychain) it into your new keychain.
- Copy the newly created keychain from your first computer to your second computer, open it with the Keychain Access application and copy/paste/drag the certificate to your second computer's login keychain.
Using Xcode
- On the first computer which has the certificates, open Xcode and go to Preferences > Accounts, select your account, select the gear symbol in the bottom left, choose Export Apple ID and Code Signing Assets, and then save the file.
- Copy the developer profile file you saved on your first computer to the second computer, open Xcode, go to Preferences > Accounts, select your account, select the gear symbol in the bottom left, and then choose Import Apple ID and Code Signing Assets.
See also
- Apple Developer Certificates
- Notarization for macOS 10.14.5+
- Hardened runtime for macOS
- Sandboxing for macOS
- Signing and Notarization FAQ
- macOS Gatekeeper Debugging Tips