Difference between revisions of "High DPI"
El Salvador (talk | contribs) m |
|||
| (45 intermediate revisions by 13 users not shown) | |||
| Line 2: | Line 2: | ||
== Introduction == | == Introduction == | ||
| − | |||
| − | + | DPI (Dots Per Inch) is the relation between size in pixels and the actual display size. Here dot is an equivalent for pixel in printing terminology. Applications can either use pixel sizes, or take into account the actual display size. In this second case, sizes are given in points. | |
| + | |||
| + | Most of today operating systems use default DPI set to 96 and allow to change it to higher value manually. The physical DPI can be determined from display through [http://en.wikipedia.org/wiki/Extended_display_identification_data EDID] protocol from physical size data and actual resolution. But the physical DPI is not used automatically by system so if you connect video output to monitor with different size then sceen resolution and visual size of controls are not automatically changed. | ||
| + | |||
| + | Usually DPI is presented as one value but it can be different for horizontal and vertical axes if pixel is not square. | ||
| + | |||
| + | In addition to basic application DPI awareness you can add own DPI options to your application to allow users to set custom per application DPI to overcome wrong system DPI setting. | ||
| + | |||
| + | ===Lazarus DPI related properties=== | ||
| + | * Graphics.ScreenInfo.PixelsPerInchX | ||
| + | * Graphics.ScreenInfo.PixelsPerInchY | ||
| + | * Forms.Screen.PixelsPerInch | ||
| + | * Forms.TForm.DesignTimePPI (See: [http://wiki.lazarus.freepascal.org/Autosize_/_Layout#DPI_auto-adjustment_and_absolute_layout_auto-adjustment DPI auto-adjustment and absolute layout auto-adjustment]) | ||
| − | |||
| − | + | ===Pixels and points=== | |
| − | For example '''300 DPI''' means that there are 300 pixels (or | + | For example '''300 DPI''' means that there are 300 pixels (or dots) per inch. There are 72 points per inch, so : |
300 pixels ↔ 1 inch | 300 pixels ↔ 1 inch | ||
| Line 20: | Line 30: | ||
'''Now with 96 DPI :''' | '''Now with 96 DPI :''' | ||
| − | + | 96 pixels ↔ 1 inch | |
1.33 pixel ↔ 1 point | 1.33 pixel ↔ 1 point | ||
| Line 30: | Line 40: | ||
2 pixels ↔ 1 point | 2 pixels ↔ 1 point | ||
| − | == | + | == Setting High DPI == |
| − | + | === Windows === | |
| − | [ | + | On Windows 95 and later, it is possible to change the DPI ratio to make elements bigger. High DPI means any custom DPI setting with more than 96 DPI (the default setting) [http://msdn.microsoft.com/en-us/library/ee318406(VS.85).aspx *]. |
| − | + | High DPI awareness means that an application takes this DPI setting into account. | |
| − | + | ==== Windows Vista and Windows 7 ==== | |
| − | + | In Windows 7 go to "Control Panel > Appearance and Personalization > Display" (or just Control Panel > Display in recent updates). | |
| − | + | Select Smaller 100% (default), Medium 125% or Larger 150%. If you select 100% (96 DPI) this is the default Windows DPI setting, (High DPI is not the default). | |
| − | If | + | If you select 125% (120 DPI) the option "Use Windows XP style DPI scaling" is enabled. Applications you run under this setting are scaled as if running under Windows XP. |
| − | + | If you select 150% (144 DPI) the option "Use Windows XP style DPI scaling" is disabled (DPI Virtualization is enabled), and applications you run under this setting must be High DPI Awareness to prevent system scaling which will produce a blurred image. | |
| − | + | You can also set your custom DPI setting via the option "Set custom text size (DPI)" and enable/disable the DPI Virtualization. | |
| − | + | ==== Windows 8 Metro Applications ==== | |
| − | + | For Windows 8 Metro Applications read this http://blogs.msdn.com/b/b8/archive/2012/03/21/scaling-to-different-screens.aspx | |
| − | + | ==== Windows 10 ==== | |
| − | + | Windows 10 "Control Panel > Appearance and Personalization > Display" have more options. You can have different font sizes for each element: Title bar, Menu, Dialog box and so on. Ensure you test twice in order to check if everything works under different sizes. | |
| − | + | Now is based on Font Size, not DPI. The DPI option is not recommended, but still there. So, instead of changing the size of all elements in desktop, this will change just the font size (And of course everything else is changed to fit). | |
| − | + | Remember that under Windows 10 there are Universal Applications (WinRT) and the classic desktop applications (Win32). We're talking here about desktop applications. | |
| − | + | === Linux === | |
| − | + | On Linux DPI setting is more complicated and depends on used software and their version. | |
| − | + | You can discover your current monitor DPI by command: | |
| + | <syntaxhighlight lang="bash">xdpyinfo|grep dots </syntaxhighlight> | ||
| − | + | You can change DPI to new value by command: | |
| + | <syntaxhighlight lang="bash">xrandr --dpi 144x144</syntaxhighlight> | ||
| − | + | To preserve setting after reboot you need to add the command as script to /etc/X11/Xsession.d/77set_dpi. | |
| − | [http:// | + | More information: |
| + | * [http://askubuntu.com/questions/197828/how-to-find-and-change-the-screen-dpi How to find and change the screen DPI?] | ||
| + | * [https://wiki.archlinux.org/index.php/xorg#Display_size_and_DPI Xorg Display size and DPI] | ||
| + | * [https://help.ubuntu.com/community/AsusZenbook#LCD Change fixed 96dpi on Ubuntu with high DPI LCD] | ||
| − | + | == Examples == | |
| − | + | === Fixed Font Sizes (not HighDPI) === | |
| − | + | Here is a form with an undefined font size (set to zero, which is the default value). It has been designed at 96 DPI (100%), and it looks like this : | |
| − | + | [[Image:Testdpi100.png]] | |
| − | + | Now, at 120 DPI (125%), it becomes : | |
| − | [[Image: | + | [[Image:Testdpi125.png]] |
| − | + | As you can see, the font gets bigger and so the text is clipped. The window title gets bigger, but the client area of the window remains the same size. Note that these changes in size can occur by using an application with a different Windows theme, or with another operating system. | |
| − | + | To avoid this, you must set the font size to a non-zero value. Note that Font.Size is expressed in points and Font.Height is expressed in pixels. In fact, only the value of Font.Height is stored, and Font.Size changes according to current DPI value. So if we set the font size, it will be fixed to a certain size in pixels. | |
| − | + | If we try again with a fixed font size of 9 points, then at 96 DPI (100%), we get this : | |
| − | + | [[Image:Testdpi100fixedM12P9.png]] | |
| − | + | Now if the same program is run at 120 DPI (125%), it becomes : | |
| − | [[Image: | + | [[Image:Testdpi125fixedM12P9.png]] |
| − | + | The result is the almost the same. The title bar is bigger, but the client area and the font size is the same. Note that in fact, the size in points of the font has changed. | |
| − | |||
| − | + | The conclusion from this is that it is possible to avoid inconsistency in the display by fixing font sizes. But we do not take into account that the graphical elements may be smaller according to actual DPI of the screen. With DPI awareness, it is possible to make an application behave as if it knew the real size of the pixels. | |
| − | |||
| − | |||
| − | + | === DPI Aware Application (For Vista +) === | |
| − | + | [http://sourceforge.net/projects/cpicksniff2/ CPickSniff] is an application to capture screen colors. We will use it as an example to see how High DPI works in Windows. | |
| − | + | '''Default DPI''' | |
| − | + | This is the app running at 96 DPI (100%). It's the default mode, when scaling isn't necessary. | |
| − | |||
| − | + | [[Image:cpicksniff_defaultdpi.png]] | |
| − | |||
| − | + | '''Windows DPI Scaling''' | |
| − | + | This is the same app running at 144 DPI (150%) without a manifest, so Windows scales it like a bitmap. The result is a blurred image. | |
| − | |||
| − | |||
| − | |||
| − | |||
| − | |||
| − | + | [[Image:cpicksniff_blured.png]] | |
| − | |||
| − | |||
| − | + | '''With Manifest''' | |
| − | |||
| − | |||
| − | |||
| − | |||
| − | |||
| − | |||
| − | + | Running at 144 DPI (150%). This time the app includes a manifest but the application contains no code to handle scaling. Items aren't scaled whereas fonts are scaled (Windows does this automatically), so text is clipped. | |
| − | |||
| − | |||
| − | |||
| − | |||
| − | |||
| − | |||
| − | + | [[Image:cpicksniff_nohighdpi.png]] | |
| − | |||
| − | |||
| − | |||
| − | |||
| − | |||
| − | |||
| − | |||
| − | |||
| − | + | '''High DPI''' | |
| − | + | Finally with both a manifest and a LCL scaling, the app is in High DPI. | |
| − | + | [[Image:cpicksniff_highdpi.png]] | |
| − | |||
| − | |||
| − | |||
| − | |||
| − | |||
| − | |||
| − | |||
| − | |||
| − | |||
| − | |||
| − | |||
| − | |||
| − | |||
| − | |||
| − | |||
| − | |||
| − | |||
| − | |||
| − | |||
| − | |||
| − | |||
| − | |||
| − | |||
| − | |||
| − | |||
| − | |||
| − | |||
| − | |||
| − | |||
| − | |||
| − | |||
| − | |||
| − | |||
| − | |||
| − | |||
| − | |||
| − | |||
| − | |||
| − | |||
| − | |||
| − | |||
| − | |||
| − | |||
| − | |||
| − | |||
| − | |||
| − | |||
| − | |||
| − | |||
| − | |||
| − | |||
| − | |||
| − | |||
| − | |||
| − | |||
| − | |||
| − | |||
| − | |||
| − | |||
| − | |||
| − | |||
| − | |||
| − | |||
| − | |||
| − | |||
| − | + | == High DPI in Lazarus 1.8 and above == | |
| − | + | To handle High DPI using new features in 1.8, follow these steps: | |
| − | + | * On Windows: enable DPI awareness in Project Options -> Application. Decide if you want to support per monitor DPI awareness or not. | |
| + | * Enable LCL scaling for your application DPI awareness in Project Options -> Application -> "Use LCL scaling (Hi-DPI). | ||
| + | * Set TForm.Scaled=True for all your forms (it is the default value). All WYSIWYG should work automatically. Also the designer scales the forms accordingly. | ||
| + | * Set Application.Scaled=True. | ||
| + | * If you create controls run-time, scale all coordinates, sizes etc that have to be DPI-aware with TControl.Scale96ToForm() or ScaleDesignToForm() (depending on your choice of default PPI) or prepare your container (e.g. panel with controls) as it was with 96 PPI and then call TControl.AutoAdjustLayout(lapAutoAdjustForDPI, 96, ParentFormOfTheContainer.PixelsPerInch, 0, 0); | ||
| + | * If some of your components don't scale their inner sizes, override DoAutoAdjustLayout and scale the sizes (see TToolBar) - it has to be done for all controls. If a LCL control misses DoAutoAdjustLayout please report to mantis and provide a patch if you can. | ||
| + | * Hint: Do ''not'' develop under HighDPI Mode, always develop under normal mode and only test under HighDPI. Otherwise Lazarus IDE will set DesignTimePPI of the different forms to different values. | ||
| − | + | === Lazarus IDE high DPI === | |
| − | + | The Lazarus IDE is DPI-aware itself. | |
| − | == | + | == High DPI in older Lazarus == |
| − | + | Is not as nice as 1.8 but it works, call on each form OnCreate event: | |
| − | + | Self.AutoAdjustLayout(lapAutoAdjustForDPI, 96, Screen.PixelsPerInch, Self.Width, ScaleX(Self.Width, 96)); | |
| − | + | == See also == | |
| − | |||
| − | |||
| − | |||
| − | |||
| − | |||
| − | |||
| − | |||
| − | + | * [[Autosize / Layout]] | |
| − | + | * [[Anchor Sides]] | |
| − | * [[ | ||
| − | |||
| − | * [[ | ||
== External Links == | == External Links == | ||
| − | *[http://msdn.microsoft.com/en-us/library/dd464646(v=VS.85).aspx High DPI (Windows)] MSDN article about High DPI | + | * [http://msdn.microsoft.com/en-us/library/dd464646(v=VS.85).aspx High DPI (Windows)] MSDN article about High DPI |
| − | *[http://msdn.microsoft.com/en-us/library/windows/apps/hh465362 Guidelines for scaling] Windows Dev Center - User experience guidelines for scaling Metro style apps | + | * [http://msdn.microsoft.com/en-us/library/windows/apps/hh465362 Guidelines for scaling] Windows Dev Center - User experience guidelines for scaling Metro style apps |
| − | *[[Windows Icon]] How to create icons that work with High DPI. | + | * [[Windows Icon]] How to create icons that work with High DPI. |
| − | |||
| − | |||
Latest revision as of 10:29, 19 August 2022
│
Deutsch (de) │
English (en) │
español (es) │
русский (ru) │
Introduction
DPI (Dots Per Inch) is the relation between size in pixels and the actual display size. Here dot is an equivalent for pixel in printing terminology. Applications can either use pixel sizes, or take into account the actual display size. In this second case, sizes are given in points.
Most of today operating systems use default DPI set to 96 and allow to change it to higher value manually. The physical DPI can be determined from display through EDID protocol from physical size data and actual resolution. But the physical DPI is not used automatically by system so if you connect video output to monitor with different size then sceen resolution and visual size of controls are not automatically changed.
Usually DPI is presented as one value but it can be different for horizontal and vertical axes if pixel is not square.
In addition to basic application DPI awareness you can add own DPI options to your application to allow users to set custom per application DPI to overcome wrong system DPI setting.
- Graphics.ScreenInfo.PixelsPerInchX
- Graphics.ScreenInfo.PixelsPerInchY
- Forms.Screen.PixelsPerInch
- Forms.TForm.DesignTimePPI (See: DPI auto-adjustment and absolute layout auto-adjustment)
Pixels and points
For example 300 DPI means that there are 300 pixels (or dots) per inch. There are 72 points per inch, so :
300 pixels ↔ 1 inch
300/72 pixels ↔ 1 point
4.16 pixels ↔ 1 point
Now with 96 DPI :
96 pixels ↔ 1 inch
1.33 pixel ↔ 1 point
Now with 144 DPI :
144 pixels ↔ 1 inch
2 pixels ↔ 1 point
Setting High DPI
Windows
On Windows 95 and later, it is possible to change the DPI ratio to make elements bigger. High DPI means any custom DPI setting with more than 96 DPI (the default setting) *.
High DPI awareness means that an application takes this DPI setting into account.
Windows Vista and Windows 7
In Windows 7 go to "Control Panel > Appearance and Personalization > Display" (or just Control Panel > Display in recent updates).
Select Smaller 100% (default), Medium 125% or Larger 150%. If you select 100% (96 DPI) this is the default Windows DPI setting, (High DPI is not the default).
If you select 125% (120 DPI) the option "Use Windows XP style DPI scaling" is enabled. Applications you run under this setting are scaled as if running under Windows XP.
If you select 150% (144 DPI) the option "Use Windows XP style DPI scaling" is disabled (DPI Virtualization is enabled), and applications you run under this setting must be High DPI Awareness to prevent system scaling which will produce a blurred image.
You can also set your custom DPI setting via the option "Set custom text size (DPI)" and enable/disable the DPI Virtualization.
Windows 8 Metro Applications
For Windows 8 Metro Applications read this http://blogs.msdn.com/b/b8/archive/2012/03/21/scaling-to-different-screens.aspx
Windows 10
Windows 10 "Control Panel > Appearance and Personalization > Display" have more options. You can have different font sizes for each element: Title bar, Menu, Dialog box and so on. Ensure you test twice in order to check if everything works under different sizes.
Now is based on Font Size, not DPI. The DPI option is not recommended, but still there. So, instead of changing the size of all elements in desktop, this will change just the font size (And of course everything else is changed to fit).
Remember that under Windows 10 there are Universal Applications (WinRT) and the classic desktop applications (Win32). We're talking here about desktop applications.
Linux
On Linux DPI setting is more complicated and depends on used software and their version.
You can discover your current monitor DPI by command:
xdpyinfo|grep dots
You can change DPI to new value by command:
xrandr --dpi 144x144
To preserve setting after reboot you need to add the command as script to /etc/X11/Xsession.d/77set_dpi.
More information:
- How to find and change the screen DPI?
- Xorg Display size and DPI
- Change fixed 96dpi on Ubuntu with high DPI LCD
Examples
Fixed Font Sizes (not HighDPI)
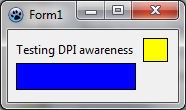
Here is a form with an undefined font size (set to zero, which is the default value). It has been designed at 96 DPI (100%), and it looks like this :
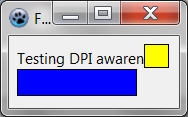
Now, at 120 DPI (125%), it becomes :
As you can see, the font gets bigger and so the text is clipped. The window title gets bigger, but the client area of the window remains the same size. Note that these changes in size can occur by using an application with a different Windows theme, or with another operating system.
To avoid this, you must set the font size to a non-zero value. Note that Font.Size is expressed in points and Font.Height is expressed in pixels. In fact, only the value of Font.Height is stored, and Font.Size changes according to current DPI value. So if we set the font size, it will be fixed to a certain size in pixels.
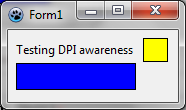
If we try again with a fixed font size of 9 points, then at 96 DPI (100%), we get this :
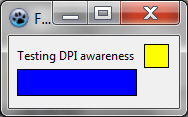
Now if the same program is run at 120 DPI (125%), it becomes :
The result is the almost the same. The title bar is bigger, but the client area and the font size is the same. Note that in fact, the size in points of the font has changed.
The conclusion from this is that it is possible to avoid inconsistency in the display by fixing font sizes. But we do not take into account that the graphical elements may be smaller according to actual DPI of the screen. With DPI awareness, it is possible to make an application behave as if it knew the real size of the pixels.
DPI Aware Application (For Vista +)
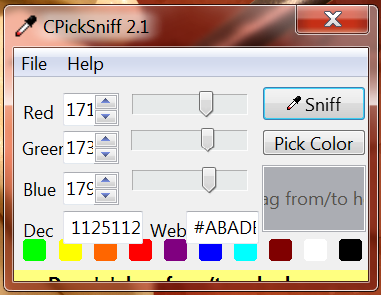
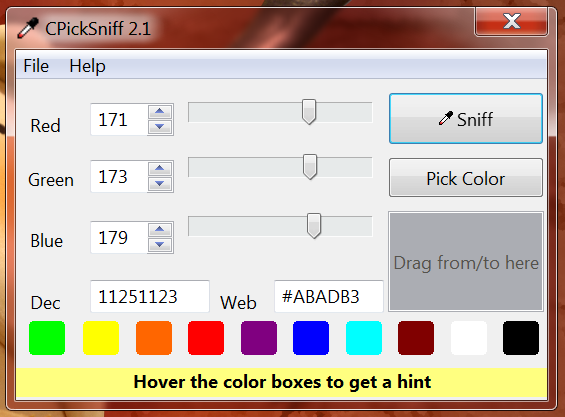
CPickSniff is an application to capture screen colors. We will use it as an example to see how High DPI works in Windows.
Default DPI
This is the app running at 96 DPI (100%). It's the default mode, when scaling isn't necessary.
Windows DPI Scaling
This is the same app running at 144 DPI (150%) without a manifest, so Windows scales it like a bitmap. The result is a blurred image.
With Manifest
Running at 144 DPI (150%). This time the app includes a manifest but the application contains no code to handle scaling. Items aren't scaled whereas fonts are scaled (Windows does this automatically), so text is clipped.
High DPI
Finally with both a manifest and a LCL scaling, the app is in High DPI.
High DPI in Lazarus 1.8 and above
To handle High DPI using new features in 1.8, follow these steps:
- On Windows: enable DPI awareness in Project Options -> Application. Decide if you want to support per monitor DPI awareness or not.
- Enable LCL scaling for your application DPI awareness in Project Options -> Application -> "Use LCL scaling (Hi-DPI).
- Set TForm.Scaled=True for all your forms (it is the default value). All WYSIWYG should work automatically. Also the designer scales the forms accordingly.
- Set Application.Scaled=True.
- If you create controls run-time, scale all coordinates, sizes etc that have to be DPI-aware with TControl.Scale96ToForm() or ScaleDesignToForm() (depending on your choice of default PPI) or prepare your container (e.g. panel with controls) as it was with 96 PPI and then call TControl.AutoAdjustLayout(lapAutoAdjustForDPI, 96, ParentFormOfTheContainer.PixelsPerInch, 0, 0);
- If some of your components don't scale their inner sizes, override DoAutoAdjustLayout and scale the sizes (see TToolBar) - it has to be done for all controls. If a LCL control misses DoAutoAdjustLayout please report to mantis and provide a patch if you can.
- Hint: Do not develop under HighDPI Mode, always develop under normal mode and only test under HighDPI. Otherwise Lazarus IDE will set DesignTimePPI of the different forms to different values.
Lazarus IDE high DPI
The Lazarus IDE is DPI-aware itself.
High DPI in older Lazarus
Is not as nice as 1.8 but it works, call on each form OnCreate event:
Self.AutoAdjustLayout(lapAutoAdjustForDPI, 96, Screen.PixelsPerInch, Self.Width, ScaleX(Self.Width, 96));
See also
External Links
- High DPI (Windows) MSDN article about High DPI
- Guidelines for scaling Windows Dev Center - User experience guidelines for scaling Metro style apps
- Windows Icon How to create icons that work with High DPI.
