Difference between revisions of "Lazarus Documentation Editor/de"
| Line 95: | Line 95: | ||
== Die Einreichung == | == Die Einreichung == | ||
| − | + | Wenn sie zufrieden sind mit ihrer Arbeit, dann wollen sie diese sicher mit der Lazarus Community teilen. Alles was sie tun müssen ist einen [[Creating A Patch|Patch]] zu erstellen, ihn zu zippen und einzuschicken. | |
== Eine kleine Notiz == | == Eine kleine Notiz == | ||
Beachten sie das Folgende: lazde ist noch in Arbeit. Es ist funktionsfähig, aber noch nicht komplett fertig. Daher können noch Bugs enthalten sein, aber fühlen sie sich frei, diese zu berichtigen. | Beachten sie das Folgende: lazde ist noch in Arbeit. Es ist funktionsfähig, aber noch nicht komplett fertig. Daher können noch Bugs enthalten sein, aber fühlen sie sich frei, diese zu berichtigen. | ||
Revision as of 12:36, 20 October 2005
Einleitung
Ein wichtiger Teil von Lazarus der noch fehlt, ist die Dokumentation. Um beim Erstellen dieser Dokumentation zu helfen, wurde ein Werkzeug entwickelt. Diese Seite will die Arbeiten dieses Werkzeugs beschreiben. Zur Bezeichnung des Lazarus Basis Verzeichnisses benutze ich [$LazDir]. Wenn sie dieses lesen, ersetzen sie es durch das Verzeichnis, in dem Lazarus installiert ist.
Das Weshalb
Das erste Ziel dieses Projektes ist es, eine Online Hilfedatei verfügbar zu machen. Um die Hilfedatei plattformunabhängig zu machen haben wir begonnen, XML Dateien für jede Unit in Lazarus zu erzeugen. Bislang wurde nur mit dialogs.pp und buttons.pp begonnen.
Diese XML-Dateien werden dann benutzt, um HTML-Seiten zu erzeugen, welche über das Internet abgerufen werden können unter http://lazarus-ccr.sourceforge.net/docs/lcl/ . In einem späteren Stadium wird eine integrierte Hilfe entwickelt, unter erneuter Nutzung der selben XML-Dateien.
Der Start
Wie zuvor erwähnt, um die Dokumentation plattformunabhängig zu halten, wird XML verwendet. Die gegenwärtige Dokumentation ist zu finden in [$LazDir]/docs/xml/. Bislang gibt es meistens Gerüstdateien im LCL Verzeichnis. Die XML Dateien, die sie in diesem Verzeichnis finden, sind automatisch generiert und müssen angepasst werden, um brauchbar zu sein. So jetzt wissen wir, wo die Dateien zu finden sind. Lassen sie uns auf das Werkzeug schauen, um sie zu erstellen/zu überarbeiten.
Das Werkzeug
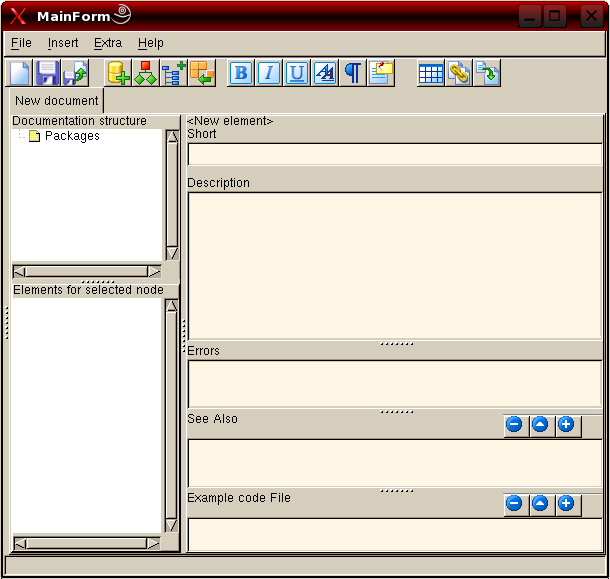
"lazde" ist ein Werkzeug, um die XML Dateien zu bearbeiten, aber es kann auch benutzt werden, um die grundlegenden Dateien aus den Quelldateien zu generieren und mittels eines externen Werkzeugs eine HTML Version der Dokumentation zu generieren. Ein Beispiel der Ergebnisse des letzten Werkzeugs ist hier zu sehen, ein Teil der Dokumentation bis hierher. Wenn sie noch keine kompilierte Version von lazde haben, dann müssen sie sie selbst erstellen. Die Quellen für "lazde" sind zu finden in [$LazDir]/doceditor/. Wenn sie dieses Programm starten und sie [$LazDir]/docs/xml/lcl/dialogs.xml geöffnet haben, dann werden sie diesen Bildschirm präsentiert bekommen

Die Arbeit
Opening the node "Packages" will show the "LCL" node which contains a "Dialogs" node. Selecting this last node will fill the lower treeview with elements. These elements depict Constants, Types and Classes defined in the Dialogs.pp unit. Used units are added as well as nodes. Other nodes are added for the properies of a class, the parameters for a function and so on.
Selecting a node in the lower left treeview will make the content of that node displayed on the right side of the window.
When you look at this page you will see an overview of classes defined in the "dialogs" unit. After each class you see a line of text. This text comes from the "short" editbox from lazde.
Below the "short" editbox, there is a memofield where you can enter a more elaborate description of the component or the property.
Note: If you want to insert a line break use <br/>
Next are "Errors", "See also" and "Example code File".
"Errors" can be used to tell about errors raised by a function if parameters have values that are out of range. For an example see this page.
Just above "See also" and "Example code File" you see three buttons. These buttons enable you to add and remove links to other pages or code examples respectively.
Das Ergebnis
Have a look at the description of InputQuery. On the top of the page we see what the page is about, in this case the InputQuery function form the dialogs.pp. The first line of text is what is entered in the "Short" editbox in lazde.
Next is the declaration of this function in the sources. The declaration part is created by the html-builder and is taken from the sources. Because there are two versions of this function the source position says 0.
Then the arguments are given. When you open the InputQuery node in lazde you will see all arguments mentioned as child nodes. The text shown after the arguments is what has been entered in the "Short" editbox when the respective child nodes are selected.
As a fourth paragraph the Function result is shown. The text shown here has been entered in the same way as the arguments.
Finally the description is shown. This is the text entered in the description box of lazde.
Das Hinzufügen neuer Units
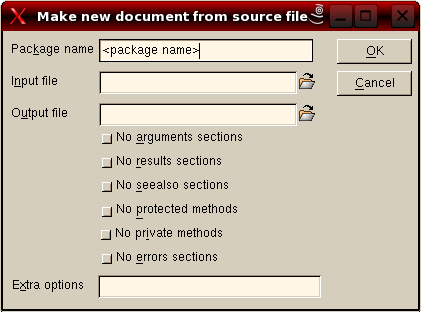
There are of course other units that need to be documented. If it is for instance a unit for some package, chances are there is no xml file to start with. You have to start from scratch then, but lazde has a function to get you off to a flying start. Just go to File -> New and the following screen will appear:

You start by giving the package a name. All units you want to add to this package should have the same package name. Afterwards you enter the source file to use; you can browse to this file as well. Then enter a name for the output file. (Do not forget the xml extension!) And press OK.
lazde will then generate the basics for the documentation. The generated file will be opened and the treeview will be populated by all units, classes, types, functions and so on from your source file. Now you are ready to start documenting a new part of Lazarus.
Have a look at LCL Documentation Roadmap to see which units still need to be documented.
Das Endergebnis
What I experienced during the use of the program is that I would like to see how the information is shown in its final stage (as a browsable document). For this purpose lazde makes use of a utility to build all necessary HTML-files.
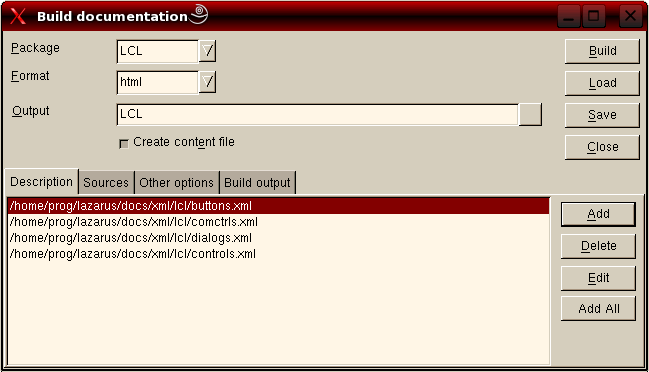
This utility can be started from the menu Extra -> Build. The following screen will be shown:

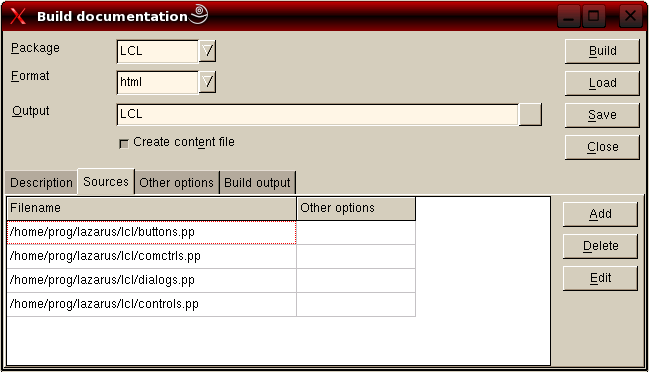
"Package" should be the same as the name you gave when you created the xml files. For "Format" choose HTML. At "Output" you enter the path where the resulting files should be placed. Press "Add all" and all documents your were working on will be added to the project. Then go to the next to tab

and enter the paths to the source files. After you have pressed build your HD will start to rattle and finally the following output will be shown on the "Build output" tab.
Building docs using command: fpdoc --package="LCL"
--output="/home/matthijs/documentatie/LCL" --format=html --content
--descr="/home/matthijs/Projecten/Lazarus/doceditor/buttons.xml"
--descr="/home/matthijs/Projecten/Lazarus/doceditor/comctrls.xml"
--descr="/home/matthijs/Projecten/Lazarus/doceditor/dialogs.xml"
--descr="/home/matthijs/Projecten/Lazarus/doceditor/controls.xml"
--input="/home/matthijs/cvsroot/lazarus/lcl/buttons.pp"
--input="/home/matthijs/cvsroot/lazarus/lcl/comctrls.pp"
--input="/home/matthijs/cvsroot/lazarus/lcl/dialogs.pp"
--input="/home/matthijs/cvsroot/lazarus/lcl/controls.pp"

FPDoc - Free Pascal Documentation Tool
(c) 2000 - 2003 Areca Systems GmbH / Sebastian Guenther, sg@freepascal.org

Writing 2788 pages...
Done.
Documentation successfully built.
When you go to the directory you entered at "Output" you will see a index.html file and (in this case 4) sub directories. Open index.html in your favorit browser and see the result of all your hard work on the documentation. You will be able to follow the links and read it all.
When you plan to continue working on this package of documentation, press "Save" and save the build options. You will be asked to provide a name for the file and the options will be saved. Next time you want to build the HTML-files you can just "load" them again.
Die Einreichung
Wenn sie zufrieden sind mit ihrer Arbeit, dann wollen sie diese sicher mit der Lazarus Community teilen. Alles was sie tun müssen ist einen Patch zu erstellen, ihn zu zippen und einzuschicken.
Eine kleine Notiz
Beachten sie das Folgende: lazde ist noch in Arbeit. Es ist funktionsfähig, aber noch nicht komplett fertig. Daher können noch Bugs enthalten sein, aber fühlen sie sich frei, diese zu berichtigen.
