Anchor Docking/ru
│ English (en) │ русский (ru) │ 中文(中国大陆) (zh_CN) │
About docking in general see Docking.
Обзор
Пристыковка окон позволяет комбинировать формы или обрабатывать элементы управления как формы. Вы используете мышь, чтобы перетаскивать и закреплять формы вместе или расстыковывать (разделять) их. Основная функциональность перетаскивания, пристыковки и расстыковки предоставляется LCL. Но вам нужен менеджер пристыковки для добавления разделителей и зон захвата, а также для сохранения и восстановления макетов.
Пристыковка с привязкой реализована, начиная с версии 0.9.29, в пакете anchordocking.lpk. Он прост в использовании и предоставляет множество функций и опций, недоступных в более ранних установочных пакетах.
Пример кода вы найдете здесь: components/anchordocking/miniide/miniide1.lpi
Это означает, что более ранние модули TLazDockingManager и LDockCtrl устарели и далее поддерживаться не будут.
Характеристики
- Перетаскивание и стыковка: добавлены заголовки, которые можно перетаскивать с помощью мыши на пристыковываемые элементы управления . Прямоугольники предварительного просмотра покажут, где и как закреплен элемент управления.
- Любой макет: с помощью привязок LCL возможна практически любая компоновка. Вы можете пристыковать [компонент] влево, вправо, сверху, снизу, внутри или снаружи или в виде страницы, как [это сделано] в TPageControl. Вы можете расширять пристыкованные элементы управления через всплывающее меню. Нет необходимости расстыковывать весь макет.
- То, что вы видите, как это структурировано: тут нет скрытых панелей для выравнивания элементов управления в строках и столбцах. Пристыковка с привязкой гарантирует, что формы не будут перекрываться.
- Сплиттеры автоматически вставляются между пристыкованными формами для [получения возможности] изменения размера.
- Пристыковка страницы: формы можно пристыковывать не только влево/вправо/сверху/снизу, но и на страницах. TPageControl автоматически создается для естественного внешнего вида. Страница также может содержать произвольные пристыкованные формы, включая сопутствующие пристыкованные формы, допускающие вложенные страницы и макеты. Когда страница отстыкована от pagecontrol, она автоматически удаляется. Вы можете таскать и бросать вкладки или использовать всплывающее меню для перемещения страниц.
- Простота использования: с помощью одной строки кода вы можете сделать форму или элемент управления пристыковываемыми. Просто дайте им уникальные имена.
- Не только формы, но и любой TWinControl может быть сделан пристыковываемым.
- Можно сохранять/загружать макеты: информация о макете сохраняется для каждого пристыкованного элемента управления, а старые файлы макетов будут работать [по-прежнему], даже если приложение получит больше пристыкованных элементов управления или некоторые из них будут удалены. Информация хранится в абстрактном классе LCL TConfigStorage. Таким образом, вы можете использовать, например, TXMLConfigStorage для хранения макетов в XML-файлах, или вы можете создать собственное хранилище для хранения его в любом месте.
- Каждая пристыкованная форма помещается в стыковочный узел, предоставляя необязательный заголовок. Заголовок показывает название пристыкованной формы и содержит кнопку закрытия. Вы можете перетащить заголовок, чтобы перетащить форму и отстыковать ее или пристыковать в другой позиции. Заголовок может находиться на любой из четырех сторон и по умолчанию автоматически перемещается на меньшую сторону, чтобы сэкономить место. Вы можете настроить и это. Заголовок показывает настраиваемую подсказку, позволяющую читать длинные надписи.
- При изменении размера стыковочного узла дочерние узлы масштабируются автоматически. Вы можете отключить это.
- Сохранение размеров форм: например, при стыковке формы к левой стороне стыковочного узла ширина пристыкованной формы сохраняется. То же самое справедливо для других сторон, а также при отстыковке.
- Уменьшение мерцания: при восстановлении предпринимается попытка повторно использовать существующие узлы и разделители, чтобы уменьшить создание и мерцание форм, и сохранить Z-порядок(порядок наложения) форм. Это позволяет быстро переключаться между макетами.
- Всплывающее меню заголовка:
- блокировать/разблокировать (отключить перетаскивание)
- положение заголовка (авто, слева, сверху, справа, снизу), это сохраняется/восстанавливается вместе с макетом
- объединить (например, после перемещения стыковочного узла страницы внутрь макета)
- отстыковать (требуется, если нет места для отстыковки на экране)
- увеличить сторону слева, сверху, справа, снизу
- закрыть
- настройки
- Всплывающее меню страницы:
- блокировать/разблокировать (отключить перетаскивание)
- отстыковать (требуется, если нет места для отстыковки на экране)
- положение вкладки для управления страницей (сверху, снизу, слева, справа), это сохраняется/восстанавливается вместе с макетом
- переместить страницу влево, вправо, в крайнее левое положение, в крайнее правое положение
- закрыть
- настройки
- Формы могут создавать стыковочные узлы. Тогда они могут пристыковываться к одной из сторон. Но их нельзя пристыковать к себе.
- Кнопка закрытия автоматически сохраняет макет
- Мощные функции для изменения макета. Вы можете использовать Drag&Drop, чтобы переместить форму, а также вы можете отстыковать и пристыковать ее за один раз. Есть функции для увеличения форм и сжатия других. Эти функции также доступны через всплывающее меню заголовка. См. ниже.
- Существует пакет IDE, который позволяет сделать стыкуемыми [окна интерфейса] IDE Lazarus. Он называется anchordockingdsgn.lpk. Убедитесь, что вы устанавливаете только один пакетдля пристыковки. Не устанавливайте easydockmgr одновременно!
Запланированное
- Пакет времени разработки: добавление всех файлов макета в меню
- Простой способ сделать формы прикрепляемыми во время разработки (то есть без написания кода)
- Кнопка сворачивания и скрытия
- При показе снова: восстановить макет по умолчанию
- Кнопка закрытия для страниц
- Реализовать автоматическое слияние меню в LCL (когда две формы с основными меню состыкованы).
Использование
Быстрый старт
Добавьте пакет AnchorDocking к требуемым пакетам в инспекторе проектов.
Затем добавьте модуль AnchorDocking в раздел uses вашего основного модуля (модуль вашей основной формы).
Добавьте в событие OnCreate вашей основной формы:
DockMaster.MakeDockSite(Self,[akBottom],admrpChild);
Для других пристыковываемых форм замените все вызовы Show и ShowOnTop на
DockMaster.MakeDockable(Form1,true,true);
Для других пристыковываемых форм замените все вызовы Visible:=true на
DockMaster.MakeDockable(Form1,true);
Удалите или закомментируйте все вызовы Hide, Visible:=false, WindowState:=.
Предварительные условия использования
- Ваш проект должен использовать пакет AnchorDocking.
- Все пристыковываемые формы должны показываться с помощью MakeDockable или MakeDockSite. Не используйте Show, BringToFront, ShowOnTop, Visible:=true. Конечно же, у вас может быть несколько не пристыковывающихся форм, таких как всплывающие подсказки или заставки.
- Все пристыковываемые формы должны иметь свободно изменяемый размер, это означает, что нет ограничений, нет BorderStyle=bsDialog.
- Нет другой системы пристыковки. AnchorDocking несовместим с EasyDockMgr.
Превращение форм в пристыкуемую
Есть два способа сделать форму пристыкуемой. Вы можете использовать DockMaster.MakeDockable, чтобы пристегнуть форму к стыкуемому узлу. Тогда ваша форма может пристыковывать и быть пристыкуемой совершенно свободно. Вы будете использовать это для большей части ваших форм, за исключением MainForm, потому что это поддерживается только для MainForm в gtk2 и qt. Второй способ - использовать DockMaster.MakeDockSite. Форма может пристыковывать другие узлы, но не может быть пристыкована сама. Вы можете использовать MakeDockSite для MainForm. Для большинства других форм вы, вероятно, захотите использовать это:
// показываем YourForm
// если это еще не сделано, пристегиваем форму к док-узлу
DockMaster.MakeDockable(YourForm);
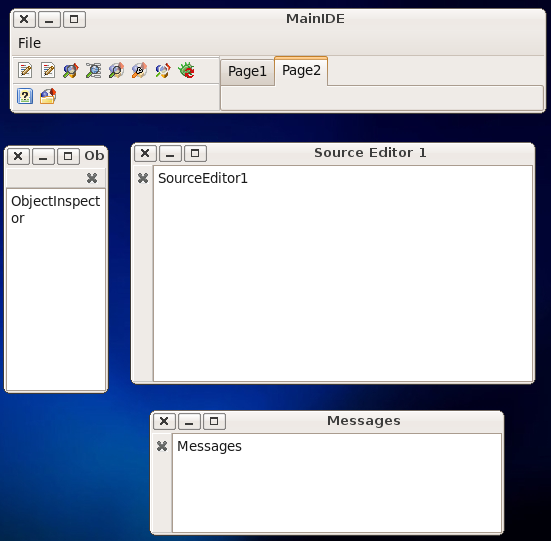
Вот несколько примеров того, как форма может быть пристыкована с помощью DockMaster.MakeDockable:
Положение заголовка обычно устанавливается автоматически, и пользователь может щелкнуть правой кнопкой мыши по любой из четырех сторон.
Example: miniide1
The example can be found in lazarus/components/anchordocking/miniide/miniide1.lpi. It has a mainform in unit unit1.pas with a main menu which works as a docksite and several forms that are dockable.
Making the main form a dock site
In the TMainIDE.FormCreate the main form MainIDE is turned into a docksite:
DockMaster.MakeDockSite(Self,[akBottom],admrpChild);The parameter [akBottom] allows to dock other sites at the bottom of MainIDE. The parameter admrpChild tells the DockMaster that when the MainIDE is enlarged the extra space is distributed to the docked sites.
When the user docks a site to the bottom of MainIDE the site is put onto MainIDE (Site.Parent:=MainIDE) with Site.Align=alBottom. The other controls on MainIDE must be compatible to this. MainIDE for example has a BtnPanel with Align=alLeft and a TNoteBook with Align=alClient. See here how Align works.
The DockMaster adds automatically a splitter:
As soon as a dockable form is docked its caption is shown in the dock header.
Requirements for a custom dock site
As long as nothing is docked into a custom dock site, your form can do everything as a normal form. But when a site is docked to it, some properties and methods need special care:
- AutoSize=true may result in an endless loop. Disable it or override DoAutoSize/CalculatePreferredSize and take special care.
- Constraints: The DockMaster clears the maximum Constraints and will restore them on undock.
- Child controls anchored to the aligned site may overlap. See here how Align works.
- ChildSizing: The spacing properties like LeftRightSpacing, TopBottomSpacing may interfere with the docking layout.
Procedure to create all other forms by name
The MainIDE sets the DockMaster.OnCreateControl event, to enable the DockMaster to create forms by name. This is needed to restore layouts.
DockMaster.OnCreateControl:=@DockMasterCreateControl;procedure TMainIDE.DockMasterCreateControl(Sender: TObject; aName: string; var
AControl: TControl; DoDisableAutoSizing: boolean);
procedure CreateForm(Caption: string; NewBounds: TRect);
begin
AControl:=CreateSimpleForm(aName,Caption,NewBounds,DoDisableAutoSizing);
end;
begin
// first check if the form already exists
// the LCL Screen has a list of all existing forms.
// Note: Remember that the LCL allows as form names only standard
// pascal identifiers and compares them case insensitive
AControl:=Screen.FindForm(aName);
if AControl<>nil then begin
// if it already exists, just disable autosizing if requested
if DoDisableAutoSizing then
AControl.DisableAutoSizing;
exit;
end;
// if the form does not yet exist, create it
if aName='CodeExplorer' then
CreateForm('Code Explorer',Bounds(700,230,100,250))
...
else if aName='DebugOutput' then
CreateForm('Debug Output',Bounds(400,400,350,150));
end;Creating a form can be as simple as this:
MyForm:=TMyForm.Create(Self);
if DoDisableAutoSizing then
  MyForm.DisableAutoSizing;
But of course you can put there all kind of initialization code.
The DisableAutoSizing reduces flickering. Make sure your forms Visible property is set to false.
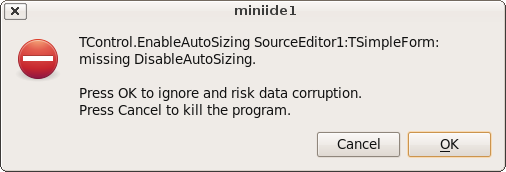
Remember to call DisableAutoSizing for the form if the parameter DoDisableAutoSizing is set to true, because Disable- and EnableAutosizing calls must be balanced. If you miss the DisableAutosizing, the LCL will raise an exception later:
TControl.EnableAutoSizing SourceEditor1:TSimpleForm: missing DisableAutoSizing
If you call DisableAutoSizing too much, your forms will not appear and/or not resize properly as the LCL is waiting for the EnableAutoSizing call that never comes.
Showing forms
When a form should be shown, you have probably used something like 'MyForm.Show. Instead you should now use
DockMaster.MakeDockable(MyForm);This will wrap MyForm in a dock site and show it. It is clever enough to figure out if the form is already wrapped in a dock site.
If you set the DockMaster.OnCreateControl event you can use this:
DockMaster.ShowControl('MyForm',true);Docking manually, via code
Use the procedure DockMaster.ManualDock to dock a site to or into another.
procedure ManualDock(SrcSite, TargetSite: TAnchorDockHostSite; Align: TAlign; TargetControl: TControl = nil);- SrcSite is the site to be docked. If SrcSite was docked it will be undocked first.
- TargetSite is the site where SrcSite will be docked into or docked as neighbor.
- TargetControl specifies if docking as neighbor (=nil), as inside neighbor (=TargetSide) or in front of a page (=a TAnchorDockPage).
Undocking manually, via code
Use the procedure DockMaster.ManualFloat to undock a site from its neighbors and create a flotaing top level form. The embedded control stays embedded into a TAnchorDockHostSite.
procedure ManualFloat(AControl: TControl);You can give as parameter a TAnchorDockHostSite or a control embedded into a TAnchorDockHostSite (for example a form made dockable with MakeDockable). The site will be put at the same screen location.
Save layout
The DockMaster allows to save the current layout to a TConfigStorage. The miniide example uses the xml version:
procedure TMainIDE.SaveLayout(Filename: string);
var
  XMLConfig: TXMLConfigStorage;
begin
  try
    // create a new xml config file
    XMLConfig:=TXMLConfigStorage.Create(Filename,false);
    try
      // save the current layout of all forms
      DockMaster.SaveLayoutToConfig(XMLConfig);
      XMLConfig.WriteToDisk;
    finally
      XMLConfig.Free;
    end;
  except
    on E: Exception do begin
      MessageDlg('Error',
        'Error saving layout to file '+Filename+':'#13+E.Message,mtError,
        [mbCancel],0);
    end;
  end;
end;
Load layout
procedure TMainIDE.LoadLayout(Filename: string);
var
  XMLConfig: TXMLConfigStorage;
begin
  try
    // load the xml config file
    XMLConfig:=TXMLConfigStorage.Create(Filename,True);
    try
      // restore the layout
      // this will close unneeded forms and call OnCreateControl for all needed
      DockMaster.LoadLayoutFromConfig(XMLConfig);
    finally
      XMLConfig.Free;
    end;
  except
    on E: Exception do begin
      MessageDlg('Error',
        'Error loading layout from file '+Filename+':'#13+E.Message,mtError,
        [mbCancel],0);
    end;
  end;
end;
Enlarge/Shrink
The anchor docking manager can enlarge/shrink docked neighbors. This is done via the popup menu of the dock header or in code with the function DockMaster.ManualEnlarge:
function ManualEnlarge(Site: TAnchorDockHostSite; Side: TAnchorKind; OnlyCheckIfPossible: boolean): boolean;Site is a child site, Side the side of Site to expand. If you only want to test if enlarge is possible set OnlyCheckIfPossible to true.
Enlarge one, shrink another
Shrink neighbor Object Inspector, enlarge Messages: Right click on the header of Messages and click on Enlarge right side. Two splitters are resized.
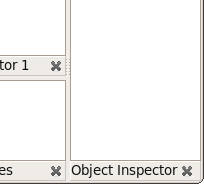 enlarging Messages to the right side:
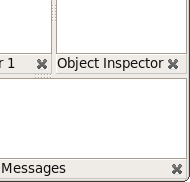
Enlarge one, shrink many
Shrink splitter at one side, enlarge both neighbor splitters, rotate the splitter behind, enlarge Control, shrink controls at rotate splitter. Right click on header of Source Editor 1 then click on Enlarge bottom side.
General docking options
The AnchorDocking package provides a dialog to setup some of the properties of the DockMaster. The dialog is in the unit AnchorDockOptionsDlg and you can use it simply:
uses ... AnchorDockOptionsDlg;
...
procedure TMainIDE.FormCreate(Sender: TObject);
...
begin
  ...
  DockMaster.OnShowOptions:=@ShowAnchorDockOptions;
  ...
end;
This will add a new menu item to the popup menus of the dock headers and pages called Docking options.
Docking in the IDE
If you don't like the default "separate windows" look of the Lazarus IDE and prefer a single window (e.g., like RAD Studio™), you can install a package called AnchorDockingDsgn. This package makes the windows dockable (lazarus/components/anchordocking/design/anchordockingdsgn.lpk). Uninstall any other docking managers (e.g., easydockmgrdsgn).
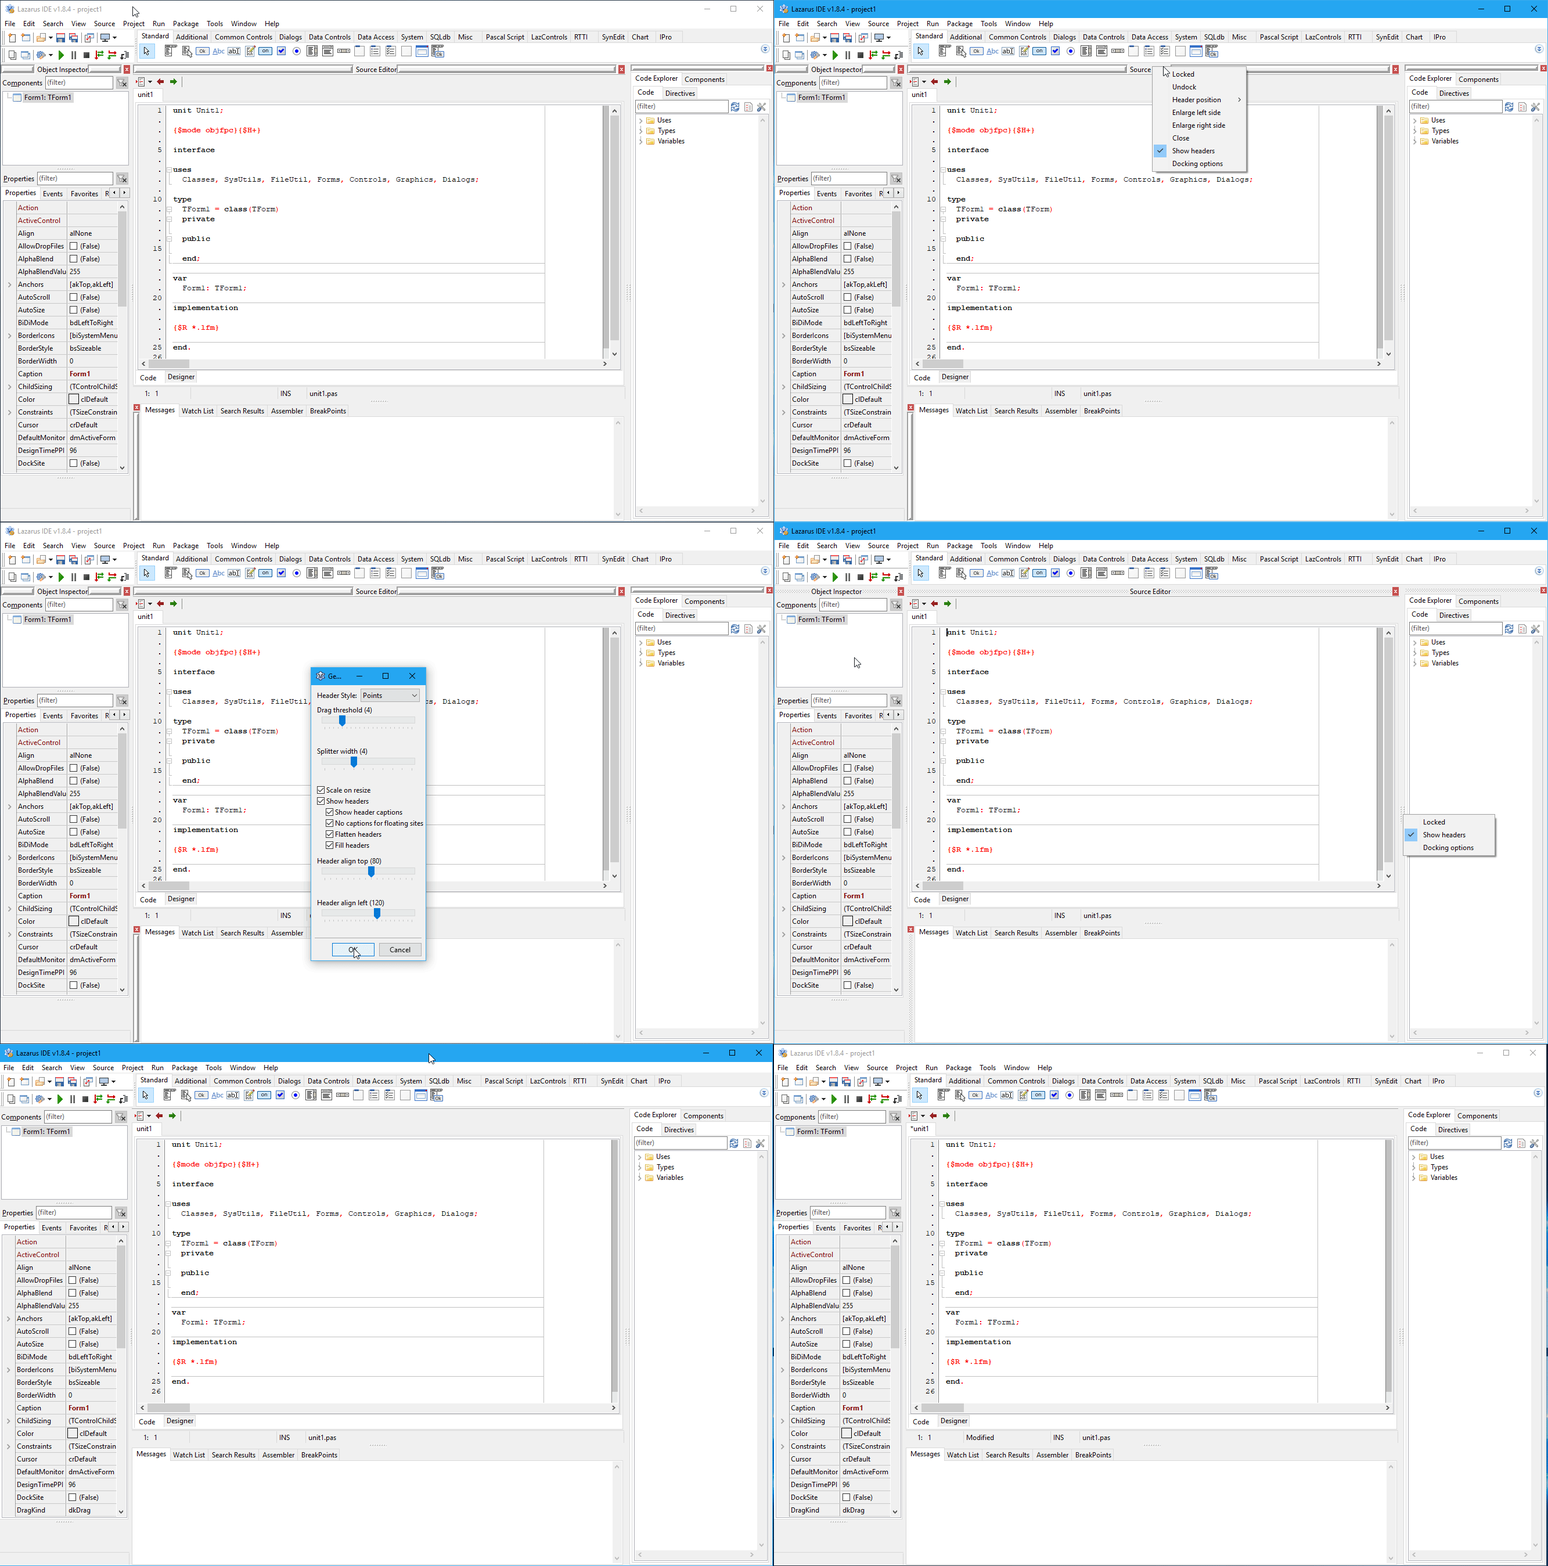
After you installed the package and restarted the IDE, the IDE starts docked with a default layout. You can change the layout: You can drag and dock the headers (the bars at the top or left of each window), resize via splitters or window borders. You can right-click on the headers to for other options, for example, to change the look of the headers, as shown farther down below:
You can save the layout via the menu item Tools / Save window layout as default. This saves to ~/.lazarus/anchordocklayout.xml and restores it when the IDE starts up.
You can also save the layout to a file and load them later.
Since Lazarus 1.1 you can pass a command line parameter
./lazarus --anchordocklayout=<filename>
Here is an example of what a docked IDE looks like on Windows 7:

Here is an example of what a docked IDE (AnchorDockingDsgn and sparta_DockedFormEditor package) looks like on Windows 10:
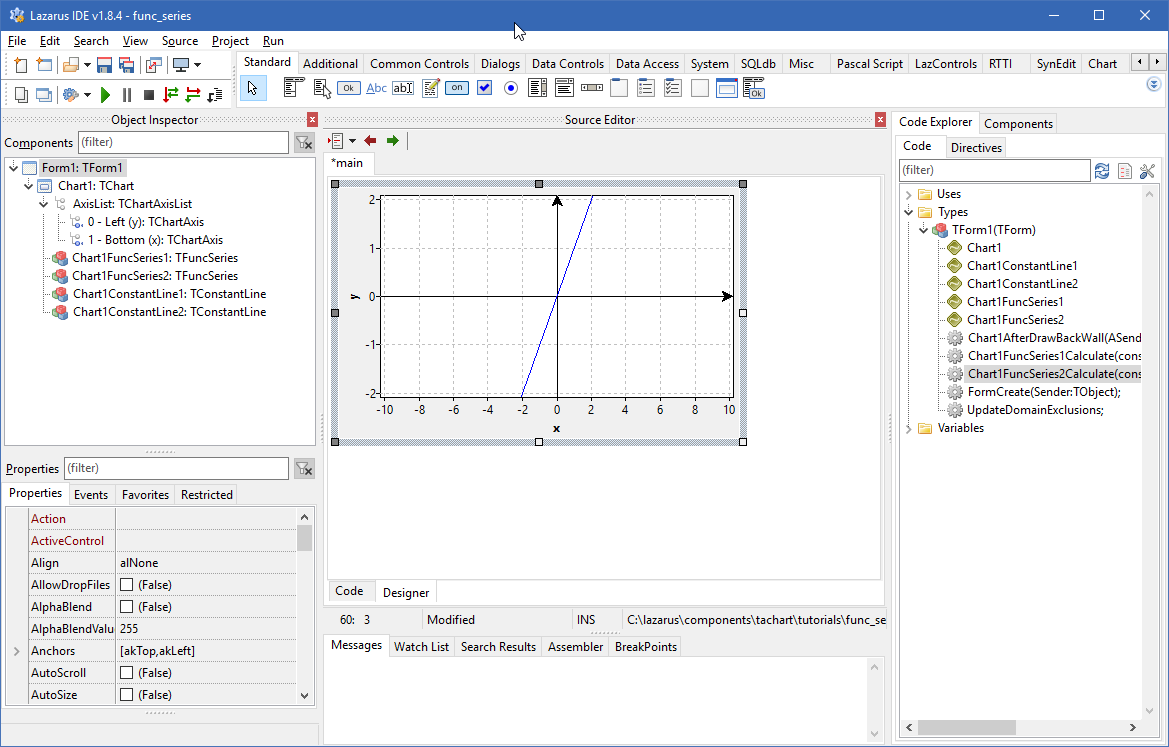
The look (like the headers) can be further tweaked by right-clicking on them.
Why use Anchors instead of Align?
Anchors allow to create any possible rectangular layout. Align is limited. Align with Panels can theoretically create a lot of layouts, but still not all. And some operations like enlarge/shrink are more complicated using Align/Panels than using Anchors. Align works good for a few forms, but the more forms are docked, the more the disadvantages of Align become visible.
Layouts that can be created with Align
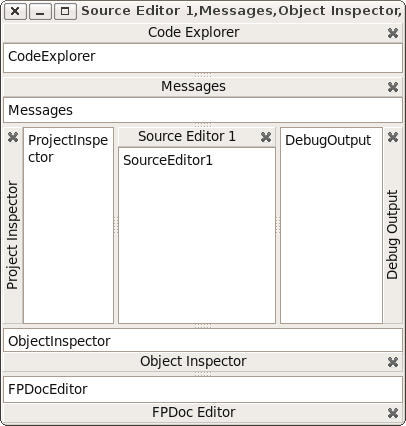
Align can only create the following layouts:
The alTop controls are always at the top, filling the whole horizontal width. That's because the LCL first aligns all controls with alTop, then all alBottom, then alLeft, then alRight and finally alClient.
Layouts that can be created with Align and Panels
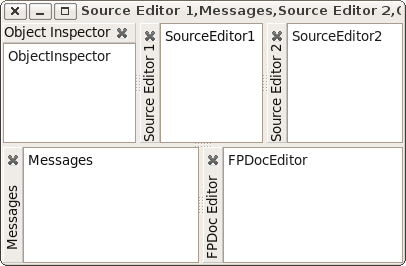
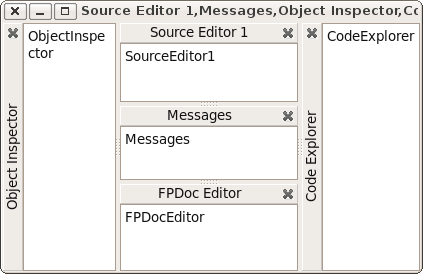
It is possible to nest Align layouts by using hidden panels. Then any layout that can be recursively splitted in halves can be created. Then you can create for example:
This requires only one hidden panel.
Changing Layouts
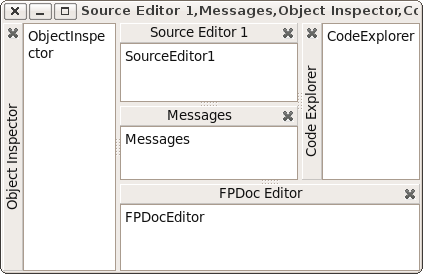
Now the user wants to enlarge the FPDocEditor horizontally (and shrink CodeExplorer). With the AnchorDocking you can simply right click on the FPDocEditor header and click Enlarge right side.
Other docking engines need at least 2 panels. One for SrcEditor,Messages,FPDocEdit,CodeExpl and one for SrcEdit and Messages. Most docking layouters do not even provide a simple way to change the layout in this way. An algorithm to allow this layout change, must analyze the whole structure as if there were no panels and must reparent a lot of things. Basically the algorithm must do the same as the anchor docking algorithm, but with the extra work of translating the layout into Align plus hidden panels.
Layouts that are impossible with Align and Panels
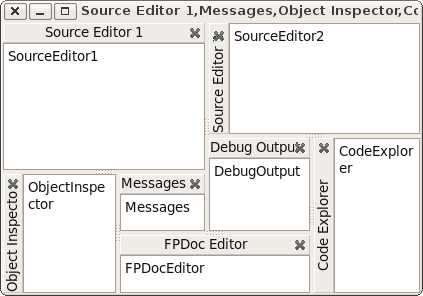
Now the user wants to enlarge SourceEditor1 horizontally (and shrink ObjectInspector):
This layout is impossible with Align and panels, because you can not cut it in two halves. The same with
Conclusion
Align with hidden panels allows to easily create a simple docking manager that works good for a few forms. But it will always limit the user. Align is useful for row and column layouts, not for tables. Anchor docking works even for complex forms.
Old/deprecated anchor docking
Create a TLazDockingManager
DockingManager:=TLazDockingManager.Create(Self);The Self as parameter is only used as Owner. That means, when the mainform is freed, the DockingManager is freed too. You can use nil and free the DockingManager yourself.
Optional: Loading a configuration
You can load the user configuration from disk.
  Config:=TXMLConfigStorage.Create('config.xml',true);
  DockingManager.LoadFromConfig(Config);
  Config.Free;
This loads the file config.xml. The config can be created by the SaveToConfig function. See below.
Make a form/control dockable
Create a TLazControlDocker for each form/control that should be dockable
 ControlDocker1:=TLazControlDocker.Create(Self);
 ControlDocker1.Name:='DockerForm1';
 ControlDocker1.Manager:=DockingManager;
Optional: Saving the user configuration to disk
When the program is closed you can save the user configuration to disk
 Config:=TXMLConfigStorage.Create('config.xml',true);
 DockingManager.SaveToConfig(Config);
 Config.WriteToDisk;
 Config.Free;
Links
- Anchor Docking: A Step by step example
- Docking in general
- EasyDockingManager - an alternative docking implementation with a simpler layout engine and less options.


