Difference between revisions of "Code Signing for macOS/ru"
| Line 62: | Line 62: | ||
</gallery> | </gallery> | ||
| − | == | + | == Обзор == |
| − | + | Основные шаги для подписания приложения, написанного с помощью Lazarus и/или Free Pascal: | |
| − | # | + | # Получите Developer ID (идентификатора разработчика) разработчика от Apple и установите его в цепочку ключей вашей системы. |
| − | # | + | # Обратите внимание на буквенно-цифровой ключ вашего Developer ID (идентификатора разработчика) (он же TeamIdentifier). |
| − | # | + | # Подпишите свое приложение командой '''codesign''. |
| − | # | + | # Подпишите свой установочный пакет с помощью команды ''productsign''. |
| − | + | '''Невозможно''' использовать сертификаты от сторонних поставщиков, таких как Comodo, потому что они не пройдут Gatekeeper, для которого требуется сертификат, выданный разработчиком Apple. Также обратите внимание, что вы не можете подписывать приложения Windows с помощью сертификата разработчика Apple (на этот раз вам нужен сторонний сертификат Comodo и т.д.). | |
| − | + | Приложение macOS, распространяемое за пределами Mac App Store, обычно имеет 3–4 отдельных уровня подписи: | |
| − | * | + | * Само приложение будет иметь подписанный код с использованием сертификата приложения. |
| − | * | + | * Если у приложения есть установщик, файл пакета будет подписан сертификатом установщика. |
| − | * | + | * Образ диска, содержащий приложение или установщик, будет подписан сертификатом приложения. |
| − | * | + | * Образ диска будет [[Notarization_for_macOS_10.14.5%2B/ru|нотариально заверен]], а затем удостоверение, сгенерированное нотариальной службой, будет к нему [[Notarization_for_macOS_10.14.5%2B/ru#.D0.A8.D0.B0.D0.B3_6_-_.D0.9F.D1.80.D0.B8.D0.BA.D1.80.D0.B5.D0.BF.D0.BB.D0.B5.D0.BD.D0.B8.D0.B5_.D1.83.D0.B4.D0.BE.D1.81.D1.82.D0.BE.D0.B2.D0.B5.D1.80.D0.B5.D0.BD.D0.B8.D1.8F_.D0.BA_.D0.BE.D0.B1.D1.80.D0.B0.D0.B7.D1.83_.D0.B4.D0.B8.D1.81.D0.BA.D0.B0|прикреплено]]. |
== Gatekeeper requirements == | == Gatekeeper requirements == | ||
Revision as of 22:27, 27 February 2022

Эта статья относится только к macOS.
См. также: Multiplatform Programming Guide
Эта статья относится только к iOS.
См. также: Multiplatform Programming Guide
│
English (en) │
русский (ru) │
Предисловие
Code signing (подписание кода) обеспечивает как подлинность, так и целостность исполняемых файлов, загруженных из глобальных сетей, таких как Интернет. Приведенное ниже обсуждение в равной степени относится как к распространению в App Store, так и к распространению вне App Store.
Подписание кода требуется в iOS. В macOS и более поздних версиях он позволяет открывать программы, загруженные из Интернета, без каких-либо предупреждений (если они подписаны сертификатом, выданным Apple), и требуется при использовании определенных функций (например, API-интерфейсы, используемые отладчиками; обратите внимание, что в этом случае достаточно самозаверяющего сертификата, помеченного как «доверенный»). Эту функцию выполняет программное обеспечение Apple Gatekeeper.
Процесс развития Gatekeeper
Gatekeeper (Привратник), впервые представленный в Mountain Lion (10.8, 2012 г.), представляет собой функцию безопасности Mac, предназначенную для защиты компьютеров Apple от вредоносного программного обеспечения. Привратник проверяет приложения по списку приложений, которые Apple одобрила для своего App Store или код которых был подписан разработчиками, имеющими сертификаты, выпущенные Apple, если приложение не предлагается через магазин приложений. Он не выполняет никаких проверок безопасности сам по себе, за исключением того, что приложение не было изменено с момента его подписания разработчиком, и не дает никаких гарантий в отношении разработчика, кроме того, что он платит Apple 99 долларов США в год (он же "Идентифицированный разработчик").
Первоначальные параметры Gatekeeper, представленные в Mountain Lion, доступ к которым можно получить из настроек "Безопасность" "Конфиденциальность" > "Общее", были следующими:
- App Store
- App Store и признанные разработчики
- Anywhere (кто угодно)
Выбрав опцию Anywhere, пользователь когда-то мог полностью отключить Gatekeeper. Настройка по умолчанию разрешала запуск приложений только из App Store или от разработчика, подписавшего свое приложение с помощью сертификата, выданного Apple.
Когда в 2016 году была выпущена macOS Sierra, Apple внесла несколько важных изменений в Gatekeeper и ограничила параметры Gatekeeper следующим образом:
- App Store
- App Store и признанные разработчики
Однако вы можете восстановить отсутствующую опцию Gatekeeper Anywhere в настройках, открыв терминал и выполнив команду:
$ sudo spctl --master-disable
которая по-прежнему работает до macOS Catalina включительно. Лучшей, как и более безопасной, альтернативой было вместо этого обойти Gatekeeper, открыв приложение из контекстного меню по клику правой клавиши мыши с зажатой Ctrl. Это по-прежнему вызывало бы диалоговое окно предупреждения, но теперь оно бы содержало кнопку Открыть для успешного запуска приложения. Этот метод обхода Gatekeeper по-прежнему работает в macOS Catalina, за исключением того, что в Catalina вам нужно запустить приложение во второй раз, удерживая Ctrl или щелкнув правой кнопкой мыши, чтобы успешно обойти Gatekeeper - при первом запуске приложения Gatekeeper не может быть обойден независимо от того, удерживаете ли вы Ctrl или щелкаете правой кнопкой мыши или нет.
Big Sur и более поздние версии ОС процессорах Apple M1 ARM64
И тогда Apple изменила правила игры.
Когда Big Sur запущена на процессоре Apple M1 (ARM64), весь нативный код ARM64 должен быть подписан, иначе операционная система не позволит его выполнение; и пользователи не могут обойти это новое требование Gatekeeper. Разработчики могут обойти его, выполнив следующую команду в окне терминала Applications > Utilities > Terminal:
spctl developer-mode enable-terminal
и затем перейдя в System Preferences > Security & Privacy > Privacy, прокрутив вниз до записи "Developer Tools" (Инструменты разработчика), выполнив аутентификацию и установив флажок рядом с Terminal.
Intel executables being run under Big Sur on an Apple M1 processor via Rosetta 2 can still be run even though they are unsigned using the control-click or right-click method to bypass Gatekeeper. Исполняемые файлы Intel, запущенные под Big Sur на процессоре Apple M1 через Rosetta 2, по-прежнему могут быть запущены, даже если они не подписаны, кликом ЛКМ с зажатой Ctrl или кликом ПКМ мыши для обхода Gatekeeper.
Больше подробностей см.: Big Sur изменения для разработчиков: Подписывание кода - Intel в сравнении с M1.
Диалоговые окна Gatekeeper
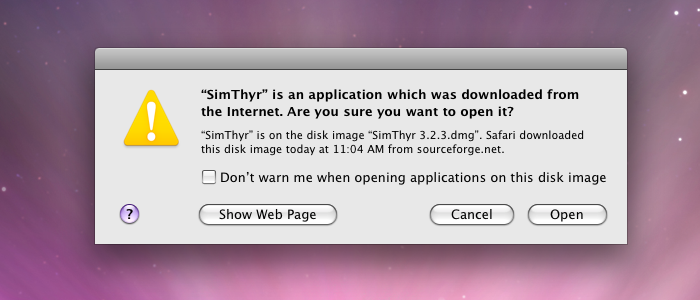
Простое предупреждение после открытия загруженного приложения в Leopard.
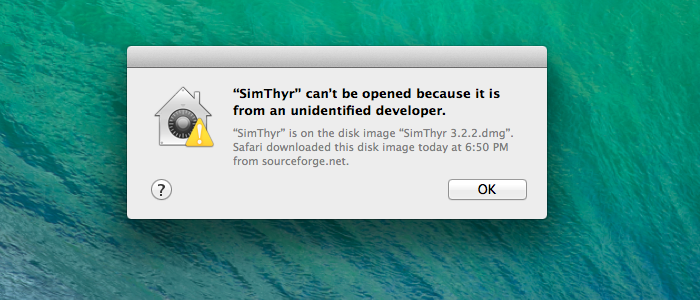
Настройки по умолчанию более строгие в Mavericks, где они предотвращают запуск загруженных неподписанных приложений с помощью двойного щелчка мыши.

Если приложение запускается через контекстное меню в Mavericks, отображается простое предупреждение, аналогичное тому, что было в более ранних версиях.

Gatekeeper показывает упрощенное предупреждение, если приложение с подписанным кодом было загружено и запущено в первый раз. При последующих запусках программа запускается сразу.
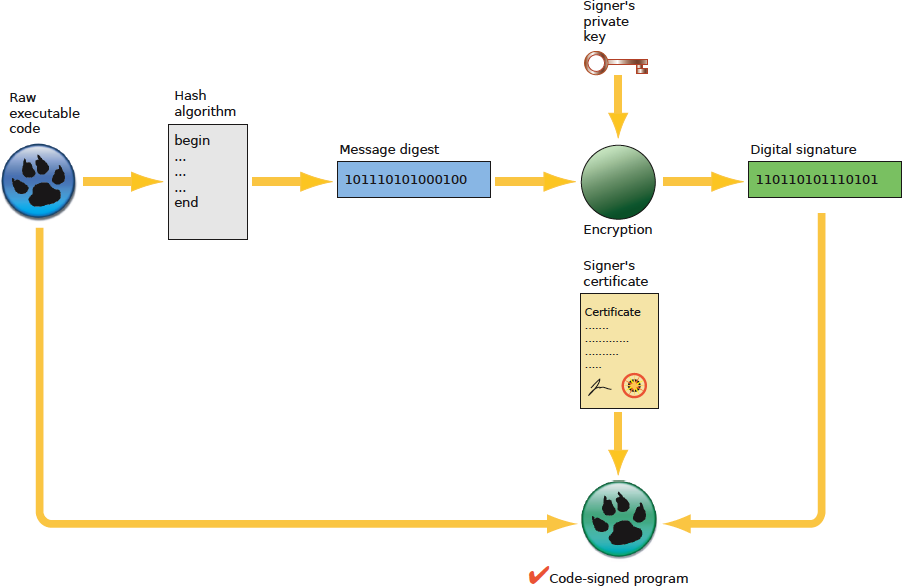
Схема подписания кода программы, написанной с помощью Lazarus и Free Pascal


Обзор
Основные шаги для подписания приложения, написанного с помощью Lazarus и/или Free Pascal:
- Получите Developer ID (идентификатора разработчика) разработчика от Apple и установите его в цепочку ключей вашей системы.
- Обратите внимание на буквенно-цифровой ключ вашего Developer ID (идентификатора разработчика) (он же TeamIdentifier).
- Подпишите свое приложение командой 'codesign.
- Подпишите свой установочный пакет с помощью команды productsign.
Невозможно использовать сертификаты от сторонних поставщиков, таких как Comodo, потому что они не пройдут Gatekeeper, для которого требуется сертификат, выданный разработчиком Apple. Также обратите внимание, что вы не можете подписывать приложения Windows с помощью сертификата разработчика Apple (на этот раз вам нужен сторонний сертификат Comodo и т.д.).
Приложение macOS, распространяемое за пределами Mac App Store, обычно имеет 3–4 отдельных уровня подписи:
- Само приложение будет иметь подписанный код с использованием сертификата приложения.
- Если у приложения есть установщик, файл пакета будет подписан сертификатом установщика.
- Образ диска, содержащий приложение или установщик, будет подписан сертификатом приложения.
- Образ диска будет нотариально заверен, а затем удостоверение, сгенерированное нотариальной службой, будет к нему прикреплено.
Gatekeeper requirements
- Your application should be standalone with no unacceptable external dependencies. The only acceptable external dependencies are system libraries. All other dependencies should be copied to your MyApp.app bundle folder. Gatekeeper rejects any application that has non-system external dependencies.
- All binary files inside MyApp.app should be code signed.
- All binary files should be located in standard locations inside the MyApp.app bundle folder. Refer to the table below.
| Location | Description |
|---|---|
| Contents | Top content directory of the bundle |
| Contents/MacOS | Main executable; helper apps and tools |
| Contents/Frameworks | Frameworks, dylibs |
| Contents/PlugIns | Plug-ins, both loadable and extensions |
| Contents/XPCServices | XPC services |
| Contents/Helpers | Helper apps and tools |
| Contents/Library/Automator | Automator actions |
| Contents/Library/Spotlight | Spotlight importers |
| Contents/Library/LoginItems | Installable login items |
| Contents/Library/LaunchServices | Privileged helper tools installed by the ServiceManagement framework |
Note: No non-binary files should ever be located in the folders specified in the table above.
Using codesign to sign your application
1. Sign your application with:
codesign -f -o runtime --timestamp -s "Developer ID Application: YOUR NAME (TEAM_ID)" /path/to/bundle.app
2. Display basic information about the result of the signing process:
codesign -dv -r- /path/to/bundle.app
If your application was successfully signed this command will return information similar to this:
Executable=/Users/apple/Desktop/your.app/Contents/MacOS/yourappname
Identifier=org.yourdomain.yourappname
Format=app bundle with Mach-O thin (x86_64)
CodeDirectory v=20500 size=101470 flags=0x10000(runtime) hashes=3164+3 location=embedded
Signature size=9063
Timestamp=7 Dec 2019 at 18:36:08
Info.plist entries=16
TeamIdentifier=<10 alpha numeric digits>
Runtime Version=10.14.0
Sealed Resources version=2 rules=13 files=45
designated => identifier "org.yourdomain.yourappname" and anchor apple generic and certificate 1[field.1.2.840.113635.100.6.2.6] /* exists */ and certificate leaf[field.1.2.840.113635.100.6.1.13] /* exists */ and certificate leaf[subject.OU] = <10 alpha numeric digits>
3. Verify your signature:
codesign -vv /path/to/bundle.app
If your app was successfully signed this command will return the strings "valid on disk" and "satisfies its Designated Requirement", respectively, after the path to your application.
Using productsign to sign your pkg installer
1. Sign your installer pkg file with:
productsign --timestamp --sign "Developer ID Installer: YOUR NAME (TEAM_ID)" /path/to/unsigned.pkg /path/to/signed.pkg
2. Verify your signature with:
spctl -vv --assess --type install /path/to/your.pkg
which should yield information similar to this if it was successful:
your.pkg: accepted
source=Developer ID
origin=Developer ID Installer: YOUR NAME (<10 alpha numeric digits>)
Using codesign to sign your disk image
Beginning in macOS 10.11.5, you can apply a code signature to read-only, compressed disk images that you use to distribute content. In this case you do not need to separately sign your application.
1. Sign your disk image with:
codesign -f -o runtime --timestamp -s "Developer ID Application: YOUR NAME (TEAM_ID)" /path/to/YourImage.dmg
2. Verify your signature with:
spctl -a -t open --context context:primary-signature -vv /path/to/YourImage.dmg
which should yield information similar to this if it was successful:
YourImage.dmg: accepted
source=Developer ID
origin=Developer ID Application: YOUR NAME (<10 alpha numeric digits>)
After 3 February 2020 Apple is fully enforcing notarization for macOS 10.14.5+ (Mojave) with the consequence that the above verification of your disk image will now return information similar to this:
YourImage.dmg: rejected
source=Unnotarized Developer ID
origin=Developer ID Application: YOUR NAME (<10 alpha numeric digits>)
See Notarization for macOS 10.14.5+ for more details.
Updating a signed file
Whenever you update a signed file, create a new file. Do not copy a new signed file over an old signed file.
Specifically, the code signing information (code directory hash) is hung off the vnode within the kernel, and modifying the file behind that cache will cause problems. You need a new vnode, which means a new file, that is, a new inode. Documented in WWDC 2019 Session 703 All About Notarization - see slide 65 (PDF).
Ad hoc signing
This is especially important on ARM64 M1 Apple processors which require all native code to be validly signed (if only ad hoc) or the operating system will not execute it, instead killing it on launch. To ad hoc sign an application:
codesign --force --deep -s - lazarus.app
or to ad hoc sign an executable file:
codesign --force -s - lazarus
A single dash/hyphen on its own for the identity makes it an ad hoc signature with no certificate.
You can check the validity of an ad hoc signed executable with:
codesign -dv -r- lazarus
which should produce output similar to the below:
Executable=/Users/trev/lazarus-src/lazarus
Identifier=lazarus
Format=Mach-O thin (arm64)
CodeDirectory v=20400 size=336137 flags=0x2(adhoc) hashes=10498+2 location=embedded
Signature=adhoc
Info.plist=not bound
TeamIdentifier=not set
Sealed Resources=none
# designated => cdhash H"2e6f474452344d6fa42feee3db14a05c14d595a3"
In cases where you have compiled the executable yourself, the macOS linker will ad hoc sign the executable for you in which case you need do nothing. You can check the validity with the command above in which case the CodeDirectory output line will indicate that the linker signed the executable with an ad hoc signature as follows::
CodeDirectory v=20400 size=336032 flags=0x20002(adhoc,linker-signed) hashes=10498+0 location=embedded
Code signing an x86_64 binary on an aarch64 machine
macOS’s code signing architecture supports two different hash formats:
- sha1, the original hash format, which is now deprecated
- sha256, the new format, support for which was added in macOS 10.11
codesign should choose the signing format based on the deployment target:
- If your deployment target is 10.11 or later, you get sha256.
- If your deployment target is earlier, you get both sha1 and sha256.
A problem crops up because, when building for both Intel and Apple Silicon, your deployment targets are different. You might set the deployment target to 10.9 but, on Apple Silicon, that’s raised to the minimum Apple Silicon system, 11.0. So, which deployment target does it choose?
Well, the full answer to that is complex but the executive summary is that it chooses the deployment target of the current architecture, that is, Intel if you’re building on Intel and Apple Silicon if you’re building on Apple Silicon.
The upshot is that you have problems if your deployment target is less than 10.11 and you sign on Apple Silicon. When you run on, say, macOS 10.10, the system looks for a sha1 hash, doesn’t find it, and complains.
The workaround is to supply the --digest-algorithm=sha1,sha256 argument to codesign which overrides the hash choice logic in codesign and causes it to include both hashes.
How to install certificates on a second computer
There are two ways to do this:
- using the Keychain Access application; and
- using Xcode.
Using the Keychain Access application
- On the first computer which has the certificates, open the Keychain Access application and create a new keychain. Now select your existing login keychain, and then My Certificates. Your certificates should be shown on the right. There should be a disclosure arrow on the left side, and selecting that should reveal your private key. Select each certificate, and copy and paste (do not drag or you'll remove it from your login keychain) it into your new keychain.
- Copy the newly created keychain from your first computer to your second computer, open it with the Keychain Access application and copy/paste/drag the certificate to your second computer's login keychain.
Using Xcode
- On the first computer which has the certificates, open Xcode and go to Preferences > Accounts, select your account, select the gear symbol in the bottom left, choose Export Apple ID and Code Signing Assets, and then save the file.
- Copy the developer profile file you saved on your first computer to the second computer, open Xcode, go to Preferences > Accounts, select your account, select the gear symbol in the bottom left, and then choose Import Apple ID and Code Signing Assets.
How to check what certificates are installed
Once you have created or imported the certificates on your computer, you can check for their presence by opening an Applications > Utilities > Terminal and executing the following command:
$ security find-identity -p basic -v
This command will list all available certificates on this computer. Make sure that you can see the presence of the Developer ID Application and Developer ID Installer certificates. If you are a member of more than one team, you may see multiple certificates for each team.
You can identify the certificates by the hexadecimal number or by the descriptive name, eg "Developer ID Application: Your Name (AB123456DE)"
The ten character alpha-numeric code at the end of your name is your Developer Team ID. If you are a member of multiple developer teams, you will have multiple certificates and the team ID will help you distinguish them.
See also
- Code signing: Intel vs Apple Silicon
- Apple Developer Certificates
- Notarization for macOS 10.14.5+
- Hardened runtime for macOS
- Sandboxing for macOS
- Signing and Notarization FAQ
- macOS Gatekeeper Debugging Tips