Daemons and Services
│
English (en) │
español (es) │
français (fr) │
polski (pl) │
português (pt) │
русский (ru) │
What are daemons, services and agents?
Unix daemons and Windows services are system-wide programs running without user interaction; macOS agents are per user programs (cf system-wide daemons) that may or may not run without user interaction. Although the nomenclature differs, their function is similar: for example www or ftp servers are called daemons under Linux and services under Windows. Because they do not interact with the user directly, they close their stdin, stdout, stderr descriptors at start.
With Free Pascal, Lazarus it is possible to write these daemons/services platform-independent via the Lazarus lazdaemon package. To avoid name conflicts with the Delphi components these classes are called 'daemons'.
Prerequisites: Install the LazDaemon package
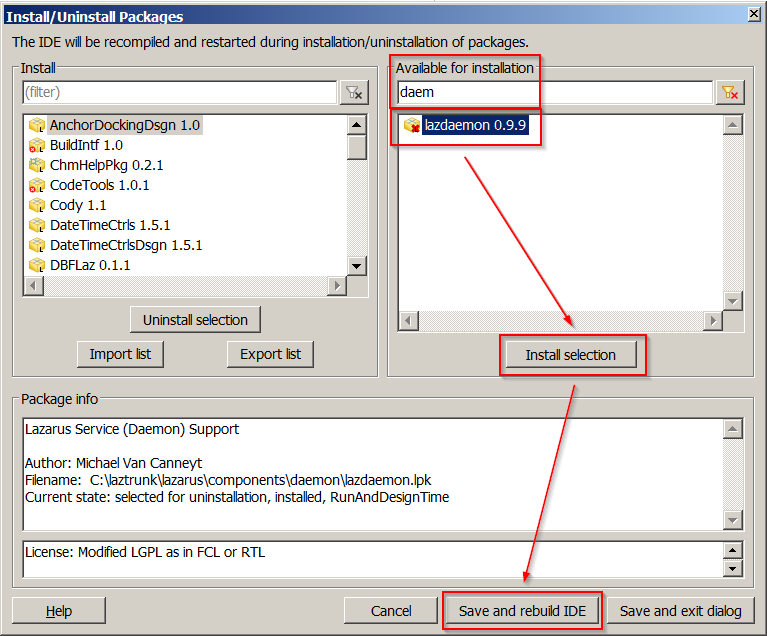
Before you can start, you must install the LazDaemon package either via "Components" - "Configure installed packages" or by installing the lpk file directly from .../lazarus/components/daemon/lazdaemon.lpk. The package installs some new components and menu items in the IDE.
Due to the way packages work in Lazarus, you need to "Save and rebuild the IDE" to install the LazDaemon package.
Creating your first Service/Daemon
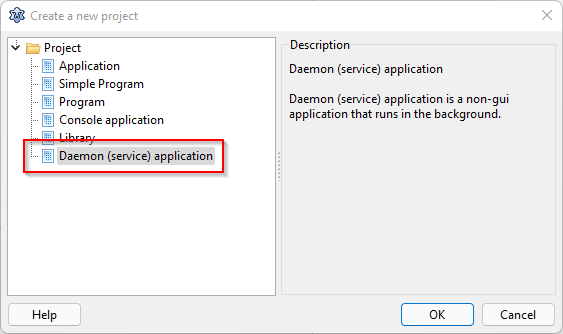
After having installed the LazDaemon package, from the "Project" - "New Project" Menu, pick "Daemon (service) application)".
This will automatically create two units, one for a TDaemon descendant ("DaemonUnit"), and one for a TDaemonMapper descendant ("DaemonMapperUnit"), and a main project file ("TestDaemon.lpr"). This is what the scaffolded files look like:
unit DaemonUnit;

{$mode objfpc}{$H+}

interface

uses
  Classes, SysUtils, DaemonApp;

type
  TDaemon1 = class(TDaemon)
  private

  public

  end;

var
  Daemon1: TDaemon1;

implementation

procedure RegisterDaemon;
begin
  RegisterDaemonClass(TDaemon1)
end;

{$R *.lfm}

initialization
  RegisterDaemon;
end.
unit DaemonMapperUnit;

{$mode objfpc}{$H+}

interface

uses
  Classes, SysUtils, DaemonApp;

type
  TDaemonMapper1 = class(TDaemonMapper)
  private

  public

  end;

var
  DaemonMapper1: TDaemonMapper1;

implementation

procedure RegisterMapper;
begin
  RegisterDaemonMapper(TDaemonMapper1)
end;

{$R *.lfm}

initialization
  RegisterMapper;
end.
Program TestDaemon;

Uses

// {$IFDEF UNIX}{$IFDEF UseCThreads}
//  CThreads,
// {$ENDIF}{$ENDIF}

{$IFDEF UNIX}
  CThreads,
{$ENDIF}
  DaemonApp, lazdaemonapp, daemonmapperunit, DaemonUnit
  { add your units here };

{$R *.res}

begin
  Application.Initialize;
  Application.Run;
end.
- The .lpr file created contains an additional {$IFDEF UseCThreads} ... {$ENDIF} clause (commented out in the above sample), which keeps daemons from running properly on Unix, unless additional measures are taken to define UseCThreads. I suggest you can safely remove the conditional entirely, like shown in the above .lpr sample.
- Both the DaemonApp and the DaemonMapper unit have support for the Lazarus Form Editor, though Daemons don't have a GUI. This way you get a familiar GUI to populate the various properties of the daemon and the mapper class. Of course, if you prefer, you can initialize all properties in code as well.
- Both the DaemonApp and the DaemonMapper unit contain a var definition (var DaemonMapper1: TDaemonMapper1; var Daemon1: TDaemon1;), those are actually never used by the running daemon, and thus remain uninitialized. If you have a closer look at how daemon applications work you'll see that the code relies solely on the types (TDaemonMapper1, TDaemon). To get at the real daemon and it's definition at runtime, use the properties of the "application" object.
The TDaemon class does mainly respond to the various service control messages sent by the OS. For the "worker" part you are supposed to create a thread of its own, see sample code below, don't try to use the execute method provided by the TDaemon class, it is not working well on Windows. The TDaemonMapper contains data structures describing the service. Both classes need to be registered, in this code sample this is done in the initialization section of each unit. The main "Application" object for a service-style application is introduced by putting a reference to DaemonApp into the uses secion of each unit. In a daemon application, "Application" provides the complete service framework including advanced features like install and uninstall support, and logging.
Populating the DaemonMapper Class
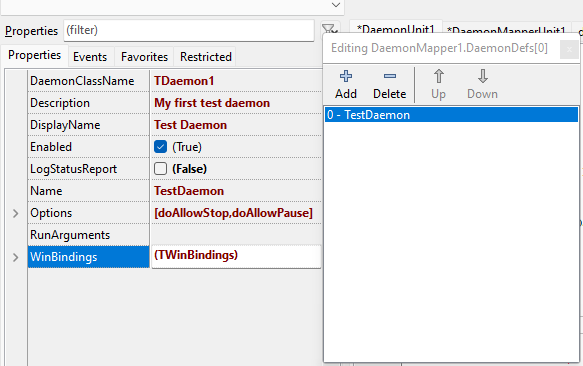
For the moment let's just fill some basic properties to get things going. Note that the DaemonClassName must exactly match with what you have defined in the DaemonClass unit.
For later use: note the WinBindings property, which lets you configure various service properties for use by the Windows Service Manager, like service start type and service user account. It doesn't have any effect on Unix. Also pay attention to the "Name" property in general, and the file names used specifically: Windows is in almost no respect case-sensitive, so you can use any case you like, but on Linux it is common use to write all service- and filenames using only lowercase characters.
That's it, the service doesn't have any "worker" code yet, nevertheless, the basic framework including the control by the operating system service manager is provided by LazDaemon and works right out of the box.
So ... how about testing what we have achieved so far? Sure, our daemon doesn't have any execute routine so far, but configuring the DaemonMapper provides all required infos for installing and uninstalling the service in the operating system, and basic starting and stopping the daemon should also work. To test, compile your application, and then you need open a command line window with elevated privileges (Windows), or make use of sudo (Linux) because normal users are by default not allowed to install Windows or Linux services.
Windows
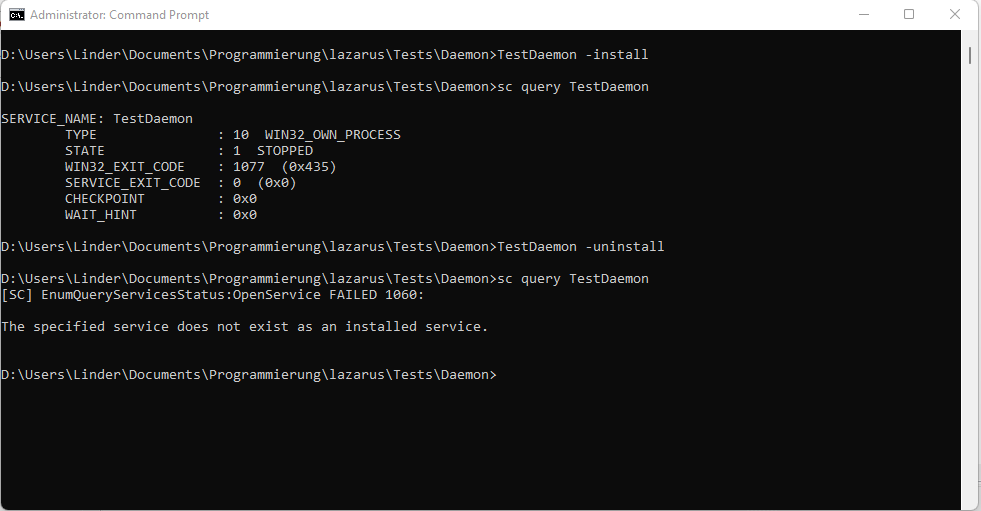
Open a terminal with elevated privileges (run as administrator), navigate to the directory where you compiled your test application into, and try the following commands:
TestDaemon -install
|
install the daemon |
sc query TestDaemon
|
check the service status, of course, our service doesn't handle any events yet, so any attempt to start it it runs into an error, but note: the service got known by sc, hence it was installed successfully. |
TestDaemon -uninstall
|
remove the daemon |
sc query TestDaemon
|
check whether the service was indeed uninstalled - should give an error saying that the service is not installed. |
Linux
Open a terminal, navigate to the directory where you compiled your test application into, and try the following commands:
sudo TestDaemon -install
|
install the daemon |
sudo systemctl status TestDaemon.service
|
check the service status, to see wether it got known to the operating system. |
sudo TestDaemon -uninstall
|
remove the daemon |
sudo systemctl query TestDaemon.service
|
check whether the service was indeed uninstalled - should give an error saying that the service is not installed. |
Writing the Daemon Methods
TDaemons support the following methods:
OnStart
|
Called when daemon should start. This method must return immediately with OK:=True. |
OnStop
|
Called when daemon should stop. This method must return immediately with OK:=True. |
OnShutDown
|
Called when daemon should be killed. This method must stop the daemon immediately and return with OK:=True. This is not triggered under Linux. Linux simply kills the daemon. |
OnPause
|
Called when daemon should pause. This method must return immediately with OK:=True. Under Linux this is not triggered, instead the kernel stops the whole daemon on STOP. |
OnContinue
|
Called when daemon should continue after a pause. This method must return immediately with OK:=True. Under Linux this is not triggered. |
BeforeInstall
|
Called before service installation. |
AfterInstall
|
Called after (successful) service installation. |
BeforeUninstall
|
Called before service de-installation. |
AfterUninstall
|
Called after successful service de-installation. |
Sample Code
The following code snippets show all the major event handlers necessary to successfully implement a simple daemon. They have been tested on Windows 7/10/11 and several Linux distros (Debian 10.8 and Ubuntu 20.04.3).
The complete project including all the source- and resource files can be downloaded from [Tbd: provide a Git repo, tbd till end of 2/2022]
Some handy helper functions have been offloaded into separate units, so they do not obfuscate the daemon core code:
- FileLoggerUnit: a thread safe log to file helper. It is required because the contol signal receiver included in the TDaemon application and the service's working code need to multitask, otherwise the daemon will not respond to control signals while the service worker code runs. So in any daemon there are at least two tasks involved, which could create a clash when accessing the log file simultaneously. See the Lazarus wiki Multithreaded Application Tutorial for details about how to serialize accesses to a single resource by using a TRTLCriticalSection to make the code thread-safe.
- DaemonWorkerThread: a TThread descendant class to hold the daemon "worker" code. See the Lazarus wiki Multithreaded Application Tutorial for details about the TThread.Execute method containing the inevitable "while not terminated" loop. There is nothing special with a worker thread initiated by a TDaemon, it's just a simple thread like any other.
- DaemonSystemdInstallerUnit: a unit which tries to provide support for the -install and -uninstall command line parameters supported on Windows for the Linux OS. Adds systemd/systemctl support by writing an appropriate control file to /lib/systemd/system.
Note that the quite simple FileLoggerUnit code does always write the log into the program directory, please make sure the daemon has write access permissions. The code writes one file per day, the filename contains the creation date. The code is also very I/O intensive, if you need a better logger, consider using the LazLogger unit.
// --------------------------------
// Installation and De-Installation
// --------------------------------

procedure TDaemon1.DataModuleAfterInstall(Sender: TCustomDaemon);

  var
  isInstalled: boolean = True;
  FilePath: string;

begin
  LogToFile('Daemon installing');
  {$IFDEF UNIX}
  FilePath := GetSystemdControlFilePath(self.Name);
  isInstalled := CreateSystemdControlFile(self, FilePath);
  if not isInstalled then
    LogToFile('Error creating systemd control file: ' + FilePath);
  {$ENDIF}
  if isInstalled then
    LogToFile('Daemon installed');
end;

procedure TDaemon1.DataModuleBeforeUnInstall(Sender: TCustomDaemon);
  var
    isUnInstalled: boolean = True;
    FilePath: string;

  begin
    LogToFile('Daemon uninstalling');
    {$IFDEF UNIX}
    FilePath := GetSystemdControlFilePath(self.Name);
    isUnInstalled := RemoveSystemdControlFile(FilePath);
    if not isUninstalled then
      LogToFile('Error removing systemd control file: ' + FilePath);
    {$ENDIF}
    if isUninstalled then
      LogToFile('Daemon uninstalled');
  end;
These Unix-only handlers utilize the routines in DaemonSystemdInstallerUnit to write a systemd control file (.service file) for our service to /lib/systemd/system, so the daemon can be controlled using the systemctl command. On uninstall, the .service file ist deleted.
For Windows these handlers are not required, because Windows service installation and uninstallation is already built into the LazDaemon code.
Note: it was intentionally not tried to adopt the WinBindings data structure found in DaemonMapper1 for use with Linux, instead the basic Linux daemon settings were hard-coded into the DaemonSystemdInstallerUnit to keep Windows and Linux apart where the operating system implementations for controlling a service is different. Feel free to read the TDaemonMapper properties used to create the deamon application, you'll find all the settings in the "Application.Definition" structure once the daemon code has initialized, and you can easily adopt some of them to parametrize the .service file.
// ---------------------
// Start and Stop signal
// ---------------------

procedure TDaemon1.DataModuleStart(Sender: TCustomDaemon; var OK: Boolean);
begin
  LogToFile(Format('Daemon received start signal, PID:%d', [GetProcessID]));
  // Create a suspended worker thread - see DaemonWorkerThread unit
  FDaemonWorkerThread := TDaemonWorkerThread.Create;
  // Parametrize it
  FDaemonWorkerThread.FreeOnTerminate := False;
  // Start the worker
  FDaemonWorkerThread.Start;
  OK := True;
end;

procedure TDaemon1.DataModuleStop(Sender: TCustomDaemon; var OK: Boolean);
begin
  LogToFile('Daemon received stop signal');
  // stop and terminate the worker
  if assigned(FDaemonWorkerThread) then
  begin
    FDaemonWorkerThread.Terminate;
    // Wait for the thread to terminate.
    FDaemonWorkerThread.WaitFor;
    FreeAndNil(FDaemonWorkerThread);
  end;
  LogToFile('Daemon stopped');
  OK := True;
end;
These handlers deal with the start and stop signals issued by the operating system. If the daemon starts, DataModuleStart fires and we spawn the "worker" thread found in the DaemonWorkerThread unit, see the TDeamonWorkerThread.Execute method to find the actual working code of our daemon. To understand the thread code, refer to the Multithreaded Application Tutorial wiki page and to the documentation of TThread.
Note: to implement the daemon worker code, one might consider to implement a handler for the "execute" method found in TDameon. This does not seem to work on Windows, TDaemon.Execute does not multitask and thus, while it executes, the daemon stops handling control messages. The daemon will appear to be hung if you try to stop it.
Done. That's all to it.
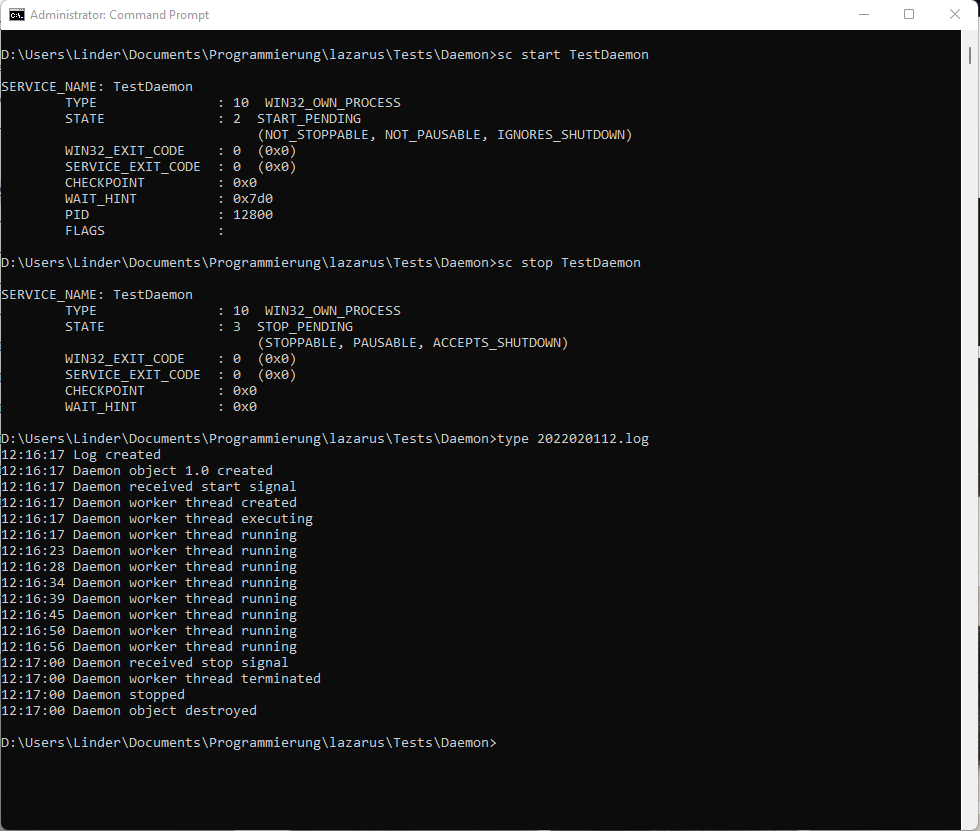
This is a sample log file showing the daemon's internals while running, it was created on Windows, but will look exactly the same on Linux.
Note that the FileLoggerUnit does always log into the program directory, please make sure the daemon has write access permissions to it.
Service Installation
Windows
You can install the service from any elevated command prompt by starting the executable with the -install parameter.
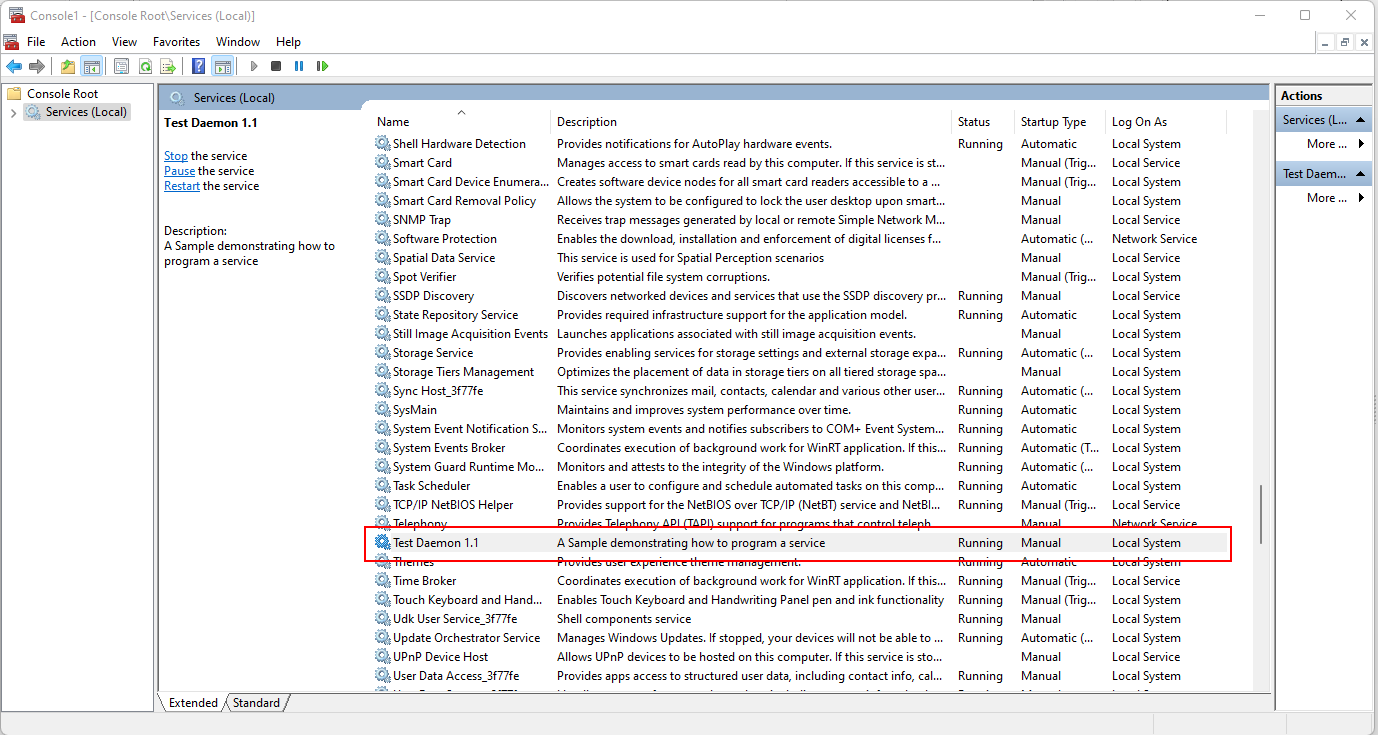
After successful installation you can control the service either command line (the command is "sc"), or by GUI using the "Services" management console. Note that most service manager properties, like autostart on boot, can be set from inside the service too, see the TTestDaemonMapper.create in the source code, and the various options provided by the TDaemonDef.WinBindings property.
The most important SC commands are:
sc start {service-name}
|
start the service |
sc query {service-name}
|
query the service state |
sc stop {service-name}
|
stop the service |
You may also use the Windows service control manager console.
Linux
Unlike for Windows, the TDaemonApp application does not have any support for an automated installation on Linux, since there is a wide variety of service control mechanisms. You can implement your own installation scripts in the install and uninstall handlers of the TCustomDaemon object, like shown for systemd support in the above code sample. If you follow that route, installation and de-installation is essentially the same like under Windows.
You can install and uninstall the service from a terminal by starting the executable with sudo and the -install or -uninstall parameter:
| install the service | sudo {service-name} -install
|
| uninstall the service | sudo {service-name} -uninstall
|
After successful installation you can control the service using the
| start the service | systemctl start ./{service-name}.service
|
| query the service state | systemctl status ./{service-name}.service
|
| stop the service | systemctl stop ./{service-name}.service
|
| configure the service to be started when the machine boots |
systemctl enable ./{service-name}.service
|
| configure the service to not be started when the machine boots |
systemctl disable ./{service-name}.service
|
Note that systemctl expects the name of the configuration file (aka "unit"), which usually is the name of the service plus the ".service" ending. Also note that under Unix, like always, everything is case-sensitive, so you may cause confusion if you name a service mixed-case like shown in the above sample.
[End of work 2/2022]
macOS
Until we do probably merge the wikis, please refer to macOS_daemons_and_agents
Debugging your Daemon
Debugging a daemon is not as straightforward as debugging an normal applicatiuon, since a daemon does not have a GUI, and its run/stop state is usually managed by the operating system. Windows and Linux require different approaches to debugging, especially to the way you initiate a debugging session. Once you have attached the debugger to the daemon and hit your first breakpoint, things work just with any other application, and you may control the debugger directly from your Lazarus GUI and the daemon source code.
(tbd 2/2022)
Known problems
(tbd 2/2022)
[Some historical contents - needs to be verified and integrated or removed]
System codepage / UTF-8
A LazDeamon project is working with default, not UTF-8, codepage. The -dDisableUTF8RTL mode has to be activated with Project Options ... -> Compiler Options -> Additions and Overrides -> Use system encoding.
Linux (only for older Debian)
Download, configure, and "Save As" - the sample script located at Web Archive: [1] (The original link is dead for a long time).
- SVC_ALIAS is the long description of your application
- SVC_FILENAME is the actual file name of your compiled service application
- SVC_DIR is the place your you copied the service application
- SVC_SERVICE_SCRIPT is the final name of the service.sh when you "Save As" the customized debian-service.sh script.
Place your script in the /etc/init.d/ folder
start the service by running "sudo service Name_Of_Your_Script start"
![]() Note: sudo has some variations, e.g.:
Note: sudo has some variations, e.g.:
sudo -s #

sudo -H #

sudo -i  #

sudo su  #
sudo sh #
In order to auto-run the service at startup you can try update-rc.d or else will need a third party tool that will do this.
Option 1
sudo update-rc.d Name_Of_Your_Script defaults
Option 2
sudo apt-get install chkconfig
sudo chkconfig --add Name_Of_Your_Script
sudo chkconfig --level 2345 Name_Of_Your_Script on
systemd (Fedora, Debian, SLES12)
Presently, linux flavors are trending away from differing daemon launching and into a unified service model.
Fedora and SuSE Enterprise Linux Server 12 use systemd and with that commands to start/stop services are the same as on debian but there are differences on the configuration files.
- From the command prompt sudo gedit
- Copy and Paste
[Unit]
Description=Long description of your application
After=network.target

[Service]
Type=simple
ExecStart=complete_path_and_file_name -r
RemainAfterExit=yes
TimeoutSec=25

[Install]
WantedBy=multi-user.target
- Edit the following values
- Description - Long Description of your service application
- ExecStart - complete-path_and_file_name is the name of your compiled service application with its complete path
- Save As Dialog
- Navigate to /lib/systemd/system/
- Name the file the name_of_your_service.service
See also
- ServiceManager Example for the Free Pascal unit for managing Windows services
- macOS daemons and agents - macOS native using launchd
- Office Automation
- Taming the daemon: PDF by Michaël Van Canneyt
- Useful discussion with small working daemon application
- Docker Containerization - Containerization as a means to create daemons / services easily
