Difference between revisions of "fpWeb Tutorial"
Edgardager (talk | contribs) |
m (Reverted edits by Edgardager (talk) to last revision by Dbannon) Tag: Rollback |
||
| Line 1: | Line 1: | ||
{{fpWeb Tutorial}} | {{fpWeb Tutorial}} | ||
| − | + | Originally based on: fcl-web tutorial (in PDF) by forum user [https://forum.lazarus.freepascal.org/index.php?action=profile;u=7523 Leledumbo]. | |
| − | == | + | == Introduction == |
| − | fpWeb | + | fpWeb is a web application framework shipped by FPC in its default distribution as a part of fcl-web |
| + | package. The framework itself is built on top of fcl-web features. The framework is built with RAD mind to | ||
| + | make a good use of componentization in producing dynamic content. A Lazarus package is provided that | ||
| + | can use the framework in a drag n drop manner for its session management and content production. | ||
| + | This tutorial will attempt to cover basic functionality of fpWeb, so that one can build common web | ||
| + | application with it. Note that this tutorial does '''NOT''' attempt to teach HTTP protocol, HTML, CSS, JavaScript | ||
| + | or database manipulation as the protocol and client languages should be the prerequisites for every web | ||
| + | application programmer and database manipulation does not differ from desktop implementation. | ||
| − | + | == Architecture (PLEASE read) == | |
| − | + | Before starting, it's necessary to know the architecture and application flow to avoid confusion when certain | |
| + | things don't work or work unexpectedly. So please spend some time reading this section. | ||
| − | + | === Application === | |
| − | + | Application here refers to the protocol that your app will implement. fpWeb will happily switch from CGI, | |
| − | + | FCGI, Apache module to embedded server, and more if fcl-web implements another one in the future. Each | |
| − | + | application is implemented in its own unit, so to switch from one application to another, with the exception | |
| + | of Apache module, one just needs to change the respective identifier in the uses clause. Currently (as of | ||
| + | 3.0.0 / 3.1.1), they are: | ||
* fpCGI -> CGI | * fpCGI -> CGI | ||
* fpFCGI -> FastCGI | * fpFCGI -> FastCGI | ||
| − | * fpApache ( | + | * fpApache (requires httpd as well) -> Apache module |
| − | * fpHttpApp -> | + | * fpHttpApp -> embedded server |
| − | * microhttpapp -> | + | * microhttpapp -> embedded server using GNU libmicrohttp library. |
| − | * fphttpsys -> | + | * fphttpsys -> Windows system support for HTTP protocol. |
| − | |||
| − | |||
| − | |||
| + | Throughout this tutorial, we will use embedded server for the sake of simplicity because you don't have to | ||
| + | deal with setting up virtual server and messing up with complicated configuration file and service | ||
| + | management. Your app will be a single binary portable web application! Another reason would be there are | ||
| + | more than just one web server application out there and each has different way to configure. It would be | ||
| + | overkill to cover all of them while their documentation already does the job. | ||
| + | Apache module is implemented as a (dynamic) library, while other protocols are normal application. Each | ||
| + | application may have specific properties (such as port) available and meaningful only to that application. | ||
| + | That's why if you look at fcl-web examples, .lpi / .lpr pairs for each protocol are put in their own directories, | ||
| + | only the web modules are shared. | ||
| − | === | + | === Web Modules === |
[[File:fpWeb-overview.png|thumb]] | [[File:fpWeb-overview.png|thumb]] | ||
| − | + | fpWeb applications consist of web modules which do the actual content production. A web module can | |
| − | + | contain web actions that can divide the functionality even more. For instance, an auth web module | |
| + | might have login and logout web actions. While an about web module might not need an action at all and | ||
| + | serves just one content. Web module is integrated with fpTemplate that can be used for producing dynamic | ||
| + | content from a template file. This is roughly similar to what PHP does, only the gap between logic and | ||
| + | presentation is forced rather than suggested. Some say that fpTemplate implements passive view while PHP | ||
| + | by default implements an active view design pattern. | ||
| − | == | + | == Installation == |
| − | + | The fpWeb package for Lazarus is not installed by default (but it's shipped), to enable fpWeb: | |
| − | # | + | # Open Lazarus and choose '''Package->Install/Uninstall Package''' |
| − | # | + | # In the Available for installation listbox, look for '''weblaz''' and press '''Install selection'''. Press '''Save and rebuild IDE''' and confirm with '''Continue''' |
| − | # | + | # Let the IDE rebuild and restart itself. If everything goes well, you should now have fpWeb tab in the component palette, as shown below: |
::[[File:fpwebtutorial_inst.png|Installed weblaz package]] | ::[[File:fpwebtutorial_inst.png|Installed weblaz package]] | ||
| − | == | + | == Specialized modules == |
| − | + | The *TFPWebModule* class (used below) is a simple example of a fpWEB module that can be used for all kinds of HTTP requests. | |
| − | + | However, fpWEB comes with some specialized modules, that have extra support for specialized tasks: | |
| − | * | + | * The '''TSimpleFileModule''' class in unit ''fpwebfile.pp'' can be used to send files. You point it to a directory, and it does the rest. |
| − | * | + | * The '''TFPHTMLModule''' class in unit ''fphtml.pp'' can be used to produce HTML. |
| − | * | + | * The '''TProxyWebModule''' class in unit ''fpwebproxy.pp'' is a ready-made forwarding proxy. |
| − | * | + | * The '''TFPWebProviderDataModule''' class in unit ''fpwebdata.pp'' serves data in JSON format that can be consumed by ExtJS stores. |
| − | * | + | * The '''TSQLDBRestModule''' class in unit ''sqldbrestmodule.pp'' implements a full REST server backed by SQLDB. See more info in [[SQLDBRestBridge]]. |
| − | * | + | * The '''TJSONRPCModule''' class in unit ''webjsonrpc.pp'' implements a JSON-RPC service. |
| − | * | + | * The '''TExtDirectModule''' class in unit ''fpextdirect.pp'' implements a Ext.Direct variant of a JSON-RPC service. |
| − | == | + | == Hello, World! == |
| − | + | Let's create a simple Web Application. As commonly taught when learning programming, "Hello, World!" will be our first app.<br /><br /> | |
| − | 1. | + | 1. Open up Lazarus and choose '''Project->New Project''' then pick '''HTTP server Application''' |
:[[File:fpwebtutorial_create_app.png|Create new HTTP server application]]<br /> | :[[File:fpwebtutorial_create_app.png|Create new HTTP server application]]<br /> | ||
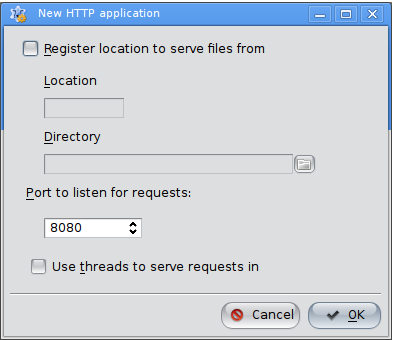
| − | 2. | + | 2. Another dialog shall appear for serving static files, port selection and multithreading. Just use default port 8080. |
| − | :<syntaxhighlight lang=pascal> | + | :<syntaxhighlight lang=pascal>You may skip the static files serving (go to tips and tricks section if you want to know it more).</syntaxhighlight> |
: [[Image:fpwebtutorial_port_selection.PNG|Static files, port selection and multithreading options]] | : [[Image:fpwebtutorial_port_selection.PNG|Static files, port selection and multithreading options]] | ||
<br /> | <br /> | ||
| − | :''' | + | :'''IMPORTANT!:''' |
| − | : | + | :If you choose to use threads on *nix, don't forget to add cthreads as the first unit in the .lpr's uses clause, otherwise a RTE 232 will be generated. When running from console, a message shall appear: |
| − | :<syntaxhighlight lang=pascal> | + | :<syntaxhighlight lang=pascal>This binary has no thread support compiled in. Recompile the application with a thread-driver in the program uses clause before other units using thread.</syntaxhighlight> |
<br /> | <br /> | ||
| − | 3. | + | 3. Since Jan 14, 2017 (or FPC 3.0.4), you may need to open the .lpr and add the following line in the main body if it's not already there: |
:<syntaxhighlight lang=pascal>Application.LegacyRouting := true;</syntaxhighlight> | :<syntaxhighlight lang=pascal>Application.LegacyRouting := true;</syntaxhighlight> | ||
| − | : | + | :reason will be explained in chapter [[#Routing]]. |
<br /> | <br /> | ||
| − | 4. | + | 4. Whatever you choose, pick "OK" and you'll be presented in the default one module fpWeb app. <br /> |
| − | 5. | + | 5. Focus the module and move to '''Object Inspector'''. Feel free to rename the module if you wish.<br /> |
| − | 6. | + | 6. Choose '''Events''' tab and click the button at the right of the second column of the '''OnRequest''' row to create the event handler. |
:[[File:fpwebtutorial_on_request.png|Creating web module's OnRequest handler in the object inspector]]<br /> | :[[File:fpwebtutorial_on_request.png|Creating web module's OnRequest handler in the object inspector]]<br /> | ||
| − | : | + | :You will be redirected to the source editor with the following code: |
:<syntaxhighlight lang=pascal>procedure TFPWebModule1.DataModuleRequest(Sender: TObject; ARequest: TRequest; | :<syntaxhighlight lang=pascal>procedure TFPWebModule1.DataModuleRequest(Sender: TObject; ARequest: TRequest; | ||
AResponse: TResponse; var Handled: Boolean); | AResponse: TResponse; var Handled: Boolean); | ||
| Line 90: | Line 111: | ||
end;</syntaxhighlight> | end;</syntaxhighlight> | ||
| − | : | + | :Fill in the event with: |
:<syntaxhighlight lang=pascal>procedure TFPWebModule1.DataModuleRequest(Sender: TObject; ARequest: TRequest; | :<syntaxhighlight lang=pascal>procedure TFPWebModule1.DataModuleRequest(Sender: TObject; ARequest: TRequest; | ||
AResponse: TResponse; var Handled: Boolean); | AResponse: TResponse; var Handled: Boolean); | ||
begin | begin | ||
| − | AResponse.Content := ' | + | AResponse.Content := 'Hello, World!'; |
Handled := true; | Handled := true; | ||
end;</syntaxhighlight><br /> | end;</syntaxhighlight><br /> | ||
| − | 7. | + | 7. Then run your app (or press F9).<br /> |
| − | 8. | + | 8. Open your browser and type: |
: http://localhost:8080/ <br /> | : http://localhost:8080/ <br /> | ||
| − | 9. | + | 9. You should see "Hello, World!" displayed.<br /> |
<br /> | <br /> | ||
| − | + | If it doesn't, check below: | |
| − | * | + | * The framework does a lot of exception handling and the IDE's debugger might catch them and interrupts your app. It's OK to add most of the exceptions to the ignore list so you can concentrate more on your app flow. Keep skipping and continue until no more dialog appears and the browser shows the output. |
| − | * '''Handled := true''' | + | * '''Handled := true''' is the way we tell the framework that the request has been handled. Not setting it (or setting it to '''false''') will show error page instead. For now, this doesn't affect the request flow yet, but it will be later on. So keep it that way until the time comes to further make a good use of it. |
| − | * | + | * other track: test without a firewall loaded in RAM (as an application, as a service or deamon, or as both). |
| + | == Reading GET & POST data == | ||
| − | + | A dynamic content is likely to be triggered from user input, either through forms, providing values in the | |
| + | URL, etc. Those data are sent along the request, which is represented in the method as '''ARequest''' | ||
| + | parameter of type '''TRequest'''. | ||
| − | + | === Reading GET === | |
| − | + | GET data is provided as '''ARequest.QueryFields''' , which is a '''TStrings''' descendant. In short, whatever you | |
| + | usually do with TStrings, is applicable here such as accessing the data in a map style through the '''Values''' | ||
| + | property. | ||
| − | + | Reusing above code, replace the method body with: | |
| − | |||
<syntaxhighlight lang=pascal>procedure TFPWebModule1.DataModuleRequest(Sender: TObject; ARequest: TRequest; | <syntaxhighlight lang=pascal>procedure TFPWebModule1.DataModuleRequest(Sender: TObject; ARequest: TRequest; | ||
AResponse: TResponse; var Handled: Boolean); | AResponse: TResponse; var Handled: Boolean); | ||
| Line 129: | Line 154: | ||
LName: String; | LName: String; | ||
begin | begin | ||
| − | LName := ARequest.QueryFields.Values['Name']; | + | LName := ARequest.QueryFields.Values['Name']; |
if LName = EmptyStr then | if LName = EmptyStr then | ||
| − | with AResponse.Contents do begin | + | with AResponse.Contents do |
| − | Add('<form action=" | + | begin |
| − | Add('<label for="name"> | + | Add('<form action="' + ARequest.URI + '" method="GET"'); |
| − | Add('<input type="text" name="name" id="name" />'); | + | Add('<label for="name">Please tell me your name:</label>'); |
| + | Add('<input type="text" name="name" id="name" />'); | ||
Add('<input type="submit" value="Send" />'); | Add('<input type="submit" value="Send" />'); | ||
Add('</form>'); | Add('</form>'); | ||
end | end | ||
else | else | ||
| − | AResponse.Content := | + | AResponse.Content := 'Hello, ' + LName + '!'; |
| − | Handled := true; | + | Handled := true; |
end;</syntaxhighlight> | end;</syntaxhighlight> | ||
| − | '''ARequest.URI''' | + | '''ARequest.URI''' is just a convenience to refer to the current URI, so even when you change your registered |
| + | module or action name, this code stays the same. | ||
| − | Note | + | Note that as in Pascal, referring to the data is done case insensitively. |
| − | + | Now you can try requesting /, which will display | |
| + | Please tell me your name | ||
| + | and /?name=<write anything here, e.g.: Bob>, which will display | ||
| + | Hello, Bob! | ||
| − | + | === Reading POST === | |
| − | |||
| − | |||
| − | + | POST is actually doesn't differ much from GET, only differs in which property to access. If GET is accessed | |
| + | through '''ARequest.QueryFields''' , POST is accessed through '''ARequest.ContentFields'''. POST style of | ||
| + | previous code is: | ||
| − | |||
<syntaxhighlight lang=pascal>procedure TFPWebModule1.DataModuleRequest(Sender: TObject; ARequest: TRequest; | <syntaxhighlight lang=pascal>procedure TFPWebModule1.DataModuleRequest(Sender: TObject; ARequest: TRequest; | ||
AResponse: TResponse; var Handled: Boolean); | AResponse: TResponse; var Handled: Boolean); | ||
| Line 161: | Line 190: | ||
LName: String; | LName: String; | ||
begin | begin | ||
| − | LName := ARequest.ContentFields.Values['Name']; | + | LName := ARequest.ContentFields.Values['Name']; |
if LName = EmptyStr then | if LName = EmptyStr then | ||
with AResponse.Contents do | with AResponse.Contents do | ||
begin | begin | ||
| − | Add('<form action=" | + | Add('<form action="' + ARequest.URI + '" method="POST"'); |
| − | Add('<label for="name"> | + | Add('<label for="name">Please tell me your name:</label>'); |
Add('<input type="text" name="name" id="name" />'); | Add('<input type="text" name="name" id="name" />'); | ||
Add('<input type="submit" value="Send" />'); | Add('<input type="submit" value="Send" />'); | ||
| Line 172: | Line 201: | ||
end | end | ||
else | else | ||
| − | AResponse.Content := | + | AResponse.Content := 'Hello, ' + LName + '!'; |
Handled := true; | Handled := true; | ||
end; | end; | ||
</syntaxhighlight> | </syntaxhighlight> | ||
| − | === | + | === Reading File Uploads === |
| − | + | One exception is for reading '''multipart/form-data''' fields, i.e. files. That one is available in | |
| − | '''ARequest.Files''' | + | '''ARequest.Files''' as a '''TUploadedFiles''' instance, which is a '''TCollection''' descendant. The following is |
| + | TUploadedFiles public interface which you can use to access the files: | ||
<syntaxhighlight lang=pascal>TUploadedFiles = Class(TCollection) | <syntaxhighlight lang=pascal>TUploadedFiles = Class(TCollection) | ||
| − | + | ... | |
| − | |||
| − | |||
public | public | ||
Function First: TUploadedFile; | Function First: TUploadedFile; | ||
| Line 195: | Line 223: | ||
end;</syntaxhighlight> | end;</syntaxhighlight> | ||
| − | + | Each '''TUploadedFile''' itself has several properties: | |
<syntaxhighlight lang=pascal>TUploadedFile = Class(TCollectionItem) | <syntaxhighlight lang=pascal>TUploadedFile = Class(TCollectionItem) | ||
| − | + | ... | |
| − | |||
| − | |||
Public | Public | ||
Destructor Destroy; override; | Destructor Destroy; override; | ||
| Line 214: | Line 240: | ||
</syntaxhighlight> | </syntaxhighlight> | ||
| − | + | They should be descriptive enough, with the exception of '''FileName''' and '''LocalFileName'''. '''FileName''' is | |
| + | the original file '''name''' as uploaded from client, '''LocalFileName''' is the file '''path''' in the server where the file | ||
| + | is temporarily stored. Note the difference in bold terms above. | ||
| − | + | Again, reusing the same request handler: | |
<syntaxhighlight lang=pascal>procedure TFPWebModule1.DataModuleRequest(Sender: TObject; ARequest: TRequest; | <syntaxhighlight lang=pascal>procedure TFPWebModule1.DataModuleRequest(Sender: TObject; ARequest: TRequest; | ||
AResponse: TResponse; var Handled: Boolean); | AResponse: TResponse; var Handled: Boolean); | ||
| − | |||
| − | |||
| − | |||
| − | |||
| − | |||
var | var | ||
| − | n | + | n: Integer; |
f: TUploadedFile; | f: TUploadedFile; | ||
| + | i: Integer; | ||
begin | begin | ||
n := ARequest.Files.Count; | n := ARequest.Files.Count; | ||
if n = 0 then | if n = 0 then | ||
| − | with AResponse.Contents do | + | with AResponse.Contents do |
| − | Add( | + | begin |
| − | else begin | + | Add('<form id="form" action="' + ARequest.URI + '" method="POST" enctype="multipart/form-data">'); |
| + | Add('<label for="name">Drag n drop or click to add file:</label>'); | ||
| + | Add('<input type="file" name="input" />'); | ||
| + | Add('<input type="submit" value="Send" />'); | ||
| + | Add('</form>'); | ||
| + | end | ||
| + | else | ||
| + | begin | ||
f := ARequest.Files[0]; | f := ARequest.Files[0]; | ||
AResponse.Contents.LoadFromStream(f.Stream); | AResponse.Contents.LoadFromStream(f.Stream); | ||
| Line 240: | Line 271: | ||
end;</syntaxhighlight> | end;</syntaxhighlight> | ||
| − | + | drag n drop a file (preferably text, as it's will be rendered as text) to the input file field (or click the respective | |
| + | button) then click '''Send''' button. The file content should be displayed. | ||
== Cookies == | == Cookies == | ||
| − | === | + | === Setting === |
| + | |||
| + | [[File:cookie session Object Pascal.png|450px|The "cookie" concept, invented by Netscape in 1994, to allow the HTTP server to identify all its clients.]]<br> | ||
| − | + | Cookies are browser responsibility to save and keep, therefore server need to send it as part of the | |
| + | response in order to set one. '''AResponse.Cookies''' contains a list of cookies to be sent. It's a descendant of | ||
| + | '''TCollection''', respectively the contained '''TCookie''' is a descendant of '''TCollectionItem'''. Therefore, you | ||
| + | can use TCollection way of managing items to manipulate it. | ||
| − | + | Here's an example: | |
| − | |||
<syntaxhighlight lang=pascal>procedure TFPWebModule1.DataModuleRequest(Sender: TObject; ARequest: TRequest; | <syntaxhighlight lang=pascal>procedure TFPWebModule1.DataModuleRequest(Sender: TObject; ARequest: TRequest; | ||
AResponse: TResponse; var Handled: Boolean); | AResponse: TResponse; var Handled: Boolean); | ||
| Line 257: | Line 293: | ||
begin | begin | ||
C := AResponse.Cookies.Add; | C := AResponse.Cookies.Add; | ||
| − | C.Name := ' | + | C.Name := 'mycookie'; |
| − | C.Value := ' | + | C.Value := 'somevalue'; |
Handled := true; | Handled := true; | ||
end;</syntaxhighlight> | end;</syntaxhighlight> | ||
| − | + | You won't see any output in your browser. But if you use some kind of developer tools (Chrome has one | |
| − | + | built-in), you can see the response header: | |
| − | |||
| − | + | [[File:fpwebtutorial_cookie_set.png|Set-Cookie response header in Chrome's developer tools]] | |
| − | + | Note that cookie has attributes, so Name and Value is not the only two you can set. Browse TCookie | |
| + | interface to see what properties are supported. | ||
| − | + | === Getting === | |
| + | Once you give '''Set-Cookie''' header above, subsequent request to your site will contain additional header | ||
| + | containing the value you ask to set previously: | ||
| − | [[File:fpwebtutorial_cookie_get.png| | + | [[File:fpwebtutorial_cookie_get.png|Cookie request header in Chrome's developer tools]] |
| − | + | Fortunately, the way to read it is no different from GET & POST data. The related property is | |
| + | '''ARequest.CookieFields'''. To read previously set cookie: | ||
<syntaxhighlight lang=pascal>procedure TFPWebModule1.DataModuleRequest(Sender: TObject; ARequest: TRequest; | <syntaxhighlight lang=pascal>procedure TFPWebModule1.DataModuleRequest(Sender: TObject; ARequest: TRequest; | ||
| Line 284: | Line 323: | ||
end;</syntaxhighlight> | end;</syntaxhighlight> | ||
| − | == | + | == Sessions == |
| − | TFPWebModule | + | TFPWebModule is a descendant of TSessionHTTPModule, so it has session management capability. Session |
| + | is module based, so each module may choose to use or not to use session management. | ||
| − | + | Session is implemented in abstract manner. By default, no implementation is provided. One sample | |
| + | implementation using .ini files is given in '''iniwebsession''' unit. You must have this unit in your project or | ||
| + | implement one for session management to work. If you decide to implement one, basically you need to | ||
| + | extend and implement abstract methods in '''TCustomSession''' and '''TSessionFactory''' classes. | ||
| − | === | + | === Activating === |
| − | + | To activate session management, set '''CreateSession''' property to true. Session will be started prior to | |
| + | request handling. In case of a new session, '''OnNewSession''' will be called. Initialize your session variables | ||
| + | here. | ||
| − | === | + | === Session Variables Manipulation === |
| − | + | Session variables are provided as '''Session.Variables''' (nb: the Session object is the equivalent of the $_SESSION array used in PHP). This is a string to string map like structure, so you | |
| − | <syntaxhighlight lang=pascal>Session.Variables[' | + | can read / write it like: |
| + | |||
| + | <syntaxhighlight lang=pascal>Session.Variables['myvar'] := myvar; // write | ||
... | ... | ||
| − | + | myvar := Session.Variables['myvar']; // read</syntaxhighlight> | |
| − | + | Setting a variable to empty string does '''NOT''' remove it. If you really want to remove a variable, call | |
| + | '''Session.RemoveVariable''' instead. | ||
| − | === | + | === Terminating === |
| − | + | Call '''Session.Terminate''' whenever you want to terminate a session (e.g.: user logout). Session will also | |
| + | automatically expire if the next request comes after '''Session.TimeOutMinutes''' since last request. When | ||
| + | session terminates, '''OnSessionExpired''' will be called. Do whatever cleanup you need there. | ||
| − | == | + | == Routing == |
| + | |||
| + | Since FPC 3.0.4, a new routing mechanism has been implemented. Instead of maintaining backward | ||
| + | compatibility, it is decided that the new routing will be the default. Thus, any old code (or new code | ||
| + | depending on old routing) must be ported by adding: | ||
| − | |||
<syntaxhighlight lang=pascal>Application.LegacyRouting := true;</syntaxhighlight> | <syntaxhighlight lang=pascal>Application.LegacyRouting := true;</syntaxhighlight> | ||
| − | |||
| − | + | in the .lpr. | |
| − | === | + | === Old Mechanism === |
| − | + | ==== Using Multiple Modules ==== | |
| + | |||
| + | You can have multiple modules in your app. Click "File" menu, then click "New...". A dialog shall appear, | ||
| + | select "Web Module" from the treeview. | ||
[[File:fpwebtutorial_new_module.png|Add new web module]] | [[File:fpwebtutorial_new_module.png|Add new web module]] | ||
| − | + | then click OK. | |
| − | + | With multiple modules exist in your app, you can no longer request just with /. The framework will not be | |
| − | + | able to magically select which module must serve the response, so there are two ways to state which | |
| − | + | module you'd like to call: | |
| − | |||
| − | + | * /<module name> | |
| + | * /?module=<module name> | ||
| + | In the 2nd format, you can change "module" (which is the default value) to whatever valid query string key | ||
| + | by modifying '''Application.ModuleVariable'''. | ||
| − | ==== | + | ==== Using Actions ==== |
| − | + | So far, we've only used web modules with single request handler. This doesn't scale much as your web app | |
| + | gets more and more complex. Moreover, some features might have shared properties and be better | ||
| + | logically grouped, e.g.: | ||
| + | * Account module | ||
| + | ** Login action | ||
| + | ** Logout action | ||
| + | ** Register action | ||
| + | * Product module | ||
| + | ** Create action | ||
| + | ** Update action | ||
| + | ** Delete action | ||
| + | ** Details action | ||
| − | + | ===== Request Handling Flow ===== | |
| − | |||
| − | |||
| − | |||
| − | |||
| − | |||
| − | |||
| − | |||
| − | |||
| + | Before using action, it is important to know fpWeb request handling flow. Failing to do so might render your | ||
| + | action useless because it's always your data module that handles the request. How could that be? Going | ||
| + | back a few chapters, remember the '''Handled := true''' that we always did before? Now this is where | ||
| + | '''Handled''' parameter comes into play. | ||
| − | + | '''Every''' requests will go through module's '''OnRequest''' first, regardless the requested action. Only if it does | |
| + | '''not''' set Handled to true, web action's OnRequest is executed. | ||
| − | + | In general, the request flow is: | |
| − | + | [[File:fpwebtutorial_request_flow.png|fpWeb request flow]] | |
| − | + | Notice the "Our Concern" box, that's what we're going to put our attention at. | |
| − | + | ===== Add Actions to Web Modules ===== | |
| − | + | To add an action, select the web module then go to object inspector. In the properties tab, select Actions | |
| + | and click the button on the second column. | ||
| + | [[File:fpwebtutorial_manage_actions.png|Manage actions button in object inspector]] | ||
| − | + | A popup window shall appear where you can add, delete and reorder actions. | |
| − | + | [[File:fpwebtutorial_edit_actions.png|Manage actions button in popup window]] | |
| − | + | Press Add, a new action shall appear in the list. Select it then go to object inspector. It will currently show | |
| + | properties and events of that newly created action. Rename the Name property (this will be the name you | ||
| + | write in the URL, so give it a short, simple but descriptive name) as you wish, I will choose "Hello". Move on | ||
| + | to events tab, do the same as OnRequest for module, click button on the right of OnRequest row to create | ||
| + | the request handler. | ||
| − | + | [[File:fpwebtutorial_action_onrequest.png|Creating web action's OnRequest handler in the object inspector]] | |
| − | + | You will be presented in the same OnRequest interface, but this one handles web action instead of web | |
| + | module. Whatever you can do in web module's OnRequest can be done here as well. Copy the method body | ||
| + | from the "Hello, World!" section. | ||
| − | + | Remember to remove '''Handled := true''' from the previous web module's '''OnRequest''' body (or remove the | |
| + | event completely) for the action to take care of the request handling. | ||
| − | + | Run your project, and fire up your browser. Now, since the request handling is delegated to web action, you | |
| + | can no longer just request /, but you need /<action name> or <Module's ActionVar property>=<action | ||
| + | name>. Note that <Module's ActionVar property> has a default value of empty string, unlike | ||
| + | '''Application.ModuleVariable''' which has "module" as the default value. So, by default, you can only use | ||
| + | the /<action name> form. | ||
| − | + | If you have multiple modules, then you have a variety of options: | |
| − | + | * /<module name>/<action name> | |
| + | * /<module name>?action=<action name> | ||
| + | * /<action name>?module=<module name> | ||
| + | * /?module=<module name>&action=<action name> | ||
| − | + | Note that as soon as a module have at least one action, /<module or action name> alone will by default | |
| + | map to /<action name>. To change the behavior such that it maps to /<module name> by default, set | ||
| + | '''Application.PreferModuleName''' to '''true'''. In case of multiple modules, if no module name given, then the | ||
| + | default module will handle the given action. To change the behavior such that module name must be | ||
| + | explicitly given, set '''Application.AllowDefaultModule''' to '''false'''. | ||
| − | + | The following tables summarize what will happen based on the two properties: | |
| − | |||
| − | |||
| − | |||
| − | |||
| − | |||
| − | |||
| − | |||
| − | |||
| − | |||
{| class="wikitable" | {| class="wikitable" | ||
| − | !colspan="2" rowspan="2"|/< | + | !colspan="2" rowspan="2"|/<module or action name> |
!colspan="2"|Application.PreferModuleName | !colspan="2"|Application.PreferModuleName | ||
|- | |- | ||
| Line 401: | Line 477: | ||
!rowspan="2"|Application.AllowDefaultModule | !rowspan="2"|Application.AllowDefaultModule | ||
|true | |true | ||
| − | |/< | + | |/<module name> |
| − | |/< | + | |/<default module>/<action name> |
|- | |- | ||
|false | |false | ||
| − | |/< | + | |/<module name> |
|ERROR | |ERROR | ||
|} | |} | ||
| − | ===== | + | ===== Default Action ===== |
| − | + | Remember the previous diagram, the "Delegate request handling to actions" is actually not so simple, but if | |
| + | we expand that diagram, the image will be too big to fit. So, here's the diagram of that part: | ||
| − | [[File:fpwebtutorial_request_delegation_flow.png| | + | [[File:fpwebtutorial_request_delegation_flow.png|Request delegation to action flow]] |
| − | + | Two important things from the flow: DefActionWhenUnknown and a default action. The former is a web | |
| + | module's property while the latter corresponds to Default property of an action. In the latter case, in case | ||
| + | there are more than two actions having Default property set to true, the the action order (as how it's | ||
| + | shown in the manage actions popup window) will be considered to decide which is the default action. The | ||
| + | two properties forms what the application should do if no matching action found for a given request. | ||
| − | + | The following tables summarize what will happen based on the two properties: | |
{| class="wikitable" | {| class="wikitable" | ||
| − | !colspan="2" rowspan="2"| | + | !colspan="2" rowspan="2"|Request with invalid action name |
!colspan="2"|DefActionWhenUnknown | !colspan="2"|DefActionWhenUnknown | ||
|- | |- | ||
| Line 428: | Line 509: | ||
!rowspan="2"|Action.Default | !rowspan="2"|Action.Default | ||
|true | |true | ||
| − | | | + | |Request handled by default action |
| − | |Error: No | + | |Error: No action found for action: <action name> |
|- | |- | ||
|false | |false | ||
| − | |Error: | + | |Error: Invalid action name and no default action |
| − | |Error: No | + | |Error: No action found for action: <action name> |
|} | |} | ||
{| class="wikitable" | {| class="wikitable" | ||
| − | !colspan="2" rowspan="2"| | + | !colspan="2" rowspan="2"|Request without action name, i.e.: / |
!colspan="2"|DefActionWhenUnknown | !colspan="2"|DefActionWhenUnknown | ||
|- | |- | ||
| Line 446: | Line 527: | ||
!rowspan="2"|Action.Default | !rowspan="2"|Action.Default | ||
|true | |true | ||
| − | | | + | |Request handled by default action |
| − | | | + | |Request handled by default action |
|- | |- | ||
|false | |false | ||
| − | |Error: | + | |Error: No action name and no default action |
| − | |Error: | + | |Error: No action name and no default action |
|} | |} | ||
| − | + | In case of error response above, a stack trace shall follow, complete with line number information if you | |
| + | build your app with -gl. We'll see later on how to create custom handler for this (stacktrace are no good for | ||
| + | production). But for now, make sure you understand the concept of web module and web action, especially | ||
| + | the request flow. Play around until you think you're ready for next section. | ||
| − | === | + | === New Mechanism === |
| − | + | The new mechanism is extremely flexible and works even without data modules (old mechanism only works | |
| + | with data modules). | ||
| − | + | A dedicated unit for this routing is provided as '''httproute''' (add this to uses clause of program / unit where | |
| + | you want to register routes). The unit contains a function '''HTTPRouter''' that will return singleton object | ||
| + | responsible for application's route management and has '''RegisterRoute''' method to register your route. | ||
| − | ==== | + | ==== Route Syntax ==== |
| − | + | The first parameter of '''HTTPRouter.RegisterRoute''' is the route that will be matched against incoming | |
| + | request. It can be as simple as '''*''' above, which means 0 or more paths or simply any paths, up to as | ||
| + | complex as '''/api/v1/:resource/*''' which means '''REQUEST_URI''' header should start | ||
| + | with '''/api/v1/''' followed by something else that will be bound to variable named resource and finally | ||
| + | ended with 0 or more paths. It will match: | ||
* /api/v1/products | * /api/v1/products | ||
| Line 471: | Line 562: | ||
* /api/v1/products/something/else/that/is/really/long/and/silly | * /api/v1/products/something/else/that/is/really/long/and/silly | ||
| − | + | but not: | |
* /api/v1 | * /api/v1 | ||
* /excuse/me/api/v1/products | * /excuse/me/api/v1/products | ||
| − | + | Basically there are only 3 special characters: | |
| − | * * | + | * * denoting 0 or more paths |
| − | * :param | + | * :param denoting a part |
| − | * / | + | * / denoting part separator |
| − | |||
| − | |||
| + | your route will be composed of these 3 characters, plus everything else that made up a route. | ||
| − | ==== | + | ==== Registering a Route ==== |
| − | + | The 2nd, 3rd or 4th parameter (depending on whether you want to handle specific HTTP method and/or | |
| + | pass additional data to it) of '''HTTPRouter.RegisterRoute''' is overloaded with several possibilities: | ||
| − | * | + | * Callback procedure |
<syntaxhighlight lang=pascal>TRouteCallback = Procedure(ARequest: TRequest; AResponse);</syntaxhighlight> | <syntaxhighlight lang=pascal>TRouteCallback = Procedure(ARequest: TRequest; AResponse);</syntaxhighlight> | ||
| − | * | + | * Callback event |
<syntaxhighlight lang=pascal>TRouteEvent = Procedure(ARequest: TRequest; AResponse) of object;</syntaxhighlight> | <syntaxhighlight lang=pascal>TRouteEvent = Procedure(ARequest: TRequest; AResponse) of object;</syntaxhighlight> | ||
| − | * | + | * Object satisfying a (CORBA) interface |
<syntaxhighlight lang=pascal>IRouteInterface = Interface ['{10115353-10BA-4B00-FDA5-80B69AC4CAD0}'] | <syntaxhighlight lang=pascal>IRouteInterface = Interface ['{10115353-10BA-4B00-FDA5-80B69AC4CAD0}'] | ||
Procedure HandleRequest(ARequest: TRequest; AResponse: TResponse); | Procedure HandleRequest(ARequest: TRequest; AResponse: TResponse); | ||
end;</syntaxhighlight> | end;</syntaxhighlight> | ||
| − | * | + | * Object extending abstract router class |
<syntaxhighlight lang=pascal>TRouteObject = Class(TObject, IRouteInterface) | <syntaxhighlight lang=pascal>TRouteObject = Class(TObject, IRouteInterface) | ||
Public | Public | ||
| Line 507: | Line 598: | ||
TRouteObjectClass = Class of TRouteObject;</syntaxhighlight> | TRouteObjectClass = Class of TRouteObject;</syntaxhighlight> | ||
| − | + | By default, if 2nd parameter is not a '''TRouteMethod''', then all HTTP methods will match. Use one | |
| + | of '''rmUnknown, rmAll, rmGet, rmPost, rmPut, rmDelete, rmOptions, rmHead, rmTrace''' to match only a | ||
| + | specific HTTP method. | ||
| − | + | Registration order matters. If there are two or more routes matching the current request, the earlier | |
| + | registered one will handle it. | ||
| − | + | In this new mechanism, standalone Hello, World! program can be as simple as: | |
<syntaxhighlight lang=pascal>uses | <syntaxhighlight lang=pascal>uses | ||
fphttpapp, httpdefs, httproute; | fphttpapp, httpdefs, httproute; | ||
| − | procedure | + | procedure DoHello(ARequest:TRequest; AResponse : TResponse); |
begin | begin | ||
| − | AResponse.Content:='<html><body><h1> | + | AResponse.Content:='<html><body><h1>Hello,World!</h1></body></html>' |
end; | end; | ||
begin | begin | ||
| − | HTTPRouter.RegisterRoute('*', @ | + | HTTPRouter.RegisterRoute('*', @DoHello); |
Application.Port := 9000; | Application.Port := 9000; | ||
Application.Initialize; | Application.Initialize; | ||
| Line 527: | Line 621: | ||
end.</syntaxhighlight> | end.</syntaxhighlight> | ||
| − | ==== | + | ==== Webserver example ==== |
| − | + | This is an example of a simple, cross-platform, multi-threaded web server. | |
<syntaxhighlight lang=pascal> | <syntaxhighlight lang=pascal> | ||
| Line 544: | Line 638: | ||
procedure route1(aReq: TRequest; aResp: TResponse); | procedure route1(aReq: TRequest; aResp: TResponse); | ||
begin | begin | ||
| − | aResp.content:='<html><body><h1> | + | aResp.content:='<html><body><h1>Route 1 The Default</h1></body></html>' |
end; | end; | ||
procedure route2(aReq: TRequest; aResp: TResponse); | procedure route2(aReq: TRequest; aResp: TResponse); | ||
begin | begin | ||
| − | aResp.content:='<html><body><h1> | + | aResp.content:='<html><body><h1>Route 2</h1></body></html>' |
end; | end; | ||
| Line 561: | Line 655: | ||
end. | end. | ||
</syntaxhighlight> | </syntaxhighlight> | ||
| − | + | To open "Route 1" type into your browser the following URL: http://127.0.0.1:8080 | |
| − | + | To open "Route 2" type into your browser the following URL: http://127.0.0.1:8080/route2 | |
| − | + | == Using Templates == | |
| − | + | fpWeb has integrated support for FPTemplate, Free Pascal's generic templating engine. It doesn't have to be | |
| + | used from web application context, but with integrated support things will be easier a bit. At least the | ||
| + | memory management can be ignored as the module will take care of it. | ||
| − | + | There are two levels where one can use templates at: action and module. The full RAD support is | |
| + | incomplete, so you need to go down to hand coding at some points. | ||
| − | + | There are two modes of operation: non-parameterized and parameterized. The active mode is controlled by | |
| + | '''AllowTagParams''' property, which should be obvious enough what value refers to what mode. | ||
| − | + | Template string can be given from a file through '''FileName''' property or a direct string through '''Template''' | |
| + | property. Template.Template, I know it sounds weird :) If both are filled then FileName will take | ||
| + | precedence. | ||
| − | + | The two properties: '''StartDelimiter''' and '''EndDelimiter''' define how the engine should recognize a | |
| − | + | template tag. For instance, if you have: | |
| − | |||
* StartDelimiter = '{+' | * StartDelimiter = '{+' | ||
* EndDelimiter = '+}' | * EndDelimiter = '+}' | ||
| − | + | then a string '{+title+}' defines a template tag named 'title'. Note that spaces are significant, so '{+ title +}' | |
| + | defines a template tag named ' title ' instead of just 'title'. | ||
| − | + | Special for parameterized mode, additional three properties: '''ParamStartDelimiter''', '''ParamEndDelimiter''' | |
| + | and '''ParamValueSeparator''' defines how the engine should recognize a template tag parameter. For | ||
| + | instance, if you have: | ||
* ParamStartDelimiter = '[-' | * ParamStartDelimiter = '[-' | ||
| Line 590: | Line 692: | ||
* ParamValueSeparator = '=' | * ParamValueSeparator = '=' | ||
| − | + | then a string '{+data [-p=v-][-a=b-] +}' defines a template tag named 'data' with parameter 'p' of value 'v' and | |
| − | + | parameter 'a' of value 'b'. This can be used to pass template level parameter such as expected date format, | |
| − | + | header-row-footer for customizable output presentation, name of file, etc. you decide. | |
| − | + | As a consequence of different way of operation, the core event where the template works is different, too. | |
| + | Non-parameterized will use '''OnGetParam''' while the parameterized will use '''OnReplaceTag'''. The two has of | ||
| + | course different interface: | ||
<syntaxhighlight lang=pascal>Type | <syntaxhighlight lang=pascal>Type | ||
| − | // OnGetParam: | + | // OnGetParam: for simple template tag support only (ex: {Name}) |
TGetParamEvent = Procedure( | TGetParamEvent = Procedure( | ||
Sender: TObject; | Sender: TObject; | ||
| Line 603: | Line 707: | ||
Out AValue: String | Out AValue: String | ||
) Of Object; | ) Of Object; | ||
| − | // OnReplaceTag: | + | // OnReplaceTag: for tags with parameters support |
TReplaceTagEvent = Procedure( | TReplaceTagEvent = Procedure( | ||
Sender: TObject; | Sender: TObject; | ||
| Line 611: | Line 715: | ||
) Of Object;</syntaxhighlight> | ) Of Object;</syntaxhighlight> | ||
| − | + | In '''OnGetParam''', you check for '''ParamName''', then assign '''AValue''' accordingly. i.e., if you want tag 'title' to be | |
| + | replaced by 'My App', then fill in the method with: | ||
| − | <syntaxhighlight lang=pascal>// use Trim() | + | <syntaxhighlight lang=pascal>// use Trim() if you want the spaces around tag to be insignificant |
case Trim(ParamName) of | case Trim(ParamName) of | ||
| − | ' | + | 'title': AValue := 'My App'; |
else | else | ||
| − | AValue := ' | + | AValue := 'UNKNOWN'; |
end;</syntaxhighlight> | end;</syntaxhighlight> | ||
| − | + | In '''OnReplaceTag''', you check for '''TagString''' and optionally '''TagParams''', then assign '''ReplaceText''' | |
| − | + | accordingly. i.e., if you want tag 'datetime' to be replaced by current time with parameter 'datetimeformat' | |
| + | to specify how the date and time should be formatted, then fill in the method like this: | ||
| − | <syntaxhighlight lang=pascal>// use Trim() | + | <syntaxhighlight lang=pascal>// use Trim() if you want the spaces around tag to be insignificant |
case Trim(TagString) of | case Trim(TagString) of | ||
| − | ' | + | 'datetime': AValue := FormatDateTime(TagParams.Values['datetimeformat'],Now); |
else | else | ||
| − | AValue := ' | + | AValue := 'UNKNOWN'; |
end;</syntaxhighlight> | end;</syntaxhighlight> | ||
| − | === | + | === At Action Level === |
| − | + | Create/select an action, then go to object inspector. You will see a subcomponent property named | |
| + | '''Template'''. This template is a normal '''TFPTemplate''' instance. Expand it and fill in the properties as | ||
| + | explained above. Now go to Events tab, again expand '''Template''', you will see the two events. Fill the one | ||
| + | based on your value of '''AllowTagParams''' property. | ||
| − | + | NOTE: If your Lazarus cannot autocomplete the event, try writing the name manually in the edit box then | |
| + | click the ... button. This is a bug in present Lazarus which may be fixed in the future. | ||
| − | + | At this level, template with a content is not automatically set as request handler. It might change in the | |
| + | future, but let's deal with its current state. Fill in '''OnRequest''' event of the action, then fill it with: | ||
<syntaxhighlight lang=pascal>with Actions.CurrentAction as TFPWebAction do | <syntaxhighlight lang=pascal>with Actions.CurrentAction as TFPWebAction do | ||
| Line 644: | Line 755: | ||
Handled := true;</syntaxhighlight> | Handled := true;</syntaxhighlight> | ||
| − | + | The cast is required since '''CurrentAction''' is of type '''TCustomWebAction''' instead of '''TFPWebAction'''. | |
| − | + | Without it, we can't access the '''Template''' property. | |
| − | === | + | === At Module Level === |
| − | + | At module level, you currently have to do it by hand coding since no RAD support is implemented. The | |
| + | linked property is ModuleTemplate . This is however not a regular '''TFPTemplate''' instance, but special | ||
| + | '''TFPWebTemplate''' class that's a descendant of it. | ||
| − | + | The idea here is to have module provide a layout while the actions provide content, with the ability to | |
| + | provide additional variables. It's therefore a good idea to keep '''AllowTagParams''' as is and assign | ||
| + | '''OnGetParam''' event **of the module** only. Do NOT assign '''OnGetParam''' of '''ModuleTemplate''' as it will | ||
| + | '''never''' be called. | ||
| − | + | A template tag named 'content' will be replaced automatically by what content produced by action, | |
| + | everything else is either replaced from internal template variables or from '''OnGetParam'''. | ||
| − | === | + | === Using Separated Template === |
| − | + | Despite the somewhat incomplete integration, nothing stops you from using fpTemplate (or any other | |
| + | templating solutions) manually, outside from the integrated support. This could even be better in some | ||
| + | cases since it's modular. | ||
| − | == | + | == Using an html Producer object == |
Latest revision as of 23:56, 17 March 2023
│
العربية (ar) │
English (en) │
español (es) │
русский (ru) │
Originally based on: fcl-web tutorial (in PDF) by forum user Leledumbo.
Introduction
fpWeb is a web application framework shipped by FPC in its default distribution as a part of fcl-web package. The framework itself is built on top of fcl-web features. The framework is built with RAD mind to make a good use of componentization in producing dynamic content. A Lazarus package is provided that can use the framework in a drag n drop manner for its session management and content production. This tutorial will attempt to cover basic functionality of fpWeb, so that one can build common web application with it. Note that this tutorial does NOT attempt to teach HTTP protocol, HTML, CSS, JavaScript or database manipulation as the protocol and client languages should be the prerequisites for every web application programmer and database manipulation does not differ from desktop implementation.
Architecture (PLEASE read)
Before starting, it's necessary to know the architecture and application flow to avoid confusion when certain things don't work or work unexpectedly. So please spend some time reading this section.
Application
Application here refers to the protocol that your app will implement. fpWeb will happily switch from CGI, FCGI, Apache module to embedded server, and more if fcl-web implements another one in the future. Each application is implemented in its own unit, so to switch from one application to another, with the exception of Apache module, one just needs to change the respective identifier in the uses clause. Currently (as of 3.0.0 / 3.1.1), they are:
- fpCGI -> CGI
- fpFCGI -> FastCGI
- fpApache (requires httpd as well) -> Apache module
- fpHttpApp -> embedded server
- microhttpapp -> embedded server using GNU libmicrohttp library.
- fphttpsys -> Windows system support for HTTP protocol.
Throughout this tutorial, we will use embedded server for the sake of simplicity because you don't have to deal with setting up virtual server and messing up with complicated configuration file and service management. Your app will be a single binary portable web application! Another reason would be there are more than just one web server application out there and each has different way to configure. It would be overkill to cover all of them while their documentation already does the job. Apache module is implemented as a (dynamic) library, while other protocols are normal application. Each application may have specific properties (such as port) available and meaningful only to that application. That's why if you look at fcl-web examples, .lpi / .lpr pairs for each protocol are put in their own directories, only the web modules are shared.
Web Modules

fpWeb applications consist of web modules which do the actual content production. A web module can contain web actions that can divide the functionality even more. For instance, an auth web module might have login and logout web actions. While an about web module might not need an action at all and serves just one content. Web module is integrated with fpTemplate that can be used for producing dynamic content from a template file. This is roughly similar to what PHP does, only the gap between logic and presentation is forced rather than suggested. Some say that fpTemplate implements passive view while PHP by default implements an active view design pattern.
Installation
The fpWeb package for Lazarus is not installed by default (but it's shipped), to enable fpWeb:
- Open Lazarus and choose Package->Install/Uninstall Package
- In the Available for installation listbox, look for weblaz and press Install selection. Press Save and rebuild IDE and confirm with Continue
- Let the IDE rebuild and restart itself. If everything goes well, you should now have fpWeb tab in the component palette, as shown below:

Specialized modules
The *TFPWebModule* class (used below) is a simple example of a fpWEB module that can be used for all kinds of HTTP requests.
However, fpWEB comes with some specialized modules, that have extra support for specialized tasks:
- The TSimpleFileModule class in unit fpwebfile.pp can be used to send files. You point it to a directory, and it does the rest.
- The TFPHTMLModule class in unit fphtml.pp can be used to produce HTML.
- The TProxyWebModule class in unit fpwebproxy.pp is a ready-made forwarding proxy.
- The TFPWebProviderDataModule class in unit fpwebdata.pp serves data in JSON format that can be consumed by ExtJS stores.
- The TSQLDBRestModule class in unit sqldbrestmodule.pp implements a full REST server backed by SQLDB. See more info in SQLDBRestBridge.
- The TJSONRPCModule class in unit webjsonrpc.pp implements a JSON-RPC service.
- The TExtDirectModule class in unit fpextdirect.pp implements a Ext.Direct variant of a JSON-RPC service.
Hello, World!
Let's create a simple Web Application. As commonly taught when learning programming, "Hello, World!" will be our first app.
1. Open up Lazarus and choose Project->New Project then pick HTTP server Application

2. Another dialog shall appear for serving static files, port selection and multithreading. Just use default port 8080.
You may skip the static files serving (go to tips and tricks section if you want to know it more).

- IMPORTANT!:
- If you choose to use threads on *nix, don't forget to add cthreads as the first unit in the .lpr's uses clause, otherwise a RTE 232 will be generated. When running from console, a message shall appear:
This binary has no thread support compiled in. Recompile the application with a thread-driver in the program uses clause before other units using thread.
3. Since Jan 14, 2017 (or FPC 3.0.4), you may need to open the .lpr and add the following line in the main body if it's not already there:
Application.LegacyRouting := true;
- reason will be explained in chapter #Routing.
4. Whatever you choose, pick "OK" and you'll be presented in the default one module fpWeb app.
5. Focus the module and move to Object Inspector. Feel free to rename the module if you wish.
6. Choose Events tab and click the button at the right of the second column of the OnRequest row to create the event handler.

- You will be redirected to the source editor with the following code:
procedure TFPWebModule1.DataModuleRequest(Sender: TObject; ARequest: TRequest;
AResponse: TResponse; var Handled: Boolean);
begin
  |
end;
- Fill in the event with:
procedure TFPWebModule1.DataModuleRequest(Sender: TObject; ARequest: TRequest;
AResponse: TResponse; var Handled: Boolean);
begin
  AResponse.Content := 'Hello, World!';
  Handled := true;
end;
7. Then run your app (or press F9).
8. Open your browser and type:
9. You should see "Hello, World!" displayed.
If it doesn't, check below:
- The framework does a lot of exception handling and the IDE's debugger might catch them and interrupts your app. It's OK to add most of the exceptions to the ignore list so you can concentrate more on your app flow. Keep skipping and continue until no more dialog appears and the browser shows the output.
- Handled := true is the way we tell the framework that the request has been handled. Not setting it (or setting it to false) will show error page instead. For now, this doesn't affect the request flow yet, but it will be later on. So keep it that way until the time comes to further make a good use of it.
- other track: test without a firewall loaded in RAM (as an application, as a service or deamon, or as both).
Reading GET & POST data
A dynamic content is likely to be triggered from user input, either through forms, providing values in the URL, etc. Those data are sent along the request, which is represented in the method as ARequest parameter of type TRequest.
Reading GET
GET data is provided as ARequest.QueryFields , which is a TStrings descendant. In short, whatever you usually do with TStrings, is applicable here such as accessing the data in a map style through the Values property.
Reusing above code, replace the method body with:
procedure TFPWebModule1.DataModuleRequest(Sender: TObject; ARequest: TRequest;
 AResponse: TResponse; var Handled: Boolean);
var
  LName: String;
begin
  LName := ARequest.QueryFields.Values['Name'];
  if LName = EmptyStr then
    with AResponse.Contents do
    begin
      Add('<form action="' + ARequest.URI + '" method="GET"');
      Add('<label for="name">Please tell me your name:</label>');
      Add('<input type="text" name="name" id="name" />');
      Add('<input type="submit" value="Send" />');
      Add('</form>');
    end
  else
    AResponse.Content := 'Hello, ' + LName + '!';
  Handled := true;
end;
ARequest.URI is just a convenience to refer to the current URI, so even when you change your registered module or action name, this code stays the same.
Note that as in Pascal, referring to the data is done case insensitively.
Now you can try requesting /, which will display
Please tell me your name
and /?name=<write anything here, e.g.: Bob>, which will display
Hello, Bob!
Reading POST
POST is actually doesn't differ much from GET, only differs in which property to access. If GET is accessed through ARequest.QueryFields , POST is accessed through ARequest.ContentFields. POST style of previous code is:
procedure TFPWebModule1.DataModuleRequest(Sender: TObject; ARequest: TRequest;
 AResponse: TResponse; var Handled: Boolean);
var
  LName: String;
begin
  LName := ARequest.ContentFields.Values['Name'];
  if LName = EmptyStr then
    with AResponse.Contents do
    begin
      Add('<form action="' + ARequest.URI + '" method="POST"');
      Add('<label for="name">Please tell me your name:</label>');
      Add('<input type="text" name="name" id="name" />');
      Add('<input type="submit" value="Send" />');
      Add('</form>');
    end
  else
    AResponse.Content := 'Hello, ' + LName + '!';
  Handled := true;
end;
Reading File Uploads
One exception is for reading multipart/form-data fields, i.e. files. That one is available in ARequest.Files as a TUploadedFiles instance, which is a TCollection descendant. The following is TUploadedFiles public interface which you can use to access the files:
TUploadedFiles = Class(TCollection)
...
public
  Function First: TUploadedFile;
  Function Last: TUploadedFile;
  Function IndexOfFile(AName: String) : Integer;
  Function FileByName(AName: String) : TUploadedFile;
  Function FindFile(AName: String) : TUploadedFile;
  Property Files[Index: Integer] : TUploadedFile read GetFile Write SetFile; default;
end;
Each TUploadedFile itself has several properties:
TUploadedFile = Class(TCollectionItem)
...
Public
  Destructor Destroy; override;
  Property FieldName: String Read FFieldName Write FFieldName;
  Property FileName: String Read FFileName Write FFileName;
  Property Stream: TStream Read GetStream;
  Property Size: Int64 Read FSize Write FSize;
  Property ContentType: String Read FContentType Write FContentType;
  Property Disposition: String Read FDisposition Write FDisposition;
  Property LocalFileName: String Read FLocalFileName Write FLocalFileName;
  Property Description: String Read FDescription Write FDescription;
end;
They should be descriptive enough, with the exception of FileName and LocalFileName. FileName is the original file name as uploaded from client, LocalFileName is the file path in the server where the file is temporarily stored. Note the difference in bold terms above.
Again, reusing the same request handler:
procedure TFPWebModule1.DataModuleRequest(Sender: TObject; ARequest: TRequest;
 AResponse: TResponse; var Handled: Boolean);
var
  n: Integer;
  f: TUploadedFile;
  i: Integer;
begin
  n := ARequest.Files.Count;
  if n = 0 then
    with AResponse.Contents do
    begin
      Add('<form id="form" action="' + ARequest.URI + '" method="POST" enctype="multipart/form-data">');
      Add('<label for="name">Drag n drop or click to add file:</label>');
      Add('<input type="file" name="input" />');
      Add('<input type="submit" value="Send" />');
      Add('</form>');
    end
  else
  begin
    f := ARequest.Files[0];
    AResponse.Contents.LoadFromStream(f.Stream);
  end;
  Handled := true;
end;
drag n drop a file (preferably text, as it's will be rendered as text) to the input file field (or click the respective button) then click Send button. The file content should be displayed.
Cookies
Setting

Cookies are browser responsibility to save and keep, therefore server need to send it as part of the response in order to set one. AResponse.Cookies contains a list of cookies to be sent. It's a descendant of TCollection, respectively the contained TCookie is a descendant of TCollectionItem. Therefore, you can use TCollection way of managing items to manipulate it.
Here's an example:
procedure TFPWebModule1.DataModuleRequest(Sender: TObject; ARequest: TRequest;
 AResponse: TResponse; var Handled: Boolean);
var
  C: TCookie;
begin
  C := AResponse.Cookies.Add;
  C.Name := 'mycookie';
  C.Value := 'somevalue';
  Handled := true;
end;
You won't see any output in your browser. But if you use some kind of developer tools (Chrome has one built-in), you can see the response header:

Note that cookie has attributes, so Name and Value is not the only two you can set. Browse TCookie interface to see what properties are supported.
Getting
Once you give Set-Cookie header above, subsequent request to your site will contain additional header containing the value you ask to set previously:

Fortunately, the way to read it is no different from GET & POST data. The related property is ARequest.CookieFields. To read previously set cookie:
procedure TFPWebModule1.DataModuleRequest(Sender: TObject; ARequest: TRequest;
 AResponse: TResponse; var Handled: Boolean);
begin
  AResponse.Contents.Add('<p>Cookie get: ' + ARequest.CookieFields.Values['mycookie'] + '</p>');
  Handled := true;
end;
Sessions
TFPWebModule is a descendant of TSessionHTTPModule, so it has session management capability. Session is module based, so each module may choose to use or not to use session management.
Session is implemented in abstract manner. By default, no implementation is provided. One sample implementation using .ini files is given in iniwebsession unit. You must have this unit in your project or implement one for session management to work. If you decide to implement one, basically you need to extend and implement abstract methods in TCustomSession and TSessionFactory classes.
Activating
To activate session management, set CreateSession property to true. Session will be started prior to request handling. In case of a new session, OnNewSession will be called. Initialize your session variables here.
Session Variables Manipulation
Session variables are provided as Session.Variables (nb: the Session object is the equivalent of the $_SESSION array used in PHP). This is a string to string map like structure, so you can read / write it like:
Session.Variables['myvar'] := myvar; // write
...
myvar := Session.Variables['myvar']; // read
Setting a variable to empty string does NOT remove it. If you really want to remove a variable, call Session.RemoveVariable instead.
Terminating
Call Session.Terminate whenever you want to terminate a session (e.g.: user logout). Session will also automatically expire if the next request comes after Session.TimeOutMinutes since last request. When session terminates, OnSessionExpired will be called. Do whatever cleanup you need there.
Routing
Since FPC 3.0.4, a new routing mechanism has been implemented. Instead of maintaining backward compatibility, it is decided that the new routing will be the default. Thus, any old code (or new code depending on old routing) must be ported by adding:
Application.LegacyRouting := true;
in the .lpr.
Old Mechanism
Using Multiple Modules
You can have multiple modules in your app. Click "File" menu, then click "New...". A dialog shall appear, select "Web Module" from the treeview.

then click OK.
With multiple modules exist in your app, you can no longer request just with /. The framework will not be
able to magically select which module must serve the response, so there are two ways to state which
module you'd like to call:
- /<module name>
- /?module=<module name>
In the 2nd format, you can change "module" (which is the default value) to whatever valid query string key by modifying Application.ModuleVariable.
Using Actions
So far, we've only used web modules with single request handler. This doesn't scale much as your web app gets more and more complex. Moreover, some features might have shared properties and be better logically grouped, e.g.:
- Account module
- Login action
- Logout action
- Register action
- Product module
- Create action
- Update action
- Delete action
- Details action
Request Handling Flow
Before using action, it is important to know fpWeb request handling flow. Failing to do so might render your action useless because it's always your data module that handles the request. How could that be? Going back a few chapters, remember the Handled := true that we always did before? Now this is where Handled parameter comes into play.
Every requests will go through module's OnRequest first, regardless the requested action. Only if it does not set Handled to true, web action's OnRequest is executed.
In general, the request flow is:

Notice the "Our Concern" box, that's what we're going to put our attention at.
Add Actions to Web Modules
To add an action, select the web module then go to object inspector. In the properties tab, select Actions and click the button on the second column.

A popup window shall appear where you can add, delete and reorder actions.

Press Add, a new action shall appear in the list. Select it then go to object inspector. It will currently show properties and events of that newly created action. Rename the Name property (this will be the name you write in the URL, so give it a short, simple but descriptive name) as you wish, I will choose "Hello". Move on to events tab, do the same as OnRequest for module, click button on the right of OnRequest row to create the request handler.

You will be presented in the same OnRequest interface, but this one handles web action instead of web module. Whatever you can do in web module's OnRequest can be done here as well. Copy the method body from the "Hello, World!" section.
Remember to remove Handled := true from the previous web module's OnRequest body (or remove the event completely) for the action to take care of the request handling.
Run your project, and fire up your browser. Now, since the request handling is delegated to web action, you can no longer just request /, but you need /<action name> or <Module's ActionVar property>=<action name>. Note that <Module's ActionVar property> has a default value of empty string, unlike Application.ModuleVariable which has "module" as the default value. So, by default, you can only use the /<action name> form.
If you have multiple modules, then you have a variety of options:
- /<module name>/<action name>
- /<module name>?action=<action name>
- /<action name>?module=<module name>
- /?module=<module name>&action=<action name>
Note that as soon as a module have at least one action, /<module or action name> alone will by default map to /<action name>. To change the behavior such that it maps to /<module name> by default, set Application.PreferModuleName to true. In case of multiple modules, if no module name given, then the default module will handle the given action. To change the behavior such that module name must be explicitly given, set Application.AllowDefaultModule to false.
The following tables summarize what will happen based on the two properties:
| /<module or action name> | Application.PreferModuleName | ||
|---|---|---|---|
| true | false | ||
| Application.AllowDefaultModule | true | /<module name> | /<default module>/<action name> |
| false | /<module name> | ERROR | |
Default Action
Remember the previous diagram, the "Delegate request handling to actions" is actually not so simple, but if we expand that diagram, the image will be too big to fit. So, here's the diagram of that part:

Two important things from the flow: DefActionWhenUnknown and a default action. The former is a web module's property while the latter corresponds to Default property of an action. In the latter case, in case there are more than two actions having Default property set to true, the the action order (as how it's shown in the manage actions popup window) will be considered to decide which is the default action. The two properties forms what the application should do if no matching action found for a given request.
The following tables summarize what will happen based on the two properties:
| Request with invalid action name | DefActionWhenUnknown | ||
|---|---|---|---|
| true | false | ||
| Action.Default | true | Request handled by default action | Error: No action found for action: <action name> |
| false | Error: Invalid action name and no default action | Error: No action found for action: <action name> | |
| Request without action name, i.e.: / | DefActionWhenUnknown | ||
|---|---|---|---|
| true | false | ||
| Action.Default | true | Request handled by default action | Request handled by default action |
| false | Error: No action name and no default action | Error: No action name and no default action | |
In case of error response above, a stack trace shall follow, complete with line number information if you build your app with -gl. We'll see later on how to create custom handler for this (stacktrace are no good for production). But for now, make sure you understand the concept of web module and web action, especially the request flow. Play around until you think you're ready for next section.
New Mechanism
The new mechanism is extremely flexible and works even without data modules (old mechanism only works with data modules).
A dedicated unit for this routing is provided as httproute (add this to uses clause of program / unit where you want to register routes). The unit contains a function HTTPRouter that will return singleton object responsible for application's route management and has RegisterRoute method to register your route.
Route Syntax
The first parameter of HTTPRouter.RegisterRoute is the route that will be matched against incoming request. It can be as simple as * above, which means 0 or more paths or simply any paths, up to as complex as /api/v1/:resource/* which means REQUEST_URI header should start with /api/v1/ followed by something else that will be bound to variable named resource and finally ended with 0 or more paths. It will match:
- /api/v1/products
- /api/v1/products/1
- /api/v1/products/1/clone
- /api/v1/products/something/else/that/is/really/long/and/silly
but not:
- /api/v1
- /excuse/me/api/v1/products
Basically there are only 3 special characters:
- * denoting 0 or more paths
- :param denoting a part
- / denoting part separator
your route will be composed of these 3 characters, plus everything else that made up a route.
Registering a Route
The 2nd, 3rd or 4th parameter (depending on whether you want to handle specific HTTP method and/or pass additional data to it) of HTTPRouter.RegisterRoute is overloaded with several possibilities:
- Callback procedure
TRouteCallback = Procedure(ARequest: TRequest; AResponse);
- Callback event
TRouteEvent = Procedure(ARequest: TRequest; AResponse) of object;
- Object satisfying a (CORBA) interface
IRouteInterface = Interface ['{10115353-10BA-4B00-FDA5-80B69AC4CAD0}']
  Procedure HandleRequest(ARequest: TRequest; AResponse: TResponse);
end;
- Object extending abstract router class
TRouteObject = Class(TObject, IRouteInterface)
Public
  Procedure HandleRequest(ARequest: TRequest; AResponse: TResponse); virtual; abstract;
end;

TRouteObjectClass = Class of TRouteObject;
By default, if 2nd parameter is not a TRouteMethod, then all HTTP methods will match. Use one of rmUnknown, rmAll, rmGet, rmPost, rmPut, rmDelete, rmOptions, rmHead, rmTrace to match only a specific HTTP method.
Registration order matters. If there are two or more routes matching the current request, the earlier registered one will handle it.
In this new mechanism, standalone Hello, World! program can be as simple as:
uses
  fphttpapp, httpdefs, httproute;
procedure DoHello(ARequest:TRequest; AResponse : TResponse);
begin
  AResponse.Content:='<html><body><h1>Hello,World!</h1></body></html>'
end;

begin
  HTTPRouter.RegisterRoute('*', @DoHello);
  Application.Port := 9000;
  Application.Initialize;
  Application.Run;
end.
Webserver example
This is an example of a simple, cross-platform, multi-threaded web server.
program webserver;

{$mode objfpc}{$H+}

uses
  {$ifdef UNIX}
    cthreads, cmem,
  {$endif}
  fphttpapp, httpdefs, httproute;

procedure route1(aReq: TRequest; aResp: TResponse);
begin
  aResp.content:='<html><body><h1>Route 1 The Default</h1></body></html>'
end;

procedure route2(aReq: TRequest; aResp: TResponse);
begin
  aResp.content:='<html><body><h1>Route 2</h1></body></html>'
end;

begin
  HTTPRouter.registerRoute('/', @route1, true);
  HTTPRouter.registerRoute('/route2', @route2);
  Application.port := 8080;
  Application.threaded := true;
  Application.initialize;
  Application.run;
end.
To open "Route 1" type into your browser the following URL: http://127.0.0.1:8080
To open "Route 2" type into your browser the following URL: http://127.0.0.1:8080/route2
Using Templates
fpWeb has integrated support for FPTemplate, Free Pascal's generic templating engine. It doesn't have to be used from web application context, but with integrated support things will be easier a bit. At least the memory management can be ignored as the module will take care of it.
There are two levels where one can use templates at: action and module. The full RAD support is incomplete, so you need to go down to hand coding at some points.
There are two modes of operation: non-parameterized and parameterized. The active mode is controlled by AllowTagParams property, which should be obvious enough what value refers to what mode.
Template string can be given from a file through FileName property or a direct string through Template property. Template.Template, I know it sounds weird :) If both are filled then FileName will take precedence.
The two properties: StartDelimiter and EndDelimiter define how the engine should recognize a template tag. For instance, if you have:
- StartDelimiter = '{+'
- EndDelimiter = '+}'
then a string '{+title+}' defines a template tag named 'title'. Note that spaces are significant, so '{+ title +}' defines a template tag named ' title ' instead of just 'title'.
Special for parameterized mode, additional three properties: ParamStartDelimiter, ParamEndDelimiter and ParamValueSeparator defines how the engine should recognize a template tag parameter. For instance, if you have:
- ParamStartDelimiter = '[-'
- ParamEndDelimiter = '-]'
- ParamValueSeparator = '='
then a string '{+data [-p=v-][-a=b-] +}' defines a template tag named 'data' with parameter 'p' of value 'v' and parameter 'a' of value 'b'. This can be used to pass template level parameter such as expected date format, header-row-footer for customizable output presentation, name of file, etc. you decide.
As a consequence of different way of operation, the core event where the template works is different, too. Non-parameterized will use OnGetParam while the parameterized will use OnReplaceTag. The two has of course different interface:
Type
  // OnGetParam: for simple template tag support only (ex: {Name})
  TGetParamEvent = Procedure(
    Sender: TObject;
    Const ParamName: String;
    Out AValue: String
  ) Of Object;
  // OnReplaceTag: for tags with parameters support
  TReplaceTagEvent = Procedure(
    Sender: TObject;
    Const TagString: String;
    TagParams: TStringList;
    Out ReplaceText: String
  ) Of Object;
In OnGetParam, you check for ParamName, then assign AValue accordingly. i.e., if you want tag 'title' to be replaced by 'My App', then fill in the method with:
// use Trim() if you want the spaces around tag to be insignificant
case Trim(ParamName) of
  'title': AValue := 'My App';
else
  AValue := 'UNKNOWN';
end;
In OnReplaceTag, you check for TagString and optionally TagParams, then assign ReplaceText accordingly. i.e., if you want tag 'datetime' to be replaced by current time with parameter 'datetimeformat' to specify how the date and time should be formatted, then fill in the method like this:
// use Trim() if you want the spaces around tag to be insignificant
case Trim(TagString) of
  'datetime': AValue := FormatDateTime(TagParams.Values['datetimeformat'],Now);
else
  AValue := 'UNKNOWN';
end;
At Action Level
Create/select an action, then go to object inspector. You will see a subcomponent property named Template. This template is a normal TFPTemplate instance. Expand it and fill in the properties as explained above. Now go to Events tab, again expand Template, you will see the two events. Fill the one based on your value of AllowTagParams property.
NOTE: If your Lazarus cannot autocomplete the event, try writing the name manually in the edit box then click the ... button. This is a bug in present Lazarus which may be fixed in the future.
At this level, template with a content is not automatically set as request handler. It might change in the future, but let's deal with its current state. Fill in OnRequest event of the action, then fill it with:
with Actions.CurrentAction as TFPWebAction do
begin
  AResponse.Content := Template.GetContent;
end;
Handled := true;
The cast is required since CurrentAction is of type TCustomWebAction instead of TFPWebAction. Without it, we can't access the Template property.
At Module Level
At module level, you currently have to do it by hand coding since no RAD support is implemented. The linked property is ModuleTemplate . This is however not a regular TFPTemplate instance, but special TFPWebTemplate class that's a descendant of it.
The idea here is to have module provide a layout while the actions provide content, with the ability to provide additional variables. It's therefore a good idea to keep AllowTagParams as is and assign OnGetParam event **of the module** only. Do NOT assign OnGetParam of ModuleTemplate as it will never be called.
A template tag named 'content' will be replaced automatically by what content produced by action, everything else is either replaced from internal template variables or from OnGetParam.
Using Separated Template
Despite the somewhat incomplete integration, nothing stops you from using fpTemplate (or any other templating solutions) manually, outside from the integrated support. This could even be better in some cases since it's modular.
Using an html Producer object
Assuming that there is a TWebAction named act_get_my_html, you must ask to write in AResponse, the return of an internal bytes stream: when answering with html Producer objects solution, we must use the methods of the writer. It manages a memory stream for a purpose of rapidity. No string type here, like with the above fpTemplate solution which uses text \ string processing as in the regular Php way. The Producer writes in AResponse with a recursive " foreach " iteration, that traverses the polymorphic objects HTML Dom tree, composed with the hierarchy THtmlCustomElement = Class(TDOMElement) Classes (see unit htmlelements.pp). So, the AResponse is written by the parameter aWriter, with the following call:
procedure TFPWebModule1.act_get_my_htmlRequest(Sender: TObject; ARequest: TRequest; AResponse: TResponse; var Handled: Boolean);
begin
  (* ask HTMLEntityProducer1 for the content of its html DOM elements: *)
  HTMLEntityProducer1.HandleRequest(ARequest, AResponse, Handled);
  Handled := True;
end;
Said again, it's the job of the Producer to convert its internal memory stream into text in the response object: that's how this pattern was designed, although there is a text-html rendering method named ProduceContent for debugging purposes only. You can override this method if you are writing or debugging a Producer component.
Here is an example, always with an html Producer object, allowing to create a web application in the "RAD way", i.e. with the drag-drop of the HTMLEntityProducer component from the pallet:
procedure TFPWebModule1.HTMLEntityProducer1WriteEntity(Sender: THTMLContentProducer; aWriter: THTMLWriter);
begin

  aWriter.startHeader;
    aWriter.Meta('','Content-Type','text/html; charset=UTF-8');
    aWriter.title('My web page');
    aWriter.link('stylesheet','stylesheet.css','text/css','screen');
  aWriter.EndHeader;

  aWriter.Startbody;
    aWriter.Startparagraph;
      aWriter.heading2('Hello, world from inside §1:');
      aWriter.Text('Here is text written inside the current paragraph.');
    aWriter.Endparagraph;
    aWriter.paragraph('This is another text written inside a self "started and ended" paragraph.');
    aWriter.Startparagraph;
      aWriter.heading2('Hello, world from inside §2:');
      aWriter.Text('Here is the final text.');
      aWriter.Image.src := 'logo.png';
      AnotherProducer.WriteContent(aWriter);
    aWriter.Endparagraph;
  aWriter.Endbody;

end;
The TWebAction.ContentProducer property allows to couple a THTTPContentProducer to its web action exposed via a URI on the net.
[ToDo: there is no official documentation about the components "RAD way" of fpWeb (html producer, html provider, html adapter, html formatter, etc)]
Tips and Tricks
Returning Different HTTP Response Code
By default, fpWeb will return HTTP 200 OK to indicate successful request handling. This surely is not always the case, as user input might not be as what we expected. To do so, set AResponse.Code in your request handler to the code you want to return.
Redirect Request to Different URL
A common flow after a successful login is to redirect user to his account page. This can be done by calling AResponse.SendRedirect in your request handler, supplying the URL to redirect request to.
Serving Static Files (Embedded Web Server)
Remember the dialog in the #Hello, World! section after you select HTTP server Application? If you tick "Register location to serve files from" you can fill "Location" (the URI segment, must not contain any slashes) and "Directory" (physical directory in your computer, must exist at runtime) and the wizard will simply add:
RegisterFileLocation('<Location>','<Directory>');
to the beginning of your .lpr and add the unit fpwebfile to the uses clause. You can actually do this by hand anytime and also register multiple times for different locations / directories. After this you can request /<Location>/<any filename under Directory> and it will be served automatically. Note that the mimetype of the file is determined by fpmimetypes. Call MimeTypes.LoadFromFile with your mime.types file in order to give correct mimetype based on its extension. Otherwise, the file will always be served as application/octet-stream which means the browser will download it instead of interpreting it (especially important for JavaScript and CSS files).
You can grab a complete mime.types here http://svn.apache.org/viewvc/httpd/httpd/trunk/docs/conf/mime.types?&view=co
In Lazarus 2.0.6 or newer you must add at the top of your program the full path of the mime.types file
begin
  MimeTypesFile := Application.Location + 'mime.txt';
Take into consideration that the default path coming with the project is lib\$(TargetCPU)-$(TargetOS)
For example httpproject\lib\i386-win32\mime.txt
Centralize Management of Configuration and Modules
By default, the program file (.lpr) is the one that contains protocol unit. This limits the ability to use Application object from other contexts such as from web modules. Fortunately, it's not difficult to refactor to have what we want. We remove RegisterHTTPModule calls from web modules' units and left out the .lpr to empty main block with single unit identifier in the uses clause, we name it: brokers. The unit contains:
unit Brokers;

{$mode objfpc}{$H+}

interface

{ $define cgi}
{ $define fcgi}
{$define httpapp}

uses
  CustWeb;

function GetApp: TCustomWebApplication; inline;

implementation

uses
  {$ifdef cgi}fpcgi{$endif}
  {$ifdef fcgi}fpfcgi{$endif}
  {$ifdef httpapp}fphttpapp{$endif}
  ,webmodule1
  ,webmodule2
  ;

function GetApp: TCustomWebApplication;
begin
  Result := Application;
end;

initialization
  RegisterHTTPModule('wm1', TWebModule1);
  RegisterHTTPModule('wm2', TWebModule2);
  {$ifndef cgi}
  Application.Port := 2015;
  {$endif}
  Application.Initialize;
  Application.Run;
end.
This way, we can control over web module registration and also provide an API to get Application object (casted as TCustomWebApplication), while still easily switch between protocol implementations, in a single place.
Terminating Gracefully (FastCGI / Embedded Web Server)
Instead of Ctrl+C-ing your app, there is a way for your app to terminate gracefully, doing whatever cleanup it needs, by calling Application.Terminate. You might need to use previous trick to easily access the Application object. A common implementation is to provide a specific password protected module / action that calls the Terminate method. You may choose whatever way you want, though.
Custom Exception Handler
[edit the May 1, 2020 => moved from a method pointer to a simple procedure.]
To override the default exception handler, which prints stacktrace whenever an exception is raised (i.e.: on HTTP 404 or 500), and thus not good for production, you must assign Application.OnShowRequestException.
This is a method so you will need to provide your procedure that implements the method and assign it by using the object. i.e.: if you have MyExceptionHandler as an
object of TMyExceptionHandler which has MyShowRequestException method, you can assign it by:
Application.OnShowRequestException := @MyExceptionHandler.MyShowRequestException;
don't forget to .Create() MyExceptionHandler BEFORE assigning above or you will get an
EAccessViolation!
You must provide your global procedure that implements your own exception handler (in production, it is advisable to replace the call stack by an HTTP status code and its explanation). Then, you can override the default exception handler, by assigning it like this:
Application.OnShowRequestException := @MyShowRequestException;
Pure Hand Coding (No Form Designer Required)
It's not a must to use Lazarus' form designer to write an fpWeb application. You can use pure hand coding technique to write it. The secret lies in the 3rd parameter of RegisterHTTPModule : SkipStreaming. When this parameter is set to true, fpWeb will not search for .lfm resource. Therefore everything must be manually handled: property settings, event handlers, action registration, etc.
Note that it's logical to do what's usually done through object inspector in an overriden constructor. Inside it, call the inherited constructor supplying both AOwner and CreateMode as parameters. After that you can set properties, assign event handlers, etc. Example:
type
  THelloWorldModule = class(TFPWebModule)
    constructor CreateNew(AOwner: TComponent; CreateMode: Integer); override;
    procedure Request(Sender: TObject; ARequest: TRequest;
      AResponse: TResponse; var Handled: Boolean);
  end;

constructor THelloWorldModule.CreateNew(AOwner: TComponent; CreateMode: Integer);
begin
  inherited CreateNew(AOwner,CreateMode);
  OnRequest := @Request;
end;

procedure THelloWorldModule.Request(Sender: TObject; ARequest: TRequest;
 AResponse: TResponse; var Handled: Boolean);
begin
  AResponse.Content := 'Hello, World!';
  Handled := true;
end;
See also
- Possibly same content
- Lazarus for the web (tutorial)
- Lazarus for the web: Sessions and Templates (tutorial) This article explains a TSQLDBSession Class that manages a SQL connection, that inherits from a web session (in order to manage the histories of web session variables, within a connection-session to a database having row-locking capabilities).
- the examples - read the text files - in your directory ...\fpc\x.x.x\source\packages\fcl-web\examples.
![]()
- XML or JSON, on ExtJS: if you want to use a more or less complex engine that is very "accomplished" regarding the rendering aspect of Javascript objects on the browser side, in addition to their functionalities (like ExtJS, for example, to display a db-aware grid, dynamic graphics, etc), this kind of solution very very often expects an XML or a JSON file. There are Adapter and Formatter classes (e.g. the classes TExtJSXMLWebdataInputAdaptor, TExtJSJSONDataFormatter).
Overall, the Adapter classes adapt the nodes of an incoming jSon or XML to a mapping of their TField database fields. And Formatter classes are mappers of each TField of a record to its node in jSon or XML format, before sending it out towards the browser.