How To Write Lazarus Component/zh CN
│
Deutsch (de) │
English (en) │
español (es) │
magyar (hu) │
italiano (it) │
한국어 (ko) │
русский (ru) │
中文(中国大陆) (zh_CN) │
以下介绍如何创建控件。
第1步: 创建一个包
- 在Lazarus IDE菜单中选择 Package > New Package 打开包管理器。

- 设置好路径和文件名后点击 保存,如果IDE提示使用小写文件名,点击点击允许。
- 一个package就创建好了。

第2步: 创建一个单元
你可以完全新建一个单元或者使用已有的单元,以下界面中包含了这两种选项。
创建新的单元
- 在包管理器中点击Add button > New component。

- 选择一个诸如TComboBox的控件。
- 选择customcontrol1.pas作为单元文件名,选择CustomControl1作为单元名称.
- 之后你可以给新的控件指定图标,以及决定它安装之后出现在哪个控件选项卡中。
- 点击Create New Component创建。
unit CustomControl1;

{$mode objfpc}{$H+}

interface

uses
  Classes, SysUtils, LResources, Forms, Controls, Graphics, Dialogs, StdCtrls;

type
  TCustomControl1 = class(TComboBox)
  private
    { Private declarations }
  protected
    { Protected declarations }
  public
    { Public declarations }
  published
    { Published declarations }
  end;

procedure Register;

implementation

procedure Register;
begin
  RegisterComponents('Standard', [TCustomControl1]);
end;

end.
- 现在你就可以加入自己的代码了。切记,尽量避免在控件尚未完善之前去安装控件,因为空间安装后就会成为IDE的一部分。如果这个空间存在bug,很有可能导致IDE崩溃甚至无法打开。所以安装测试请务必小心谨慎。
- 当控件测试好之后,便可以进行安装。点击"Package" > "Install/uninstall packages",点击"Compile"进行编译,然后点击Use -> Install进行安装:

- 这时IDE就会询问是否重构,选择是。

- Lazarus会自动重新启动,重启后你就能看到新的控件在控件面板中,控件安装成功。

![]() Note: If you do not see your new component in the component palette, it is most likely that you are not running the re-compiled version of Lazarus. You can set where Lazarus builds to using Tools -> Options -> Files -> Lazarus directory.
Note: If you do not see your new component in the component palette, it is most likely that you are not running the re-compiled version of Lazarus. You can set where Lazarus builds to using Tools -> Options -> Files -> Lazarus directory.
使用已有的单元
如果你已经有写好的单元,你可以将它加入这个包:

- 点击Add按钮,选择Add Files选项卡。单元文件名一项浏览选择已有的单元文件,然后点击Add files to package。如果包管理器提示找不到单元文件不在单元路径中,按照提示允许添加此路径。
- 再次点击Add按钮,选择Add Files选项卡,浏览.lrs文件并点击确认(参考第3步)。
- 又一次点击Add按钮,选择New Requirement选项卡,在包名称一项选择LCL,然后点击确定。
最后的效果应该是这样的:

- Click under the Files tree in the Package Manager. In the File Properties, make sure Register unit is checked.
- Click the Options button. Select the IDE Integration tab. In Package Type, make sure Designtime and Runtime is selected.
- Click the Compile button to check to see that the files compile without errors.
- Click the Install button. Lazarus will rebuild and restart automatically.
空间创建成功,效果如下:
![]()
第3步: 创建图标
你需要创建24x24像素大小的PNG图像作为图标,如果是 Laz 1.8以上版本,也可以额外提供36x36和48x48像素的图标,文件名之后加“_150”和“_200”用以表示150%和200%的缩放比例。
FPC从2.6版本开始,可以使用标准资源文件格式(.rc)或已编译资源(.res)。参见Lazarus_Resources#FPC_resources。
至于使用.lrs文件:
使用Laz图像编辑器
你可以使用 Lazarus Image Editor创建.lrs格式的图标。
使用lazres
lazres通常可以在Laz的工具目录中找到。
第一次使用lazres时需要首先编译。 在IDE中打开lazres.lpi,然后点击菜单run > build选项。
创建lrs文件
To create the lrs file run:
~/lazarus/tools/lazres samplepackage.lrs TMyCom.png
or, if high-resolution images are available
~/lazarus/tools/lazres samplepackage.lrs TMyCom.png TMyCom_150.pgn TMyCom_200.png
Where
- samplepackage is the name of your package
- TMyCom is the name of your component! The name of the image must match the name of your component!
You can add more than one image to the lrs file by appending the image file name at the end. Eg. ~/lazarus/tools/lazres samplepackage.lrs TMyCom.png TMyOtherCom.png ...
示例
Following is a sample of the resulting samplepackage.lrs file.
LazarusResources.Add('TMyCom','PNG',[
  #137'PNG'#13#10#26#10#0#0#0#13'IHDR'#0#0#0#24#0#0#0#24#8#2#0#0#0'o'#21#170#175
  +#0#0#0#4'gAMA'#0#0#177#143#11#252'a'#5#0#0#0'|IDAT8O'#237#212#209#10#192' '#8
  +#5'P'#247#231#251's'#215#138#133#164#166'\'#220#195'`'#209'c'#157'L'#173#131
  +#153#169'd4'#168'dP'#137'r_'#235'5'#136'@Zmk'#16'd9'#144#176#232#164'1'#247
  +'I'#8#160'IL'#206'C'#179#144#12#199#140'.'#134#244#141'~'#168#247#209'S~;'#29
  +'V+'#196#201'^'#10#15#150'?'#255#18#227#206'NZ>42'#181#159#226#144#15'@'#201
  +#148#168'e'#224'7f<@4'#130'u_YD'#23#213#131#134'Q]'#158#188#135#0#0#0#0'IEND'
  +#174'B`'#130
]);
Make sure to include your resource file in your new component source by adding the following at the bottom your component's unit and including "LResources" in the uses clause
initialization
  {$I samplepackage.lrs}
创建res文件
lazres can also create a compiled resource file, just specify a file with the .res extension, e.g.:
~/lazarus/tools/lazres samplepackage.res TMyCom.png
or, with high-res icons:
~/lazarus/tools/lazres samplepackage.res TMyCom.png TMyCom_150.png TMyCom_200.png
In this case, instead of including the lrs file in the initialization section, just include the resource file anywhere in your component source file
{$R samplepackage.res}
使用glazres
GLazRes is the graphical version of lazres that can assemble files into a Lazarus resource file (.lrs). It can be found in the tools directory of a Lazarus installation.
重新编译包
每一次修改mycom.pas文件后都需要重新编译包,需要在包管理器中打开samplepackage.lpk文件,而后点击Install按钮。
移除包
- 如需移除包,则需要在IDE菜单中点击Package > Install/Uninstall packages选项,会跳出如下的界面:
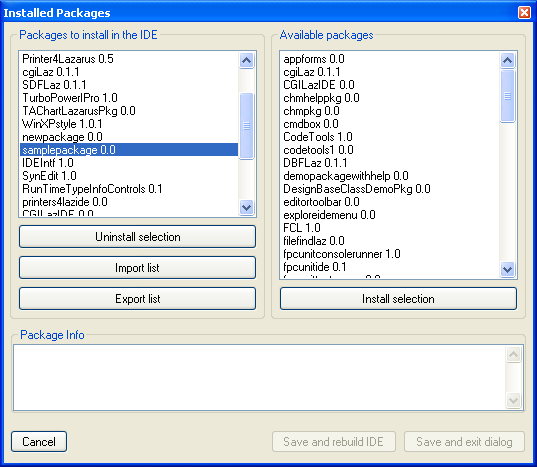

- 选择你想要卸载的包。
如果卸载过程出现问题(例如包的路径在未卸载前就已经被删除),Laz可能会不允许卸载某个包。解决方法是,点击IDE菜单Tools > Build Lazarus,重新编译IDE并重启之后就可以卸载出问题的包了。
加强mycom.pas
- 上文中mycom.pas的代码只是创建了一个最基本的控件,接下来是一些进阶内容,包括如何编写过程和事件。
- OnChange2展示如何创建一个事件;
- OnSample展示如何创建一个自定义事件;
- MyText和MyText2展示了两种不同的属性定义方式;
- 你可以使用TComboBox而不是TCustomComboBox作为基类,这样可以避免发布TComboBox的所有的属性。
- 如果使用TCustomComboBox作为基类,你会发现IDE的Object Inspector中会少很多属性和事件。如果需要这些属性,需要复制// properties from TComboBox之后的内容。这些属性定义在StdCtrls单元的TComboBox类之中,如果你不希望某个属性出现在Object Inspector中,就在published区域忽略它。
unit mycom;

{$mode objfpc}{$H+}

interface

uses
  Classes, SysUtils, StdCtrls, Forms, Dialogs,
  LCLType,LCLIntf,lresources,LCLProc;

type

  TSampleEvent = procedure(MyText: String) of Object;

  TMyCom = class (TCustomComboBox)
  private
    FMyText: String;
    FOnChange2: TNotifyEvent;
    FOnSample: TSampleEvent;
  public
    constructor Create(TheOwner: TComponent); override;
    procedure CreateWnd; override;
    procedure Change; override;
  protected
    function GetMyText2: String;
    procedure SetMyText2(MyText: String);
  published
    property MyText: String read FMyText write FMyText;
    property MyText2: String read GetMyText2 write SetMyText2;
    property OnChange2: TNotifyEvent read FOnChange2 write FOnChange2;
    property OnSample: TSampleEvent read FOnSample write FOnSample;

    // properties from TComboBox
    property Align;
    property Anchors;
    property ArrowKeysTraverseList;
    property AutoComplete;
    property AutoCompleteText;
    property AutoDropDown;
    property AutoSelect;
    property AutoSize;
    property BidiMode;
    property BorderSpacing;
    property CharCase;
    property Color;
    property Ctl3D;
    property Constraints;
    property DragCursor;
    property DragMode;
    property DropDownCount;
    property Enabled;
    property Font;
    property ItemHeight;
    property ItemIndex;
    property Items;
    property ItemWidth;
    property MaxLength;
    property OnChange;
    property OnChangeBounds;
    property OnClick;
    property OnCloseUp;
    property OnContextPopup;
    property OnDblClick;
    property OnDragDrop;
    property OnDragOver;
    property OnDrawItem;
    property OnEndDrag;
    property OnDropDown;
    property OnEditingDone;
    property OnEnter;
    property OnExit;
    property OnGetItems;
    property OnKeyDown;
    property OnKeyPress;
    property OnKeyUp;
    property OnMeasureItem;
    property OnMouseDown;
    property OnMouseMove;
    property OnMouseUp;
    property OnStartDrag;
    property OnSelect;
    property OnUTF8KeyPress;
    property ParentBidiMode;
    property ParentColor;
    property ParentCtl3D;
    property ParentFont;
    property ParentShowHint;
    property PopupMenu;
    property ReadOnly;
    property ShowHint;
    property Sorted;
    property Style;
    property TabOrder;
    property TabStop;
    property Text;
    property Visible;
  end;

procedure Register;

implementation

procedure Register;
begin
  RegisterComponents('Sample',[TMyCom]);
end;

constructor TMyCom.Create(TheOwner: TComponent);
begin
  inherited Create(TheOwner);
  Self.Style := csDropDownList;
end;

procedure TMyCom.CreateWnd;
begin
  inherited CreateWnd;
  Items.Assign(Screen.Fonts);
end;

procedure TMyCom.Change;
begin
  inherited;
  if Assigned(FOnChange2) then FOnChange2(Self);
  if Assigned(FOnSample) then FOnSample(FMyText);
end;

function TMyCom.GetMyText2: String;
begin
  Result:=FMyText;
end;

procedure TMyCom.SetMyText2(MyText: String);
begin
  FMyText:=MyText;
end;

initialization
  {$I samplepackage.lrs}

end.
同时你也会发现一些没有声明的,或是你不希望他出现在Object Inspector中的属性,如果需要移除这些属性,只需要在Published区域将它们定义成简单的变量即可,例如:
Published
...
    property Height: Integer;
    property Width:  Integer;
...
使用嵌入式组件 embedded (visual) components
可以将标准的空间嵌入你自己的控件,就像TLabeledEdit或TButtonPanel那样。
Let's say you want to create a custom panel with a TLabel on it. With the steps described above the base package and source files can be created. 现在,按以下步骤就能够将TLabel控件嵌入自己的控件:
- 添加一个私有的控件属性(FEmbeddedLabel: TLabel;);
- 为这个私有控件添加一个发布的只读属性(property EmbeddedLabel: TLabel read FEmbeddedLabel;);
- 在constructor的实现中创建这个label控件(FEmbeddedLabel := TLabel.Create(self););
- 将其parent属性修改为此控件(FEmbeddedLabel.Parent := self;);
- If the component to be embedded is not a 'subcomponent' by default (like TBoundLabel, TPanelBitBtn etc) then add the call to SetSubComponent. This is necessary for the IDE so it knows that it has to store the properties of the embedded component as well. TLabel is not a subcomponent by default so the call to the method must be added (FEmbeddedLabel.SetSubComponent(true);).
总体来说,你需要像这样来定义(只展示了关键部分):
TEnhancedPanel = class(TCustomControl)
private
  { The new attribute for the embedded label }
  FEmbeddedLabel: TLabel;

public
  { The constructor must be overriden so the label can be created }
  constructor Create(AOwner: TComponent); override;

published
  { Make the label visible in the IDE }
  property EmbeddedLabel: TLabel read FEmbeddedLabel;
end;

implementation

constructor TEnhancedPanel.Create(AOwner: TComponent);
begin
  inherited Create(AOwner);

  // Set default width and height
  with GetControlClassDefaultSize do
    SetInitialBounds(0, 0, CX, CY);

  // Add the embedded label
  FEmbeddedLabel := TLabel.Create(Self); // Add the embedded label
  FEmbeddedLabel.Parent := self;         // Show the label in the panel
  FEmbeddedLabel.SetSubComponent(true);  // Tell the IDE to store the modified properties
  FLabel.Name := 'EmbeddedLabel';
  FLabel.Caption := 'Howdy World!';

  // Make sure the embedded label can not be selected/deleted within the IDE
  FLabel.ControlStyle := FLabel.ControlStyle - [csNoDesignSelectable];

  // Set other properties if necessary
  //...

end;
使用自定义的绘制过程
你可以在自己的程序中构造控件的子类,在以下例子中,TMyLabel就定义了一个自定义的绘制过程:
type
  TMyLabel = class(TLabel)
    protected
      procedure Paint; override;
  end;
{...}
implementation
{...}
procedure TMyLabel.Paint;
begin
  // your code to implement Paint, for example
  Canvas.TextOut(0,0,Caption);
end;
这样一来,一个TMyLabel控件就会使用如上覆盖的方法来绘制。 但是更常见且更推荐的做法是在其中继承父类的绘制过程:
procedure TMyLabel.Paint;
begin

  inherited Paint;   /////////////////////

  // your code to implement Paint, for example
  Canvas.TextOut(0,0,Caption);
end;
然而,以上例子也存在一定的问题,因为在重绘之后,第二句又会产生新的修改。
整合控件和IDE
属性编辑对话框
属性编辑对话框在Object Inspector中提供了自定义的属性编辑窗口,对于大多数属性(字符串、字符串表,图像,枚举类型等),已经有默认的编辑窗口,但是如果控件中有特殊形式的属性,那么就需要对应的属性编辑窗口。
每一个属性编辑对话框都是TPropertyEditor的子类,或是其后代的子类。They should be registered in the 'Register' procedure by using the function RegisterPropertyEditor from the unit PropEdits. It is a standard to name property editors with the property name followed by 'Property', for example TFieldProperty for the property editor of the TField property.
  TPropertyEditor = class
  public
    function  AllEqual: Boolean; Virtual;
    function  AutoFill: Boolean; Virtual;
    procedure Edit; Virtual;     // Activated by double-clicking the property value
    procedure ShowValue; Virtual; // Activated by control-clicking the property value
    function  GetAttributes: TPropertyAttributes; Virtual;
    function  GetEditLimit: Integer; Virtual;
    function  GetName: ShortString; Virtual;
    procedure GetProperties(Proc: TGetPropEditProc); Virtual;
    function  GetHint(HintType: TPropEditHint; x, y: integer): String; Virtual;
    function  GetDefaultValue: AnsiString; Virtual;
    procedure GetValues(Proc: TGetStrProc); Virtual;
    procedure SetValue(const NewValue: AnsiString); Virtual;
    procedure UpdateSubProperties; Virtual;
    function  SubPropertiesNeedsUpdate: Boolean; Virtual;
    function  IsDefaultValue: Boolean; Virtual;
    function  IsNotDefaultValue: Boolean; Virtual;
    // ... shortened
  end;
A good example for a property editor is the TFont property editor.
One of the most common cases for property editors is properties which are classes. Because classes have many fields and can have a variety of formats, it's not possible for Lazarus to have the object inspector edit field able to edit it, like is done for strings and numeric types.
For classes, a convention is to have the value field show permanently the name of the class in parentheses, for example "(TFont)" and the "..." button shows a dialog to edit this class. This behaviour, except for the dialog, is implemented by a standard property editor for classes called TClassPropertyEditor, which can be inherited from when writing property editors for classes:
TClassPropertyEditor = class(TPropertyEditor)
public
  constructor Create(Hook: TPropertyEditorHook; APropCount: Integer); Override;
  function GetAttributes: TPropertyAttributes; Override;
  procedure GetProperties(Proc: TGetPropEditProc); Override;
  function GetValue: AnsiString; Override;
  property SubPropsTypeFilter: TTypeKinds Read FSubPropsTypeFilter
                                         Write SetSubPropsTypeFilter
                                       Default tkAny;
end;
Going back to the TFont example, inheriting from TClassPropertyEditor already offers part of the desired behavior and then the TFontPropertyEditor class only needs to implement showing the dialog in the Edit method and set the attributes for the editor:
  TFontPropertyEditor = class(TClassPropertyEditor)
  public
    procedure Edit; Override;
    function  GetAttributes: TPropertyAttributes; Override;
  end;

procedure TFontPropertyEditor.Edit;
var
  FontDialog: TFontDialog;
begin
  FontDialog := TFontDialog.Create(NIL);
  try
    FontDialog.Font    := TFont(GetObjectValue(TFont));
    FontDialog.Options := FontDialog.Options + [fdShowHelp, fdForceFontExist];
    if FontDialog.Execute then SetPtrValue(FontDialog.Font);
  finally
    FontDialog.Free;
  end;
end;

function TFontPropertyEditor.GetAttributes: TPropertyAttributes;
begin
  Result := [paMultiSelect, paSubProperties, paDialog, paReadOnly];
end;
组件编辑器
组件编辑器控制在设计窗口中组件的右键和双击行为。
Each component editor is a class, which should descend from TComponentEditor or one of its descendents and implement methods from this base class. They should be registered in the 'Register' procedure by using the function RegisterComponentEditor from the unit ComponentEditors. It is a standard to name component editors with the component name followed by 'Editor', for example TStringGridComponentEditor for the property editor of the TStringGrid component. Although user component editors should be based in TComponentEditor, most of its methods are actually from an ancestor, so it is necessary to also know TBaseComponentEditor:
  TBaseComponentEditor = class
  protected
  public
    constructor Create(AComponent: TComponent;
                       ADesigner: TComponentEditorDesigner); Virtual;
    procedure Edit; Virtual; Abstract;
    procedure ExecuteVerb(Index: Integer); Virtual; Abstract;
    function  GetVerb(Index: Integer): String; Virtual; Abstract;
    function  GetVerbCount: Integer; Virtual; Abstract;
    procedure PrepareItem(Index: Integer; const AnItem: TMenuItem); Virtual; Abstract;
    procedure Copy; Virtual; Abstract;
    function  IsInInlined: Boolean; Virtual; Abstract;
    function  GetComponent: TComponent; Virtual; Abstract;
    function  GetDesigner: TComponentEditorDesigner; Virtual; Abstract;
    function  GetHook(out Hook: TPropertyEditorHook): Boolean; Virtual; Abstract;
    procedure Modified; Virtual; Abstract;
  end;
The most important method of a component editor is Edit, which is called when the component is double clicked. When the context menu for the component is invoked the GetVerbCount and GetVerb methods are called to build the menu. If one of the verbs (which means menu items in this case) are selected, ExecuteVerb is called. There is a default component editor (TDefaultEditor) which implements Edit to search the properties of the component for the most appropriate one to be edited. It usually chooses an event, which is edited by adding it's skeleton code in the code editor and setting the cursor to be in place to add code for it.
Other important methods from TBaseComponentEditor are:
- ExecuteVerb(Index) - Executes one of the extra menu items placed on the right-click popup menu;
- GetVerb – To return the name of each extra popup menu item. Note that it is the responsibility of the component editor to place special menu item caption characters like & to create a keyboard accelerator and "-" to create a separator;
- GetVerbCount – Returns the amount of items to be added to the popup menu. The index for the routines GetVerb and ExecuteVerb is zero based, going from 0 to GetVerbCount – 1;
- PrepareItem – Called for each verb after the menu item was created. Allows the menu item to be customized such as by adding subitems, adding a checkbox or even hiding it by setting Visible to false;
- Copy - Called when the component is being copied to the clipboard. The component data for use by Lazarus will always be added and cannot be modified. This method is instead for adding a different kind of clipboard information to paste the component in other applications, but which won't affect the Lazarus paste.
A simple and interesting example is the TCheckListBox component editor which creates a dialog to edit. More convenient than implementing all methods from TBaseComponentEditor is inheriting from TComponentEditor, and this is what TCheckListBoxEditor does. This base class adds empty implementations for most methods and some default ones for others. For Edit it calls ExecuteVerb(0), so if the first item will be identical to the double-click action, which is a convention for editor, there is no need to implement Edit. This basic action for the double-click and first menu item is often a dialog, and for TCheckListBox this is also done:
  TCheckListBoxComponentEditor = class(TComponentEditor)
  protected
    procedure DoShowEditor;
  public
    procedure ExecuteVerb(Index: Integer); override;
    function  GetVerb(Index: Integer): String; override;
    function  GetVerbCount: Integer; override;
  end;

procedure TCheckGroupComponentEditor.DoShowEditor;
var
  Dlg: TCheckGroupEditorDlg;
begin
  Dlg := TCheckGroupEditorDlg.Create(NIL);
  try
    // .. shortened
    Dlg.ShowModal;
    // .. shortened
  finally
    Dlg.Free;
  end;
end;

procedure TCheckGroupComponentEditor.ExecuteVerb(Index: Integer);
begin
  case Index of
    0: DoShowEditor;
  end;
end;

function TCheckGroupComponentEditor.GetVerb(Index: Integer): String;
begin
  Result := 'CheckBox Editor...';
end;

function TCheckGroupComponentEditor.GetVerbCount: Integer;
begin
  Result := 1;
end;
Design-time component debugging
To catch design-time-errors in a (newly created) dbgcomponent:
- open project C:\lazarus\ide\lazarus.lpi;
- run project;
- set breakpoint in dbgcomponent in main (1st) app;
- use dbgcomponent pascal code in second app;
- step through design-time component code in debug-session; do whatever is necessary;
See also
- Extending the IDE
- Lazarus Packages - A guide for creating a package under Lazarus
- Components and Code examples
- Lazarus Components
- IDE Window: Add to Package
- IDE Window: Create new package component
You can post questions regarding this page here